Chapter 7 · Capturing Sound: Microphones, Acoustics & Gear
Studio Acoustics and Monitoring
“The room you listen in has far more influence on what you hear than any device in the signal path, including even the loudspeakers in most cases.”
—Ethan Winer
By the end of this chapter, you will be able to:
- Identify the four goals of studio acoustics — accurate frequency response, stereo imaging, controlled reverberation, and sound isolation — and explain how each goal shapes decisions in both tracking and mixing environments
- Distinguish among the three surface behaviors (reflection, absorption, and diffusion) and describe how each is applied to solve specific acoustic problems: modal ringing, standing waves, flutter echo, and SBIR
- Calculate axial room modes using the formula f = c/2L, explain why corner placement produces the highest modal pressure, and describe how non-proportional room dimensions distribute modes across the frequency spectrum
- Apply RT60 as the primary metric for evaluating control-room acoustics, state the target range of 0.2–0.4 s for a treated room, and explain how Room EQ Wizard is used to measure it
- Configure room layout and acoustic treatment by applying the 38% rule and Cardas method for listening-position placement, maintaining lateral symmetry, installing corner bass traps, locating early-reflection points with the mirror trick, and deploying diffusion
- Distinguish sound isolation from acoustic treatment, explain how mass and decoupled air gaps reduce transmission, and interpret STC ratings and NC noise-floor targets in terms of professional studio requirements
- Select monitor classifications appropriate to a given working context, set up an equilateral-triangle listening configuration with SBIR-safe placement, and calibrate monitoring loudness to a fixed SPL reference (85 dB for film; 79–83 dB common in music)
- Compare closed-back and open-back headphones for their respective roles in tracking and reference listening, and explain why speaker crosstalk makes monitors preferable for final mix decisions
- Describe how membrane and Helmholtz resonators extend bass absorption below the range porous panels can reach, and apply the five-step subwoofer integration procedure to achieve accurate low-frequency monitoring
Early in my career I mixed a song that sounded incredible in the studio—punchy low end, clear vocals, everything balanced. Then I played it in my car and the bass was completely gone. The kick drum had vanished. The sub bass that had been shaking my chair in the control room simply did not exist on the recording. The problem was not the mix. The problem was the room: a massive low-frequency buildup at my listening position had fooled me into thinking there was more bass than actually existed, so I kept turning it down. That experience taught me a lesson I never forgot—you are only as good as what you hear, and what you hear depends entirely on the room.
Every decision an engineer makes—every EQ move, every volume adjustment, every pan position—is based on what comes out of the monitors and into the ears. If the room distorts that information, every decision is wrong before it starts. This chapter covers the acoustics that shape what you hear, the monitors that deliver it, and the headphones that check it.
The Four Goals of Studio Acoustics
suggest a correctionStudio acoustics serves both directions of the signal flow—what comes out of the speakers and what goes into the microphone. Rooms act as a filter on both. Whether you are tracking a vocalist or mixing a record, four goals frame everything in this chapter: accurate frequency response, accurate stereo imaging, controlled reverberation and echo, and sound isolation. The rest of this chapter is about achieving them.
How Sound Interacts with Surfaces
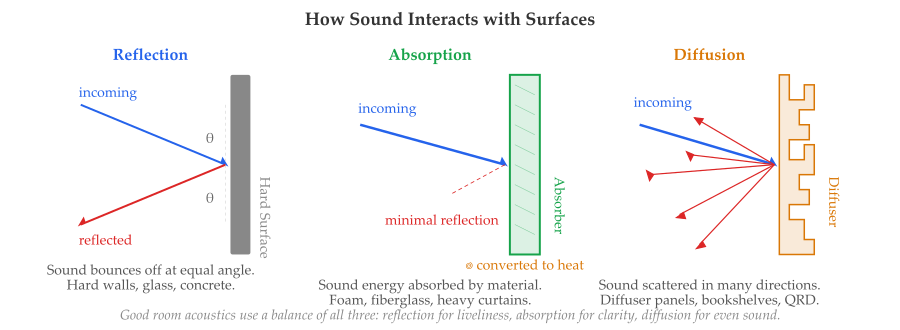
suggest a correctionWhen sound hits a wall or solid surface, three things can happen: it can be reflected (bounced back), absorbed (converted to heat energy), or diffused (scattered in multiple directions). Understanding these three behaviors is the foundation of all acoustic treatment.
Reflections and Reverberation
suggest a correctionReflections are the primary acoustic problem in studios. When a single sound bounces off a wall it may be heard as an echo. In most rooms, many reflections occur simultaneously, and they arrive at the listener so quickly—typically within tens of milliseconds of the direct sound—that the brain does not hear them as discrete echoes. Instead, our hearing fuses everything that arrives within a few tens of milliseconds of the original sound into a single perceived event—the exact threshold depends on the sound, from only a few milliseconds for sharp transients (a snare, a click) up to roughly 40–50 ms for sustained material such as speech and music. This is called the precedence effect (or the Haas effect, after Helmut Haas). The reflections are not silent; they color the timbre, expand the perceived size of the source, and shift its apparent location—but they merge with the direct sound rather than splitting off as separate echoes. Only when reflections arrive significantly later (as in a large hall or a long hallway) do we start hearing them as distinct.
When these reflections persist after the original signal has stopped, the result is called reverberation. Reverb gives our brains cues about the size of the space—think of the sound of a cathedral versus a tiled bathroom.
Reverb can add depth and lushness to music, but it becomes a problem when uncontrolled. Excessive reverb in a recording booth gets captured by the microphone and baked into the recording. Modern de-reverb plugins (Accentize dxRevive, Acon DeVerberate, the dialogue-isolation tools in iZotope RX) can pull some of it back, but they degrade the source as they work—so it is still far better to record dry and add reverb in the mix, unless the room produces a genuinely desirable natural reverberation. The control room creates the mirror-image problem: mix in a room with too much uncontrolled reverb and you will instinctively add too little reverb to your mixes (the room is already supplying it), so your mixes come out too dry everywhere else. Mix in a room that is too dead and you will over-add reverb to compensate, and your mixes come out washy. Either way, an untrustworthy room pushes your reverb decisions in the wrong direction.
RT60 (Reverberation Time 60) measures the time it takes for sound to decay by 60 dB after the source stops. A large concert hall might have an RT60 of around 1.5–2.5 seconds, while a well-treated control room typically targets 0.2–0.4 seconds (Everest & Pohlmann, 2015). RT60 can be measured with Room EQ Wizard (free software) and is one of the most important metrics for evaluating a room's acoustic behavior.
RT60 is also the oldest equation in architectural acoustics. Wallace Sabine derived it at Harvard in the 1890s—armed with an organ pipe, a stopwatch, and seat cushions he carried between lecture halls at night—and his formula still runs every room calculator today:
where V is the room volume in cubic feet and A is the total absorption in sabins—each surface's area multiplied by its absorption coefficient, summed (with V in cubic meters, the constant becomes 0.161). The equation explains two things you can feel: doubling a room's absorption halves its decay time, and big rooms need far more treatment than small ones to reach the same RT60. It drifts at the extremes—very dead rooms and very low frequencies break its assumptions—but as a planning tool for how many panels a room needs, it has not been improved on in over a century.
I have caught myself adding plate reverb to a vocal in the mix because I felt the take was “too dry,” only to realize the dryness was the engineering blind spot of an over-treated tracking room. The performance was fine; the over-deadened room had eaten the natural micro-reverberations that give a vocal its life and presence. Now I track in slightly live spaces. The room is the first reverb plugin in your chain, and you cannot unbake it after the fact.
The Acoustic Problems
suggest a correctionNow that you understand the basics of how reflections and reverberation color sound, here are the specific problems that untreated rooms create. Once you understand them, you can fix them.
Modal Ringing
Depending on the distances between walls, a room will emphasize certain frequencies through a form of low-frequency resonance called modal ringing (also known as room modes). The room itself becomes a giant resonator: excite it with a kick drum hit and certain bass notes will ring long after the source has stopped. I have worked in rooms where an 80 Hz tone would sustain for nearly two seconds after the kick drum hit—it made every bass-heavy track sound like mud, and no amount of EQ could fix it because the problem was the room, not the recording.
The math of room modes. Every pair of parallel surfaces in a room has a fundamental resonance frequency, plus integer multiples (harmonics). The first axial mode for any pair of parallel walls is calculated as (Everest & Pohlmann, 2015):
Read it one symbol at a time:
- f is the mode frequency—the bass note (in Hz) that this pair of walls will resonate and ring at.
- c is the speed of sound, about 1,125 feet per second in a normal room.
- L is the distance between the two parallel walls, in feet.
- The 2 is there because the sound has to travel the length of the room and back—one full round trip—to complete a cycle, so the resonant wavelength is twice the room dimension.
So for a 10-foot wall spacing: f = 1,125 ÷ (2 × 10) = 1,125 ÷ 20 = 56 Hz—right in the kick drum's territory. A 16-foot dimension gives 1,125 ÷ 32 = 35 Hz. A 20-foot dimension gives 1,125 ÷ 40 = 28 Hz. Plug your own room dimensions in and you will know exactly which bass notes will ring before you ever play a tone.
Three types of modes. Rooms produce three categories of modal resonance, named for how many surfaces are involved:
- Axial modes bounce between two parallel surfaces (front-back, side-side, or floor-ceiling). These are the loudest and most audible. The first three modes of any room are almost always axials.
- Tangential modes bounce between four surfaces (e.g., all four walls in a horizontal circuit). Roughly half the energy of an axial.
- Oblique modes involve all six surfaces. They are the weakest but the most numerous.
Why corners are the worst. Every mode—axial, tangential, oblique—has a pressure maximum at every corner of the room. That is why corner bass traps work so dramatically: a single trap addresses every mode at once. Conversely, a microphone or listening position placed exactly in a corner experiences every modal peak simultaneously, which is why corners are the worst place to set up either a recording or a mix position.
Modal density vs. concentration. A room with “well-spread” modes—first mode at 50 Hz, second at 64 Hz, third at 72 Hz, fourth at 89 Hz—sounds far better than one where multiple modes pile up at the same frequency (the curse of cubic rooms, where every dimension produces the same first mode). The goal of intelligent room design is not to eliminate modes (impossible without an anechoic chamber) but to spread them across the frequency spectrum so no single frequency dominates. You do that by making the three room dimensions—length, width, and height—all different from one another (and not simple multiples of each other), so each pair of surfaces resonates at its own frequency instead of piling up on the same note. Treatment with bass traps then tames each mode individually.
Standing Waves and Flutter Echoes
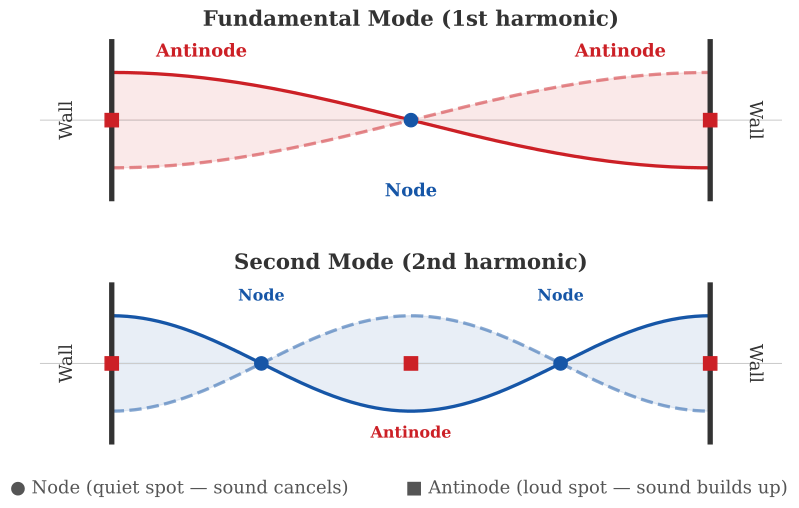
Standing waves occur when sound reflects off a surface and combines with the direct sound along the same path. This creates fixed points of reinforcement (antinodes) and cancellation (nodes), causing certain frequencies to sound dramatically louder or quieter depending on the listener's position. Walk around any untreated room while playing a low bass tone and you will hear it: the bass booms in the corners and nearly disappears in certain spots between the walls. Standing waves are caused by parallel walls, which is why studios often incorporate angled walls and ceilings.
Flutter echoes are rapid, short echoes that produce a clicking, ringing, or buzzing sound after the original signal has stopped. They are caused by sound bouncing back and forth between parallel reflective surfaces. Clap your hands in a small, untreated room with hard walls and you will likely hear one—a metallic ringing that follows the clap. Flutter echoes make recordings sound cheap and create monitoring problems in a control room. The fix is straightforward: break up the parallel surfaces with absorption or diffusion on at least one of the two opposing walls. Even a single 2-inch panel on one side of the room can dramatically reduce a flutter echo.
SBIR (Speaker Boundary Interference Response)
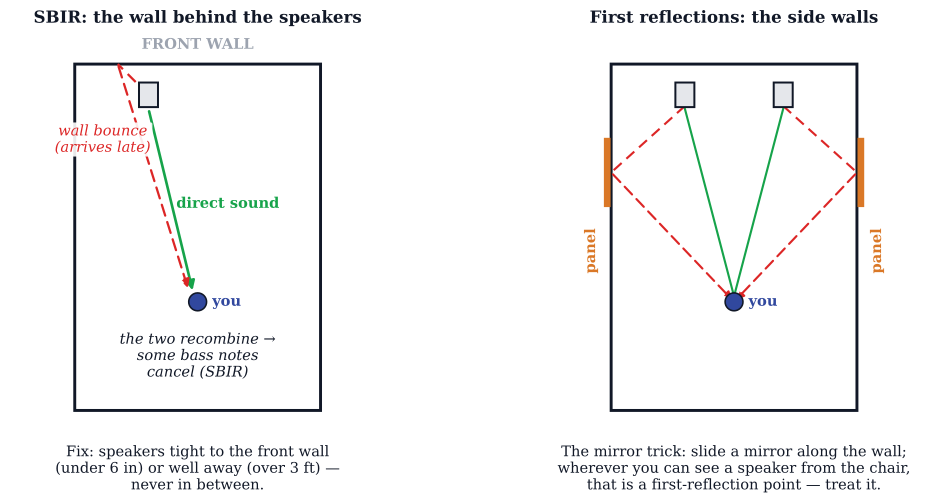
SBIR is a phenomenon that creates a severe dip in low-frequency response based on the distance between the studio monitors and the nearest walls. Sound from the speaker reflects off the wall behind it, and at certain frequencies, that reflection arrives back at the listening position out of phase with the direct sound—causing cancellation. The result is a bass null that no amount of EQ can fix, because the cancellation is physical.
The ideal solution is to soffit-mount the speakers into the front wall, which eliminates SBIR from that surface entirely. When soffit mounting is not practical, you have two viable options and one trap to avoid. Option A: place the monitors very close to the front wall (six inches or less from the rear of the cabinet to the wall). This pushes the SBIR cancellation frequency up into a range that is easy to treat with thinner absorption—often above the troublesome bass region entirely. Option B: pull the monitors well away from the front wall (three feet or more). The cancellation frequency drops to a different point that may fall outside the critical bass range, and any remaining null is shallower because the reflection has lost more energy traveling. What does NOT work is the dead zone in between—roughly twelve to thirty-six inches—where the SBIR cancellation lands directly in the kick-drum and bass-guitar fundamentals (somewhere between roughly 95 and 280 Hz, depending on distance—f ≈ c/4d, so twelve inches nulls near 280 Hz and three feet near 95 Hz). Whichever option you choose, also make sure the distance from the monitors to the front wall differs from the distance to the side walls; otherwise, the same frequency will be canceled twice.
Room Layout and Positioning
suggest a correctionWith the problems diagnosed, the next set of decisions concerns where everything goes: how the room itself is proportioned, where the monitors sit, and where the listener sits. These choices interact with the modes and reflections you have already addressed—good layout amplifies good treatment; bad layout undoes it.
Room Dimensions and the Golden Ratio
If you are designing or choosing a room from scratch, the dimensions matter more than any treatment you can add later. The worst room dimensions are those with identical ratios (such as 8' × 8' × 8') or simple multiples (8' × 16' × 24'), because these cause the same modal frequency to be reinforced by all three pairs of parallel surfaces simultaneously. Unrelated dimensions spread the modes across different frequencies, making each one easier to control.
The golden ratio provides an excellent starting point for room proportions: 1 × 1.6 × 2.56. Another commonly used ratio is 0.62 × 1 × 1.62. With an 8-foot ceiling, the golden ratio yields approximately 8' H × 12.8' W × 20.5' L. These ratios are not magic—they simply distribute the room modes across the spectrum so no single frequency piles up.
In a rectangular room, face the short wall and maximize the distance behind the listening position. Since the speakers direct most of their energy toward the back wall, having more space allows low frequencies more time to develop before being reflected back, resulting in more accurate bass response.
Listening Position and Speaker Placement
Where you sit in the room matters as much as how the room is treated. There are several mathematically proven methods for determining the optimal listening position:
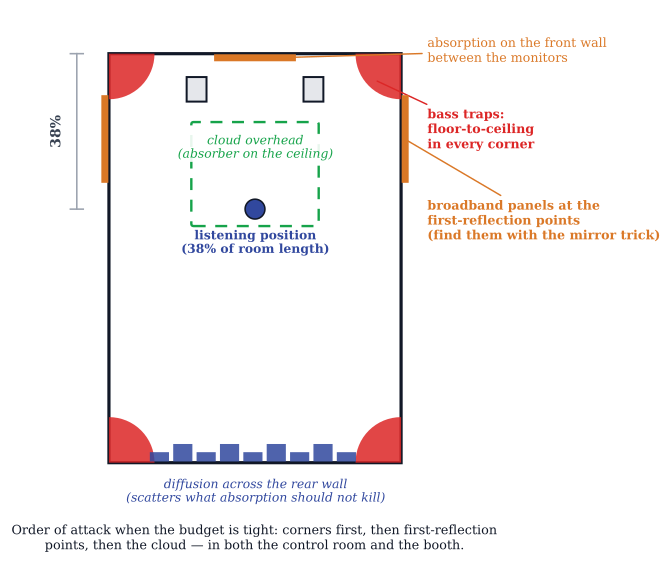
The 38% rule states that the most accurate listening position in a rectangular room is 38% of the way back from the front (short) wall. For a room that is 23 feet long, the optimal position would be approximately 8.7 feet from the front wall. This position avoids the strongest modal peaks and nulls.
The Cardas method uses a golden-ratio formula to place the speakers, with both distances derived from the room width. The distance from each speaker to the nearest side wall is the room width multiplied by 0.276, and the distance from each speaker to the wall behind them is the room width multiplied by 0.447. Because both numbers come from the same dimension in a golden-ratio relationship, the speaker-to-wall reflections never reinforce one another. The Cardas method is widely used in high-end listening rooms and audiophile setups.
The rule of thirds divides the room into three equal sections lengthwise. The speakers are placed at the boundary of the first third and the listening position at the boundary of the second third. This is a simpler approximation that works well in many rooms.
All three methods aim for the same goal: placing the listener at a point where room modes cause the least interference with accurate bass reproduction. Try each one in your room and use measurement software to determine which yields the flattest response.
I have moved my mix chair eighteen inches forward in three different rooms over the years, all because of the same lesson: the “natural” position—usually right at the front-back midpoint of the room—is exactly where the room's bass response turns most uneven: the even modes pile their peaks on top of you while the fundamental drops into a null. Eighteen inches forward, toward the 38% rule position, and the bass tightens, the mids open up, and EQ moves you used to make stop being necessary. The chair position is the cheapest acoustic improvement you can make. Do not skip it.
Room Symmetry
Symmetry in a control room means lateral symmetry only: setting up so that the left and right sides of the room are proportionally identical relative to the listener. Both side walls should be the same distance from the listening position, and any treatment on one side wall should be mirrored on the other. If one wall is closer to the monitors than the other, or if treatment is not balanced left-to-right, early reflections will arrive unevenly at the two ears, deteriorating the stereo image.
Do not extend symmetry along the front-back or floor-ceiling axes. The listener should not be at the front-back midpoint of the room (where the even modes stack their antinodes while the odd modes, the fundamental included, fall into nulls—the least predictable spot in the room), and the monitors should not be at the floor-ceiling midpoint either—the even vertical modes concentrate an antinode at the half-height, while the fundamental builds its pressure against the rigid floor and ceiling themselves. Use the 38% rule or Cardas method to determine how far back to position the listening chair. Place the tweeters at ear level rather than at the geometric vertical midpoint of the room. The worst place to set up a studio is in a corner or directly against a wall in an asymmetrical arrangement.
When the room cannot be made symmetric. Most home studios are not naturally symmetric. Bedroom corners are not where the listening position wants to be; closet doors and HVAC vents tend to live on one wall and not the other. When the room cannot be made symmetric, get the layout as close as you can, then compensate the asymmetry with treatment. If one side wall has a window or doorway you cannot move, hang a thicker absorption panel on the opposite (treatable) wall to match the absorption density. If a bookshelf or dresser sits asymmetric to the listener, mirror its size with a similar-density object on the other side. Use REW with a UMIK-1 to verify that early reflections at both ears arrive within roughly 1–2 dB of each other; if they do not, add or remove material on the louder side until they do. Perfect symmetry is the ideal; pragmatic balance is the floor.
Acoustic Treatment
suggest a correction“Control rooms are really musical instruments—they're actually scientific instruments if you get right down to it.” —Wes Lachot (acoustic designer; creator of the 38% rule; who reworked the control rooms at Electric Lady Studios and designed David Barbe's Chase Park Transduction, among many others)
Once the problems are named, the toolkit is straightforward: capture sound energy with absorption, scatter it with diffusion, and treat the corners where every modal pressure peak converges. Nothing about a treated room is decoration—every panel either absorbs or scatters energy that would otherwise become a problem.
Acoustic Absorption
Absorption works by capturing sound energy and converting it to thermal energy, reducing the amount of reflected sound in the room. Sound-absorbing material comes in various forms, with the most common being acoustic foam. Foam panels typically come in squares or rectangles with wedge or pyramid surface patterns. Thicker panels (2–4 inches) provide better absorption across a wider frequency range.
I once walked into a project studio where the engineer had stapled cheap foam panels to every square inch of every wall. The room was completely dead, and the mixes coming out of it sounded that way too—no kick-drum thump, no snare slap, no cymbal air. The foam had stripped the high end and done nothing for the bass. We pulled half of it down, replaced the front corners with rigid fiberglass bass traps, and the room came back to life within an afternoon. Cheap foam is the most common acoustic-treatment mistake in home studios.
A word of caution: cheap acoustic foam found online is often low-density and only absorbs high frequencies effectively, leaving low and midrange frequencies to reflect. The result is a room that sounds dull and muddy—you have killed the brightness but the bass problems remain. This is worse than no treatment at all, because it fools the engineer into thinking the room has been addressed. Invest in quality panels from professional brands (Auralex, GIK Acoustics, Primacoustic) or build your own from rigid fiberglass. The difference between a treated room and an untreated one is not subtle—it is the difference between making mix decisions based on reality and making them based on a lie your room is telling you.
Bass Traps and Broadband Absorption
Bass is the most difficult frequency range to control because of its long wavelengths. Bass traps are acoustic absorbers specifically designed to damp low-frequency energy and achieve a flatter room response. They are typically constructed from porous, high-density rigid fiberglass (such as Owens Corning 703 or 705, or Rockwool) mounted in wooden frames and covered with fabric. Although called “bass traps,” quality fiberglass panels absorb effectively across the entire frequency range—this is known as broadband absorption.
Since modal ringing is strongest in the corners of a room, place bass traps in as many corners as possible. A rectangular room has 12 corners (where walls meet walls, walls meet the ceiling, and walls meet the floor). The most important are the tri-corners where three surfaces meet—these are where the most bass energy accumulates. I start every room treatment project with the corners. Even before touching the first reflection points, getting bass traps into the front corners behind the monitors and the rear corners behind the listening position will tighten the low end more than any other single treatment. DIY bass traps can be built affordably—rigid fiberglass panels wrapped in breathable fabric cost roughly $30–50 each and take an afternoon to build.
Tuned Bass Absorption: Membrane and Helmholtz Absorbers
Porous absorption—fiberglass, Rockwool, foam—works by converting particle velocity into heat as air molecules oscillate through the material. That is the key word: velocity. A sound wave has two components, pressure and velocity, and they are 90 degrees out of phase with each other. At a rigid boundary such as a wall, pressure is maximum and velocity is zero. The velocity—and therefore the absorption—is highest one quarter-wavelength away from the surface. For a 500 Hz tone, a quarter-wavelength is about 6.75 inches, which is why a 4-inch panel handles midrange well. For 100 Hz, the quarter-wavelength is roughly 34 inches. For 50 Hz—which is where many room modes live, as the modal math from earlier in this chapter shows—it is about 5.6 feet. Filling a corner floor-to-ceiling with fiberglass will help everywhere, but physics places a practical floor on how low porous materials can reach without building a wall of material most rooms cannot accommodate. Below roughly 70 Hz, the laws of wavelength physics mean you run out of panel thickness before you run out of mode.
This is where tuned resonant absorbers enter the toolkit. Instead of requiring particle velocity, they absorb through mechanical resonance: you build a structure that resonates sympathetically at the problem frequency and dissipates energy as the resonance decays. They come in two practical families.
Membrane (panel) absorbers. A membrane absorber is a mass-air-spring system: a panel of plywood, MDF, or a limp-mass material (such as mass-loaded vinyl) is suspended over a sealed airspace. The panel mass combined with the springiness of the trapped air determines the resonant frequency—increase the panel mass or deepen the cavity and the resonant frequency drops; lighter panels over shallower cavities tune higher. The classic design formula is f0 = (170)/(√(m · d)), where m is the panel's surface mass in pounds per square foot and d is the cavity depth in inches, giving the resonant frequency in Hz. Commercial products such as GIK Acoustics Soffit Bass Traps and broadband panels with limp-mass facings use this principle. A layer of fiberglass or Rockwool placed inside the cavity, just behind the panel, adds damping so the resonance peak is broad rather than a razor-thin spike. Without damping, a membrane trap is efficient only at a very narrow band; with damping it spreads absorption across a musically useful band around the target frequency.
Helmholtz resonators. You already know the principle—you encountered its discoverer as the epigraph to Chapter 2. Hermann von Helmholtz described the resonating cavity that bears his name: a rigid enclosure with a narrow neck or slot opening. Blow across a bottle mouth and the air in the neck oscillates in and out as a mass; the air trapped in the body acts as a spring. Together they form the same mass-air-spring system as the membrane absorber, but oriented differently. The resonant frequency is f0 = c/(2π)√(A/(V · L')), where A is the neck cross-sectional area, V is the cavity volume, and L' is the effective neck length. In practice, Helmholtz absorbers are engineered as slotted-panel absorbers—a rigid front panel with a row of slots or holes over a sealed cavity. The slot geometry is tuned to the target frequency. Line the cavity with absorption and the resonance broadens. Commercial slotted-panel Helmholtz absorbers are widely available, and some designs pair their tuned low-frequency absorption with a degree of mid-frequency diffusion. DIY versions can be built from 3/4-inch MDF with a routed slot face and a shallow sealed airspace—a weekend project if you have accurate measurements in hand.
Practice: surgical treatment in the right corner. The correct workflow is the one the REW exercise at the end of this chapter builds toward: run the measurement, identify the single worst bass mode—the one that shows the highest, narrowest peak on your frequency response—and note its frequency. That is your target. Build or buy a tuned trap resonant at that frequency and install it in the high-pressure corner (from the corner placement discussion above: every mode has a pressure maximum at every corner). The broadband fiberglass you already have handles everything above 80 Hz. The tuned trap handles the one mode the fiberglass cannot reach. There is no need to line every corner with Helmholtz slots.
Be honest about the cost-benefit curve. Tuned absorbers are surgical tools: they work in a narrow band and only at the tuned frequency. If your target mode shifts slightly as temperature and humidity change, the trap's effectiveness shifts with it. Broadband fiberglass is forgiving—it works across a wide range, tolerates imprecise placement, and lets you treat multiple problems with a single panel. The practical approach for most home studios: fill the corners with broadband porous absorbers first. Add a tuned absorber at the exact worst-mode frequency only if measurement confirms the mode is still problematic after the broadband treatment is in place. Tuned traps are a second-pass fix, not a first one.
When shopping for acoustic treatment, you will encounter the NRC (Noise Reduction Coefficient) rating—a number from 0 to 1 indicating what percentage of sound energy a material absorbs. An NRC of 0.85 means 85% absorption. A 4-inch rigid fiberglass panel typically has an NRC of 0.95 or higher, while thin foam may only achieve 0.5–0.7.
NRC is an average across the speech band; the fuller picture is the absorption coefficient (α) at each frequency, and the table below shows why thickness is everything below 500 Hz—thin materials that look impressive at 1 kHz do almost nothing where rooms actually have problems:
| Material | 125 Hz | 500 Hz | 2 kHz |
|---|---|---|---|
| Drywall on studs | 0.10–0.3 | 0.05 | 0.07 |
| Carpet on pad | 0.05–0.1 | 0.2–0.3 | 0.5–0.6 |
| 1-inch acoustic foam | 0.1 | 0.5–0.7 | 0.9 |
| 2-inch rigid fiberglass | 0.2 | 0.95+ | 1.0 |
| 4-inch rigid fiberglass | 0.75+ | 1.0 | 1.0 |
Representative published values; specific products vary. Coefficients above 1.0 appear in lab data due to edge diffraction and are reported as 1.0 here.
Read the 125 Hz column and the chapter's advice falls out of the numbers: carpet and thin foam are treble-only treatments (a room treated with them gets duller, not better), 2-inch panels handle the mids beautifully but need corner placement or an air gap to reach down low, and 4-inch panels straddling corners are the only entry on the list that touches the bass region at all.
Early Reflection Points
Beyond corners, the early reflection points are the most important areas to treat. These are positions where sound takes a single bounce off a surface and reaches the listener with significant energy. Think of a billiards table: the ball is sound, your ears are the pocket, and anywhere the ball takes one bounce off a rail and reaches the pocket is a problem area.
The mirror trick was the moment acoustics clicked for me. An engineer I assisted handed me a small bathroom mirror and told me to slide it along the side wall until I could see the speakers from his mix position—then mark that spot with masking tape. We did it for both side walls, the floor, the ceiling, and the back wall. Six panels later, the stereo image opened up to twice the width it had before, and the low-mid muddiness disappeared. That cheap mirror taught me more about acoustics than any textbook had up to that point.
The first early reflection point is the mirror point on the side walls between the monitors and the listening position. To find it, have someone hold a mirror against the side wall and slide it until you can see the speaker from your mix position—that is where the panel goes.
The second early reflection point is on the floor and ceiling between the monitors and listening position. A desk or console in the control room is also a major reflection surface—the smaller and less resonant the desk, the better.
The third early reflection point is on the front and back walls between each speaker and the listener.
Even four panels at the first reflection points and two bass traps in the front corners will transform a small room. Do not cover an entire room with absorption. Beyond the sonic problem—an over-absorbed room sounds dead, lifeless, and exhausting to mix in for hours—there is a real practical concern: too much porous absorption restricts air circulation and traps moisture. Studios that go all-in on foam often develop a stuffy, stale smell within months, and in humid climates the panels themselves can grow mold. The room becomes uncomfortable to spend long sessions in, and the air quality suffers. Treat strategically: corners, first reflection points, and a controlled amount of broadband absorption. Leave breathable, untreated surfaces elsewhere in the room—they help the space remain a place humans actually want to work in. Find the right balance between acoustic accuracy and a comfortable, naturally ventilated space.
Diffusion
Diffusion spreads reverberation evenly throughout a room. While a flat reflective surface reflects most energy at the same angle and time, a diffuser causes sound to radiate in many directions and at different times. Diffusers make enclosed spaces sound larger, reduce standing waves, and can remedy the dead, muddy sound that comes from excessive absorption. Used in combination with absorption, diffusion creates a lively yet accurate listening environment.
Bookshelves are a natural example of diffusion—the varying depths of books scatter sound at different frequencies. Purpose-built diffusers work on the same principle using precisely calculated surface depths. The depth of a diffuser determines the lowest frequency it can scatter: a diffuser one foot deep will be effective down to approximately 280 Hz. DIY diffusers can be constructed by gluing blocks of wood in varying lengths onto a plywood backing. Professional options include quadratic residue diffusers (QRD) and skyline diffusers. The QRD's well depths are not decorative—they follow a number-theory sequence (the quadratic residues of a prime number) that scatters sound evenly across both angle and frequency, which is why commercial QRDs outperform randomly varied blocks: the math guarantees there is no direction the panel favors.
These ideas have names when they are built into a whole room. A LEDE (Live End, Dead End) control room absorbs heavily at the front—killing the early reflections around the monitors—and leaves the rear live and diffusive, so the room breathes behind you while the mix position stays accurate. Its modern descendant is the RFZ (Reflection-Free Zone) design, which angles or splays the front surfaces so early reflections are steered away from the engineer rather than absorbed, creating a window of reflection-free listening at the mix position. You will meet both terms in studio-design literature and on facility tours; both are formalizations of exactly what this chapter has been teaching—control the first reflections at the front, keep useful diffuse energy at the back.
Sound Isolation
suggest a correctionSound isolation addresses a different problem than acoustic treatment: keeping outside noise from entering the studio and preventing studio sound from disturbing neighbors. I once had a studio next to a parking lot. Every time a car alarm went off, it bled straight into the vocal booth. No amount of acoustic foam helped—because foam treats reflections, not transmission. Only two things stop sound from passing through walls: mass and space.
Studios often incorporate double walls, double doors (sound locks), floating ceilings, and raised sub-floors with air gaps between each layer. Heavy-duty building materials like concrete or brick provide significantly better isolation than standard drywall. Green Glue—a viscoelastic damping compound applied between layers of drywall—is a cost-effective way to add mass and damping to existing walls and ceilings.
Sound transmits through solid materials as well as air. A speaker resting directly on a desk will vibrate the desk, which transmits energy to the floor and eventually to the ceiling below. Keep monitors on heavy-duty speaker stands whenever possible. If the only option is desk placement, decouple the monitors using isolation pads (such as Primacoustic RX9 or IsoAcoustics ISO series stands).
Isolation performance is measured using the STC (Sound Transmission Class) rating. A standard single drywall wall has an STC of about 33–35, while a well-constructed double wall with air gap and Green Glue can achieve STC 55–65. Professional studios typically aim for STC 50 or higher between rooms.
Background noise: HVAC, fans, and NC ratings. Sound isolation only handles transmission through walls. The other half of the noise problem is the noise generated inside the room—HVAC pushing air through ducts, the computer fan grinding through a session, the refrigerator compressor in the next room, the buzz from a wall-wart power supply. All of it shows up on the noise floor of every recording. Studios are rated using NC (Noise Criterion) curves: NC-25 is professional studio quiet (around 30 dB SPL ambient), NC-15 is audiophile silent (a serious build-out target), and NC-30 (roughly 35 dB SPL ambient) is acceptable for tracking but noticeable on quiet sources. To get below NC-30: silence the computer (move the desktop into an isolation closet, run a fanless workstation, or use a laptop), use insulated flex duct in the HVAC and oversize the ducts so air moves slowly, and consider a remote machine room for noisy outboard. A treated room with a quiet noise floor will outperform an over-treated room with a buzzing fan on every quiet recording you ever make.
Studio Monitors
suggest a correctionStudio monitors are the speaker systems used for critical listening. Unlike consumer speakers designed to flatter the sound, studio monitors prioritize flat, accurate frequency response and precise stereo imaging. The true test of any monitoring system is how well mixes translate to other playback systems.
Most speakers operate like a dynamic microphone in reverse. An electrical signal drives a voice coil attached to a magnet, causing a cone to move back and forth and create sound pressure. The cones are called woofers (low frequencies) and tweeters (high frequencies). Tweeters typically cover 2,000 Hz to 20,000 Hz, while woofers cover approximately 45 Hz to 2,500 Hz. Subwoofers extend down to 20 Hz.
When two or more drivers are used, a crossover divides the frequency spectrum into bands, sending each to the appropriate driver. This allows each driver to operate within its optimal range, reducing distortion.
Active (powered) monitors have built-in amplifiers. Passive (unpowered) monitors require an external amplifier. There is no inherent quality difference—what matters is the quality of the amplifier, drivers, and cabinet construction.
Two-way vs three-way designs. Two-way monitors use a single woofer plus a tweeter, with one crossover point splitting the spectrum between them. Three-way designs (ATC SCM45A Pro, Adam S3V, Dynaudio Core 59) add a dedicated midrange driver between woofer and tweeter, with two crossover points instead of one. Each driver in a three-way operates over a narrower frequency range, which reduces individual-driver distortion and improves linearity through the critical 200 Hz–2 kHz region where vocals and most musical information live. The trade-off is more crossovers, each introducing phase complexity at the crossover frequency. For most engineers a high-quality two-way is more than sufficient; the three-way premium pays off mostly at midfield and farfield sizes and at the mastering price tier. Coaxial designs nest the high-frequency driver at the center of the low-frequency one, creating a true single-point source that sidesteps some phase issues, at the cost of more demanding driver engineering. The KEF LS50 is a two-way coaxial; Genelec's “The Ones” (the 8331A, 8341A, 8351B, and 8361A) are three-way coaxials—a coaxial midrange-tweeter paired with concealed woofers, point-source and three-way at once.
Monitor Classifications
There are three main classifications. Nearfield monitors are the most common, placed close to the engineer on or near the console. Midfield monitors are larger and placed several feet back. Farfield (main) monitors are high-output systems placed far back or soffit-mounted in the walls. Having multiple sets to reference against is invaluable—what sounds great on large mains may reveal problems on small nearfields, and vice versa.
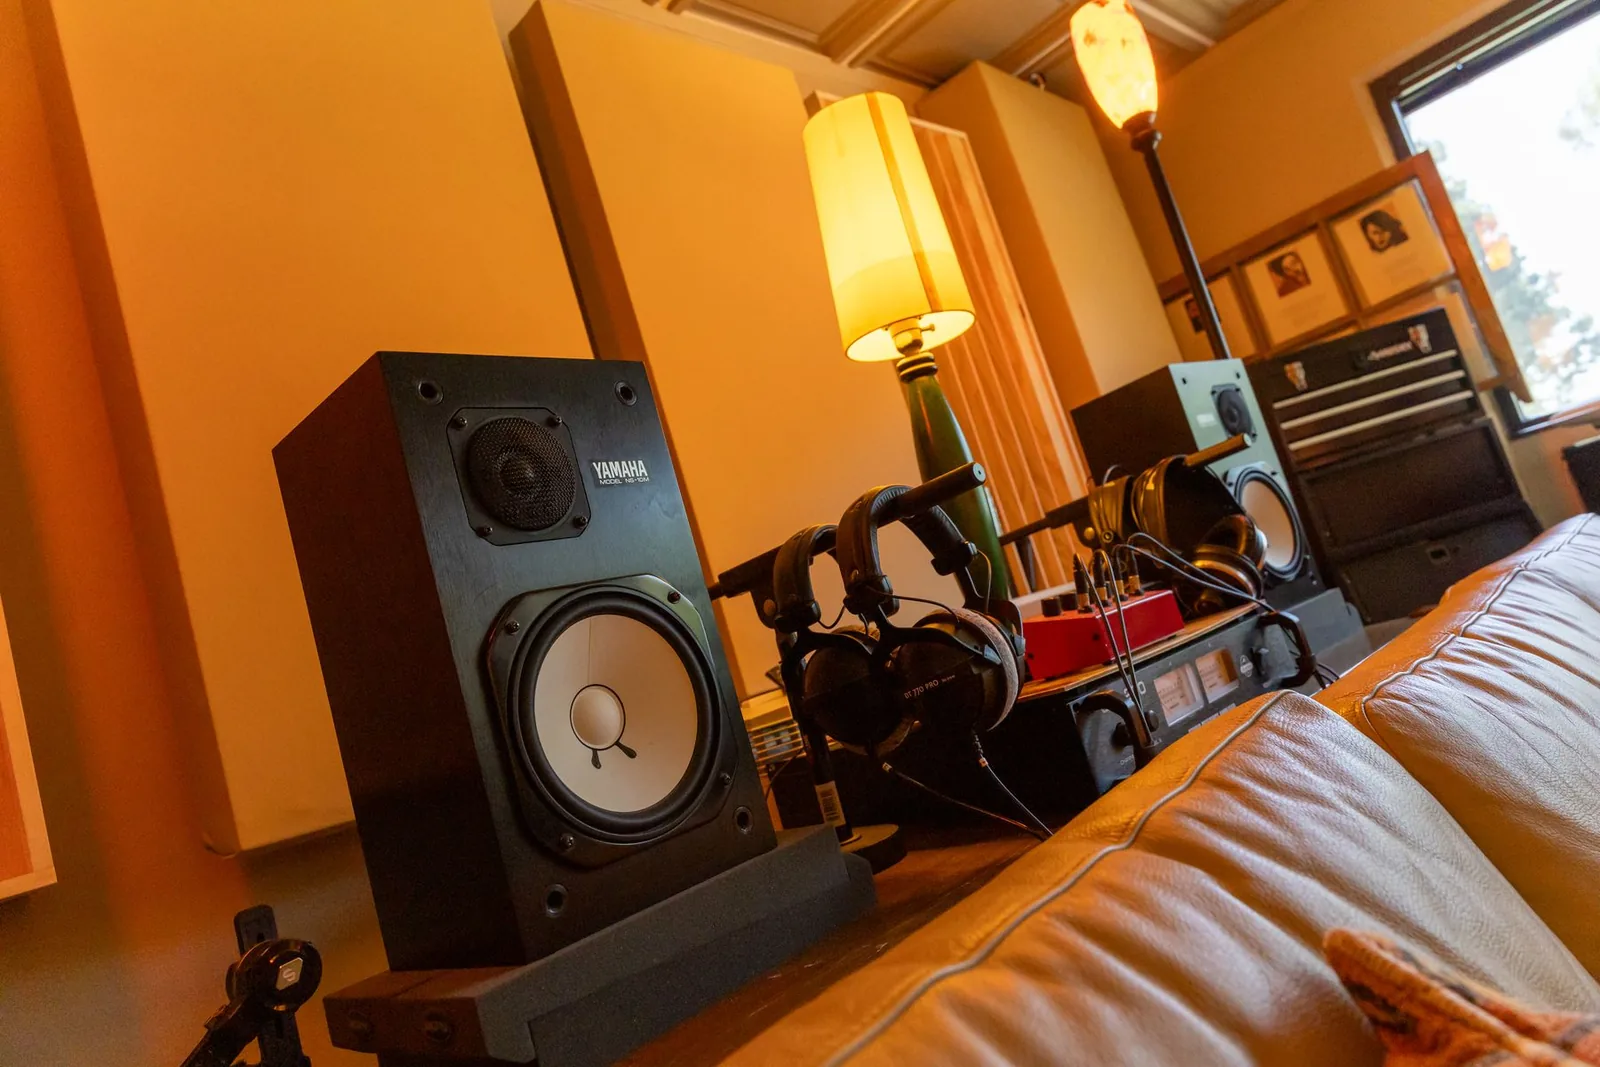
The Yamaha NS-10 is the most iconic studio monitor in history—a passive nearfield with an unforgiving midrange that reveals mix problems other speakers hide. The saying goes: “if it sounds good on NS-10s, it sounds good anywhere.” They have been discontinued since 2001, and engineers still hunt for them.
Other professional monitors include the Genelec 8341A (The Ones) (coaxial point-source with room correction via GLM software), Focal Twin6 (exceptionally flat response with beryllium tweeters), ATC SCM25A Pro (handbuilt in England, revered for midrange accuracy—a mastering standard), Adam A7V (AMT tweeter technology for smooth, detailed highs with built-in DSP room correction), KRK Rokit 7 (widely used in home studios, with onboard DSP EQ and app-assisted room tuning), and the Auratone 5C Super Sound Cube (a single-driver “mix cube” for checking translation on small speakers).
Monitor Placement
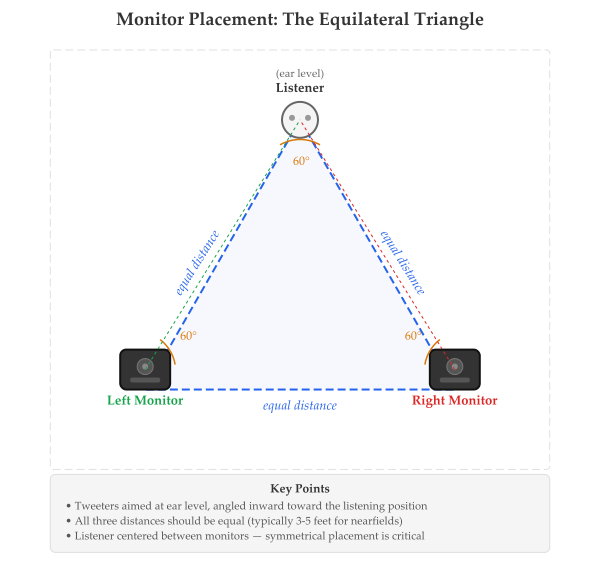
The engineer should sit directly centered between the two monitors. Form an equilateral triangle: the distance between the monitors should be roughly the same as the distance from each monitor to the listener. The tweeters should be at ear level—high frequencies are more directional than low frequencies, so a tweeter positioned above or below ear level results in lost detail. Some monitors may need to be placed upside down to achieve this. Monitors should remain vertical (not tilted horizontally) unless specifically designed for horizontal use. For distance from the front wall, use the SBIR-safe rule covered earlier in the chapter: either get the monitors very close to the wall (six inches or less) or well away from it (three feet or more), and avoid the twelve-to-thirty-six-inch dead zone where SBIR cancels right in the bass region. Whichever distance you choose, keep both monitors the same distance from the front wall—but the symmetry that matters most is left-to-right: each monitor must be the same distance from its nearest side wall, so reflections arrive evenly at both ears. Front-wall distance keeps the pair aligned; side-wall symmetry is what protects the stereo image.
Subwoofers and Central Monitoring
Adding a subwoofer can significantly improve low-frequency accuracy. Since low frequencies radiate omnidirectionally, subwoofer placement is flexible—and the only way to find the best spot is to measure. For years I assumed the sub had to sit dead center between the monitors. Then I ran Room EQ Wizard and moved it through every position I could—each corner, along each wall, every spot in between—measuring the response at each one. For my room, the flattest low end came from the front-right corner, nowhere near where I had always assumed it belonged. Measure your own room; the right position is wherever the response is flattest, not wherever it looks like it should go.
Integrating a Subwoofer: A Five-Step Procedure
Getting low-frequency accuracy from a sub is not plug-and-play. Placement is only one of five variables that must all be dialed in together, or the sub will make your low end worse, not better.
(a) Set the crossover first. The crossover frequency is where the sub hands off to the mains. Start at 80 Hz—the THX standard and the default for many bass-management systems—or wherever your mains begin to roll off naturally (look at their published −3 dB point; a nearfield with a stated response to 60 Hz can share the load down to around 80 Hz comfortably, but a small 5-inch monitor that rolls off at 80 Hz needs the crossover set higher, closer to 100 Hz). If the crossover is set too high, the sub covers a range where low frequencies become directionally localizable to the human ear—above roughly 80 Hz, listeners can start to point at the sub, and your stereo image suffers.
(b) Placement: the subwoofer crawl. As described above—place the sub at the mix position, play pink noise or a bass-heavy track, and walk the perimeter listening for the smoothest, most even response. Mark that spot, move the sub there, then verify with REW from the listening position.
(c) Match the level. With the sub placed, play pink noise and adjust the sub's output level until it blends—not booms. Use an SPL meter or REW's RTA at the listening position; the sub's contribution should bring the 40–80 Hz region into line with the overall response, not peak above it. A sub that is too loud makes mixes with less bass than you think—you keep turning the bass down, and your mix is thin everywhere else.
(d) Polarity and phase at the crossover. Play a tone at the exact crossover frequency—if you set 80 Hz, play an 80 Hz sine wave. While it is playing, flip the sub's polarity switch (or press the 0/180 button). Keep whichever position is louder at the listening position—louder means the sub and the mains are adding, not canceling. Many subwoofers also offer a variable phase control (0–180 degrees continuously); if yours does, sweep it slowly while playing the crossover tone and stop at the loudest position. If the sub offers a delay trim, use REW's impulse response to measure the time offset between sub and mains and dial it in directly. This single step—polarity alignment at the crossover frequency—eliminates the most common integration failure: a deep notch right where the sub and mains are supposed to overlap.
(e) Verify in REW. Run a full frequency sweep from the listening position. You are looking for a smooth handoff: a gradual slope through the crossover region with no abrupt peak and no suckout. A good integration will show a continuous curve. A polarity problem shows as a dip of 6 dB or more right at the crossover. A level mismatch shows as a step—the sub-bass region sits visibly higher or lower than the mains' response. Correct and re-measure until the curve through the crossover region is smooth.
The classic failure. Sub level too high plus crossover frequency too high: the result is a one-note boom you can point at in the room. Everyone feels the 60 Hz thud from the sub cabinet; the midrange sounds thin by comparison; every mix decision you make about bass will be wrong because the sub is telling you there is more bass than the mix actually contains.
The payoff. A correctly integrated sub relieves the mains of sub-bass duty entirely—the woofers operate over a narrower range, where they are most linear, reducing intermodulation distortion and cleaning up the midrange. More importantly, you can finally hear what is actually happening below 60 Hz: whether the kick drum has a 50 Hz fundamental or a 60 Hz one, whether the 808 is sitting at the right level or burying everything else. Those decisions used to be guesses when your mains could not reproduce them. This is exactly the translation problem that runs through this book—you cannot make a good decision about something you cannot hear. The sub is not a luxury; on any mix where low end matters, it is the thing that makes your decisions real. When a studio has multiple monitor sets and inputs, a central monitoring station (such as the Dangerous Monitor ST or Grace Design m905) provides convenient control over input selection, monitor switching, subwoofer level, mono summing, talkback, and mute.
Loudness Calibration
For consistent mixing decisions, many engineers calibrate their monitoring level to a fixed reference. The film industry standard is 85 dB SPL (measured at the listening position with pink noise); many music engineers calibrate to that same 85 dB reference, while others work slightly lower—around 79–83 dB SPL—for comfort during long sessions. Calibrating to a fixed level means you always know how loud your mix is in absolute terms, which leads to more consistent frequency balance—especially in the low end, where our perception of bass changes dramatically with volume (the Fletcher-Munson curves). An SPL meter is all that is needed.
Room Correction Software
Modern room correction software such as Sonarworks SoundID Reference and IK Multimedia ARC System can measure a room's frequency response using a calibration microphone and apply corrective EQ to the monitor output in real time. Room correction is not a substitute for proper acoustic treatment—it cannot fix standing waves or flutter echoes—but it can significantly improve accuracy by compensating for remaining anomalies. Room EQ Wizard (REW) is a free tool for measuring your room's response and diagnosing acoustic problems; pair it with a calibrated measurement microphone (the miniDSP UMIK-1, an omnidirectional measurement microphone, is the de facto budget standard, USB-powered with calibration data downloaded by serial number).
Immersive Audio Monitoring
With the rise of Dolby Atmos Music and Apple Spatial Audio, immersive audio has become increasingly important. Atmos mixes use height channels (speakers above the listener) in addition to traditional surround channels to create a three-dimensional sound field. While a full Atmos studio requires specialized monitoring (typically a 7.1.4 speaker array and a Dolby Atmos renderer), the acoustic principles covered in this chapter—treatment, symmetry, isolation, and accurate monitoring—apply to immersive rooms as well, extended to more dimensions.
Studio Headphones
suggest a correctionHeadphones are essential for recording, and historically they have not been the primary tool for mixing or mastering—mixes done on monitors tend to translate better to headphones than the reverse. But let me be honest: plenty of great mixes are done entirely on headphones, and the gap is closing fast with correction tools like Sonarworks. What matters more than monitors-versus-headphones is how well you know whatever you are mixing on. An engineer who has spent twenty years on one pair of headphones and knows exactly how they lie will out-mix someone dropped fresh into a perfect room with $3,000 monitors they have never heard before. Familiarity beats the spec sheet. The reasons monitors are traditionally preferred still hold, but they are not a law.
Headphones have very small drivers with limited bass response compared to full-size monitors. More importantly, headphones alter the stereo image. On speakers, sound from the left speaker still reaches the right ear—a phenomenon called crosstalk that is part of how we naturally perceive space. In headphones, each ear hears only its own channel with no crosstalk, creating an exaggerated stereo image. Mixing on loudspeakers produces results more representative of how most listeners will experience the music.
For tracking, headphones are indispensable. Closed-back headphones provide the best isolation—they prevent sound from leaking into the microphone and give the performer a focused monitoring environment. Open-back headphones allow air and sound to pass through the ear cups, offering a more natural sound and wider soundstage. Many engineers use open-back headphones for reference listening and detail work, but they should never be worn during recording as they leak significant sound.
Common closed-back headphones for recording: Sony MDR-7506, Audio-Technica ATH-M50x, Beyerdynamic DT 770 Pro. Common open-back headphones for mixing/reference: Sennheiser HD 600/650, Beyerdynamic DT 900 Pro X, AKG K702, Audeze LCD-X. If your room is too small or untreated for accurate monitor mixing, high-quality open-back headphones paired with Sonarworks SoundID Reference can be a viable alternative.
I once mastered a song entirely on headphones because my room was being treated and I had no monitors set up. The mix sounded great on the cans. Then I played the master in a car and realized the kick drum and the bass guitar were sitting on top of each other—something I never would have heard with the natural left-right crosstalk of speakers. Headphones are extraordinary tools. They are not a substitute for monitors at the final-decision stage.
The Honest Room
suggest a correctionAcoustics, monitors, and headphones form the foundation of every decision an engineer makes. No plugin, no technique, no amount of talent can overcome a monitoring environment that lies to you. A kick drum that sounds boomy in an untreated room will lead you to cut low end that did not need cutting—and your mix will sound thin on every other system. Every bad decision compounds.
The good news is that you do not need a perfect room. You need an honest one. Treat the first reflection points, tame the corners, place your monitors in an equilateral triangle, and calibrate your listening level. Learn what your room does wrong and compensate for it. Reference every mix on headphones, a car stereo, a phone speaker—any system that reveals what your room hides.
The switching rhythm during a session matters as much as the systems themselves. Make your decisions on the main nearfields; verify low end and overall balance on a second, humbler reference (a cube speaker or NS-10s—anything honest in the midrange); and save the consumer checks—phone, earbuds, the car—for confirming a nearly finished mix, not for making moves. Nearfields are for decisions, small speakers are for balance, consumer systems are for translation.
If you are building from scratch, treat both the control room and the vocal booth—they are equally important, and they feed each other. Leave the booth untreated and every recording arrives in your control room with baked-in room problems you will then hear (and fight) on your nicely treated monitors. Leave the control room untreated and you will make bad calls on even the cleanest booth recording. One shapes what you capture; the other shapes every judgment you make about it. If budget truly forces you to stage the work, start with the corners and first-reflection points in both rooms before you do anything fancy in either—but the goal is both, not one before the other.
This is also why your relationship with your monitors matters more than which monitors you own. A $300 pair in a treated room, listened to daily for a year, will produce better mixes than a $3,000 pair unboxed last week in an untreated bedroom. Familiarity breeds accuracy. When you know exactly how your system reproduces low end, handles transients, and where it exaggerates or rolls off—you stop second-guessing and start making decisions with confidence. That confidence is what clients hear when they say, “that sounds like a record.”
Back to the Car
Remember the mix I told you about at the start of this chapter—the one where the bass disappeared in the car? That was the last time I ever mixed in an untreated room. The very next week, I built four bass traps and hung panels at the first reflection points. The difference was immediate. I could suddenly hear the low end as it actually was, not as the room wanted me to believe it was. That $200 in materials changed my mixes more than any plugin I have ever bought.
Treat your room, trust your monitors, and verify on multiple systems—everything else in this book depends on it.
The room is the one piece of gear you never finish tuning. Every new client, every new genre, every new pair of monitors reveals something you did not hear last month. Treat the room like an artist treats their craft—something you refine over a lifetime, not something you check off a list. The best engineers I know are still moving panels around twenty years in, still measuring, still listening for what changed. That ongoing attention is what keeps a control room honest.
Review Questions
Work these before moving on — every question is answerable from this chapter. Written answers live in the instructor Answer Key, available to course adopters.
- What are the four goals governing studio acoustics?
- What are the three things that can happen when sound hits a wall or solid surface?
- When large numbers of reflections persist in a space after the original signal is gone, we get what is called ______________.
- When a room continues to ring at its resonant frequency after the sound source stops, this is called:
- Standing waves
- Modal ringing
- Flutter echo
- Reverberation
- ______________ occur when sound reflects off a parallel surface and combines with the direct sound along the same path.
- Standing waves
- Modal ringing
- Flutter echo
- Reverberation
- What are the two main methods of controlling unwanted reflections in a room?
- What would you use to control low-frequency resonances in a studio?
- List and briefly describe the three early reflection points.
- True or False: Absorption is when sound gets scattered in different directions within a room.
- Fill in the blank: Tweeters are to ______________ as low frequency is to ______________.
- What must be used when a speaker has more than one driver (cone)?
- What are the three main classifications of studio monitors?
- What kind of headphones are best for recording purposes, and why?
- You have a $3,000 budget for studio monitors, a monitoring station, headphones, and acoustic treatment. Your studio has a 10 ft × 10 ft control room and a 10 ft × 10 ft booth. What would you buy and why?
- Why are studio monitors the preferred playback source for mixing and mastering rather than headphones?
- Why is symmetry important in designing an acoustic space?
- Why is it important to have the tweeters of a monitor at ear level?
- Describe how to build a DIY bass trap.
- What is the difference between active and passive monitors?
- What does it mean to create an equilateral triangle between the listener and monitors at the mix position?
- What is SBIR, and what is the optimal monitor setup in relation to the front and side walls?
- What is room correction software, and how does it complement acoustic treatment?
- Explain the difference between closed-back and open-back headphones. When would you use each in a studio?
- What is RT60, and what is a typical target for a control room?
- What does the NRC rating tell you about an acoustic treatment material?
- What is STC, and why is it important when building studio walls and doors?
- What is loudness calibration, and why do engineers mix at a fixed SPL reference level?
- Watch IN THE STUDIO with Asaf Fulks: Episode 5 [Acoustics], and name one specific thing you learned from it.
- What is Dolby Atmos, and what speaker configuration is typically used for immersive audio monitoring?
- What is Green Glue, and how is it used in studio sound isolation?
- Why is it important to reference your mixes on multiple playback systems? Name at least three systems you should check your mix on.
- Your control room measures 12 ft × 18 ft × 9 ft. After filling all four floor-to-ceiling wall corners with 4-inch rigid fiberglass bass traps, you run a Room EQ Wizard sweep and find a sharp, narrow peak at 47 Hz that is still 9 dB above the surrounding response. A colleague suggests building a membrane absorber tuned to 47 Hz; another suggests simply doubling the fiberglass in the corners. Which approach is more appropriate, and why? In your answer, explain (a) what physical property prevents thick porous panels from fully controlling this mode, (b) how a membrane absorber targets it instead, and (c) what risk you accept when you add a tuned resonant absorber.
Studio Exercise: Measure Your Room
The fastest way to understand what your room is doing to your sound is to measure it.
Setup. You will need:
- A room you mix or record in (any room works; rectangular predicts most easily).
- Room EQ Wizard (REW)—free, from
roomeqwizard.com. - An omnidirectional measurement microphone (the miniDSP UMIK-1 is the budget standard), your studio monitors, and a tape measure.
Method.
1. Predict the modes. Measure your room's length, width, and height in feet, and for each dimension calculate the first axial mode—f = c / (2L), c = 1125 ft/s. Write down the three predicted frequencies.
2. Set the listening position. Center it laterally—equidistant from both side walls—then apply the 38% rule: measure 38% of the room length back from the front wall. Note your monitor distance from the front wall (close, under 6 inches, or far, over 3 feet—never the SBIR dead zone between).
3. Run the sweep. Place the measurement mic at the listening position, at ear height. In REW, calibrate input levels and run a sweep through both monitors; save the response graph and impulse response.
4. Analyze and propose. Compare measured peaks and nulls to your predicted modes. Identify the worst problem in the bass region (50–200 Hz) and write down one specific treatment that would address it—e.g., “two corner bass traps for the 56 Hz side-wall mode.”
Submit. The REW screenshot, your predicted-modes table, listening-position measurements, and a 100-word analysis naming the worst problem and your treatment.
Bonus. With your baseline saved, change one variable at a time and re-measure each:
- Monitor placement. Shift monitors closer to or farther from the front wall (SBIR Option A or B); the bass null shifts in frequency.
- Listening position. Move your chair to the 38% position; the old position's modal peaks should diminish.
- First reflection points. Use the mirror trick to find every first-reflection point—side walls, ceiling (a cloud), floor (a rug), front and back walls—and hang a 4-inch panel at each. Early-reflection energy should drop in the impulse response.
- Corner bass trap. Build one DIY rigid-fiberglass trap ($30–50 materials), install in the worst corner. The lowest modal peak should drop by 3–6 dB.
Compare the graphs side by side: a directly observed map of how each acoustic variable shapes your room—and more acoustics than any chapter can teach.