Chapter 6 · Capturing Sound: Microphones, Acoustics & Gear
Advanced Microphone Technique
The Good Rule (after David Miles Huber, Modern Recording Techniques): good musician + good instrument + good performance + good acoustics + good gear + good mic + good placement = good sound.
By the end of this chapter, you will be able to:
- Apply the Good Rule to evaluate every link in the recording chain—source, room, gear, mic choice, and placement—and explain why no downstream processing can substitute for a strong source
- Configure microphone placement using lateral symmetry and offset positioning to avoid the worst modal positions at room center and wall boundaries, and describe how placement decisions directly shape the captured frequency response
- Select among the four micing distance zones—close, distant, accent, and ambient—and explain the isolation-versus-room-sound trade-off each zone presents
- Distinguish on-axis from off-axis mic placement and explain how angle, distance, and the proximity effect alter tonal character before any signal processing is applied
- Apply the three-to-one rule to a multi-microphone setup and explain how phase coherence and comb filtering affect the combined signal when multiple mics share a source
- Compare the six stereo micing techniques—spaced pair (AB), XY, Blumlein, ORTF, M/S, and the Decca Tree—across the dimensions of stereo width, phase coherence, and mono compatibility, and select the appropriate technique for a given recording context
- Set up instrument-specific microphone configurations for drums (Glyn Johns and Recorderman), vocals (shaka distance and reflection filter), acoustic guitar (12th-fret placement), and guitar amplifier (reamping and DI-plus-amp blending)
- Select and correctly use pop filters, windscreens, and reflection filters for their intended recording scenarios, and apply safe microphone maintenance practices including phantom-power precautions for ribbon mics and proper storage procedures
- Identify boundary/PZM mics, the Jecklin disc, dummy-head binaural recording, and ambisonic full-sphere capture, and determine which technique is appropriate for a given spatial or format requirement
During one of my earliest sessions as an assistant, the lead engineer spent over an hour moving a single microphone around a guitar amplifier—half an inch left, an inch back, a slight tilt off-axis—while I stood there wondering what could possibly change that much. Then he hit playback and A/B'd the positions. The difference was staggering. Same mic, same amp, same performance, but each position sounded like a completely different guitar tone. That day I learned that microphone technique is not a finishing touch—it is where the sound is made.
The Good Rule: Source First
suggest a correctionThe Good Rule (from David Huber's quote above) states that every element in the chain matters: the musician, the instrument, the performance, the acoustics, the gear, the mic, and the placement. If any one of these is weak, the recording suffers. But the most crucial element is the source itself. No microphone or technique will make a source sound good that is not good in the first place. This means tuning instruments, warming up vocals, choosing the right acoustic space (see Chapter 7), coaching the performer, and ensuring comfort. Once the source sounds great to the naked ear, the microphone comes into play.

Choosing the right microphone and positioning it properly during recording will save enormous time during mixing. It will also yield better results than choosing a less appropriate mic and trying to fix problems later with EQ. As the saying goes: get it right at the source.
Choosing the Right Microphone
suggest a correctionAs we learned in Chapter 5, every microphone has its own sonic character. One that sounds great on one source may not work on the next. The first step after the Good Rule is choosing the right mic. The best way to do this is by testing several on a given source—set up two or three mics, record the same passage through each, and compare. As you get to know your mic collection, you will develop an intuitive feel for what works. I can now walk into my mic locker, look at a vocalist, and reach for the right mic before they sing a note. That instinct comes from years of testing.
Pop Filters and Windscreens
suggest a correctionPop filters and windscreens are primarily used for vocal recording. A pop filter eliminates plosives (hard “p” and “b” sounds) and protects the diaphragm from excess moisture. A double-sided nylon pop filter is recommended: the double layer provides extra protection. A windscreen (foam cover) placed over the capsule provides additional protection. Pop filters and windscreens can also be useful on loud instruments—a windscreen on a kick drum mic or a brass mic provides a layer of physical protection for the diaphragm against high-SPL air blasts.
One thing to be aware of: both pop filters and windscreens can slightly attenuate high frequencies, particularly above 10 kHz. The effect is usually subtle, but on a bright source or with a transparent condenser, it can be noticeable. I once spent half a day chasing a high-end dullness on a vocal recording before I realized the foam windscreen was sitting right against the capsule. I pulled it off, used only the pop filter at the standard hand-spread distance, and the air came back instantly. Pop filters are not free—they cost you something on top, however small—so use them only when the source actually needs the protection.
For untreated home studios, a reflection filter—a curved acoustic panel that mounts behind or around the microphone (Kaotica Eyeball, sE Reflexion Filter Pro, Aston Halo)—absorbs early reflections from the room before they reach the back and sides of the mic. The result is a drier vocal recording. These are not just a budget patch for a missing treated room—I use one in my own treated studio when I want an extra-dry vocal or voiceover, deliberately killing reflections that even a good room adds. In an untreated apartment a reflection filter can be the difference between an unusable recording and a professional one; in a treated room it is a tool for control. Either way it is a deliberate choice, not a compromise.
For outdoor recording, location work, and any scenario with wind or moving air, a dead-cat (also called a “windjammer”)—a long-haired fur cover designed to break up turbulence before it reaches the diaphragm—is essential. Without one, even a light breeze produces low-frequency rumble that can ruin a take. Shotgun mics for film and broadcast work always travel with their own dead-cat covers; for indoor studio work, a foam windscreen is normally enough.
Microphone Placement
suggest a correctionOnce you have chosen a microphone, the next step is placement: where in the room, how far from the source, and at what angle. Every room sounds different. Simply moving a microphone around a room can make as much difference as the mic itself—particularly in rooms with reflection issues from glass, hard floors, or closely spaced parallel walls.
I once wasted an entire session because I had set up a vocal mic in the corner of an untreated room. Every loud syllable triggered a low-end ring at the room's primary mode—the singer's chest voice was being doubled by a 90 Hz boom that no EQ would ever clean up. We re-recorded the next day with the mic moved off-center, away from any wall and broken out of the floor-ceiling midpoint—same mic, same singer, same performance instructions—and the recording was usable. The mic did not change. The placement did. That session taught me a habit I have never broken: before plugging in, walk the source around the room while the performer plays, and listen with your ears for where it sounds best.
Follow lateral symmetry: place the microphone equidistant from the left and right side walls. This keeps the room's reflections arriving symmetrically at the mic, preserving stereo balance and preventing the recording from skewing to one side. But do not extend that symmetry in every direction. Avoid the dead geometric center of the room along its length—the even modes stack their antinodes there while the odd modes, the fundamental included, fall into nulls (Everest & Pohlmann, 2015), so bass response at center is uneven and unpredictable. Avoid placing the mic at exactly half the height between floor and ceiling for the same reason: the even vertical modes concentrate an antinode at the midpoint while the odd vertical modes, the fundamental included, fall into nulls there, and a mic right there will record an uneven, unpredictable low end. And avoid corners and positions directly against a wall—these put you in heavy reflection zones where standing waves and boundary effects color the sound. The sweet spot is almost always laterally symmetric (left-right balanced) but offset front-to-back and at a height that breaks the floor/ceiling midpoint. The room's acoustic problems—standing waves, modal ringing, flutter echoes—do not just affect what you hear through the monitors. They affect what the microphone captures. A mic placed at a standing wave node will record less bass at that frequency; placed at an antinode, it will record too much. These are phase interactions between the direct sound and the room's reflections, and they alter the frequency response of the recording itself. We cover the underlying acoustics in much greater depth in the next chapter.
This is why room treatment matters for recording, not just monitoring. Even basic treatment—absorption at the first reflection points and bass traps in the corners—dramatically improves what the mic captures. See Chapter 7 for a detailed discussion of room acoustics and treatment. Experiment with your room and find the spot that sounds best for each scenario—but know that the room is always part of the sound.
Distance from the Source
suggest a correctionThe first thing every assistant wants to do is move the mic closer. Tighter, more present, more “professional” sounding—that is the instinct, and it is wrong as often as it is right. Distance is a creative choice, not a default. Some of the best recordings I have ever helped capture happened with the mic farther from the source than felt comfortable: a Coles 4038 six feet from a horn section, an LDC ten feet from a drum kit. The space did the work.
The distance between the mic and the source is one of the most powerful variables in recording. Closer means more direct sound, more isolation, and (with cardioid mics) more bass from the proximity effect. Farther means more room sound, more ambience, and a more natural representation of the instrument's full tonal range. Engineers think about distance in four broad zones, each with a clear purpose.
Close micing—placement from about an inch to a foot from the source—is the most common technique in modern multitrack recording. It produces a tight, present sound with strong isolation between sources, which makes mixing easier and gives the engineer the most control over each element in the mix. Most close-mic'd sources also exhibit the proximity effect: a bass buildup that can be a feature on a vocal or guitar amp (Eargle, 2011) (giving them weight and intimacy) or a problem on a brass instrument that already has too much low end.
Distant micing—three feet or more from the source—lets the instrument's full range and tonal balance develop in the air before the mic captures it. The result is a live, open feeling that close micing simply cannot replicate. A great-sounding room paired with distant micing produces some of the most beautiful recordings ever captured. A bad-sounding room paired with distant micing produces some of the worst. The room is the second instrument; if it is not playing in tune, do not pull the mic back.
Accent micing is used for solo passages when recording an ensemble. The accent mic sits close enough to lift the soloist above the rest of the group, but not so close that the soloist sounds unnaturally present compared to the distant mics covering everyone else. The art is finding the distance that lets the accent mic blend into the ensemble's perspective rather than jumping out of it. Used well, the audience never realizes there is an accent mic at all. Modern multi-mic drum recording is really accent micing in disguise: the overheads (or room mics) capture the whole kit as the main perspective, and the close mics on snare, kick, and toms are accent mics that lift each drum out of that blend. Same principle as a soloist in an orchestra—a detailed spot mic layered over a fuller, more distant capture.
Ambient micing places the mic so far from the source that the room sound dominates the direct signal. Used for audience capture, the natural reverberation of a concert hall, or “room” mics in drum recording (parallel-compressed and blended with close mics for size and impact). Ambient micing turns the room itself into the instrument—John Bonham's drum sound on When the Levee Breaks came from an ambient pair compressed hard, while Steve Albini's drum recordings rely on room mics in large live rooms captured with little or no compression.
On-Axis vs. Off-Axis
suggest a correctionWhen the diaphragm directly faces the sound source, the mic is on-axis. When it faces the source at an angle, it is off-axis. On-axis placement produces a cleaner, brighter sound with the most accurate frequency response. Off-axis placement introduces coloration and reduced high-frequency definition—which can actually be useful for taming overly bright or sibilant sources. A common studio technique for guitar amplifiers is to blend an on-axis mic with an off-axis mic for tonal flexibility.
Mono and Stereo Concepts
suggest a correctionMono refers to a single-channel system in which all sound appears to originate from one position. A recording made with a single microphone is mono. When a mono signal plays through a stereo speaker system, it appears to come from the center.
Stereo (from the Greek for “solid sound”) refers to the ability to recreate a spatially accurate sound image using two or more independent channels (typically left and right). A stereo recording preserves the spatial relationships of sounds—their positions, widths, and depths.
Recording a mono source (like a single vocalist) in stereo is often unnecessary and can introduce phase issues. However, any time a source has distinct left and right components—a drum kit, piano, choir, orchestra, or conga array—recording in stereo captures a wider, more spatially accurate image.
Important: just because two or more mics are used does not mean the recording is stereo. Sometimes multiple mics blend tones in mono. True stereo micing involves two or more mics positioned at different angles or locations and panned left/right to capture spatial information.
Phase Issues with Multiple Microphones
suggest a correctionHere is something that confuses many students: phase differences between microphones are not always a problem. In fact, phase is what makes stereo recording work. When two mics capture the same source from different positions, the slight time-of-arrival differences between them are what our brains interpret as width and spatial position. The greater the phase difference, the wider the stereo image. This is by design—stereo micing techniques deliberately use phase to create the illusion of space.
The problems arise when phase differences are uncontrolled. When two mics intended for mono blending (like a top and bottom snare mic, or an on-axis and off-axis guitar amp mic) have phase offsets, certain frequencies cancel and others reinforce—a phenomenon called comb filtering. The result sounds thin, hollow, or flanged. Even in mono, though, slight phase offsets are not always bad—two mics on a guitar amp with a small time difference can produce a thick, complex tone that a single mic cannot. The key is intention: if you hear comb filtering and it sounds wrong, fix it. If you hear a phase interaction and it sounds cool, keep it.
Methods for managing phase include: flipping the polarity (phase invert) on the preamp, changing the polar pattern of one mic, adjusting mic positions, and monitoring in mono while moving mics until the sound is fullest. The three-to-one rule (discussed in the Spaced Pair section below) is the most fundamental guideline for minimizing unwanted phase interactions between multiple microphones.
I have heard student recordings where two snare mics were summed without anyone checking phase, and the snare disappeared completely—just hi-hat bleed and a thin click where the drum should have been. The performance was fine; the phase was destroying it. A polarity flip on one mic, and the snare came roaring back. Always mono-check, always listen for the fullest sound when you have two or more mics on a single source.
Stereo Micing Techniques
suggest a correctionWhen I started, I treated stereo techniques like recipes—XY for orchestras, ORTF for choirs, spaced pair for drums. Then I worked with a producer who switched mid-song from XY to spaced pair on a piano part because the verse needed focus and the chorus needed width. That session is when I understood that each technique has a personality, and you choose based on what the music wants—not on what the manual says is “correct” for the source.
The following are the most widely used stereo microphone techniques. Each offers a different balance of stereo width, phase coherence, and mono compatibility. It is important to use a matched pair of microphones (same make, model, and ideally matched serial numbers) when setting up any stereo configuration except M/S, where the Mid and Side mics can be different models on purpose.
Spaced Pair
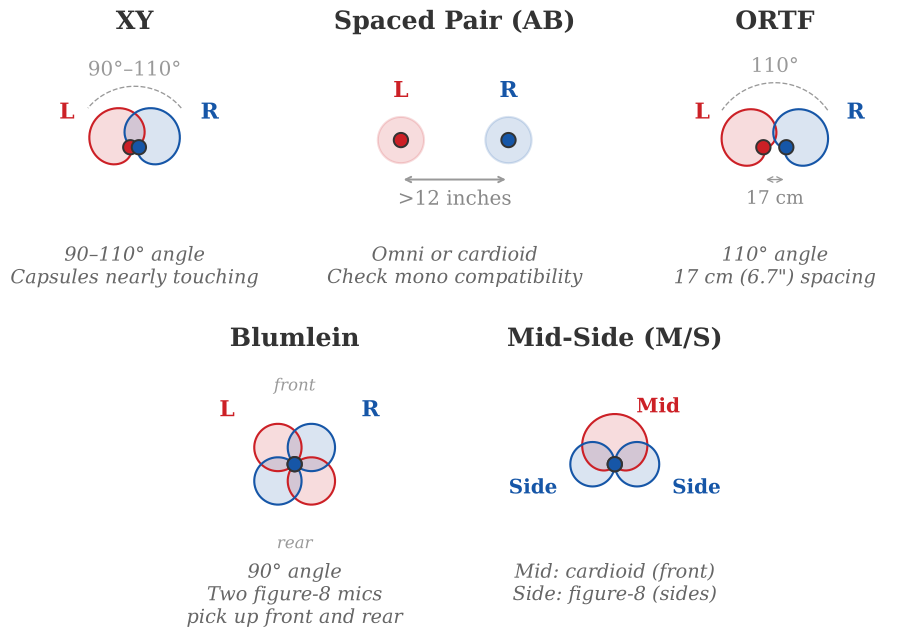
A spaced pair (also called AB) consists of two matched microphones positioned more than twelve inches apart, usually spaced evenly to the left and right of the source. With cardioids, both mics typically aim straight at the source; angling them slightly outward (10–30° away from the center) widens the image but introduces off-axis coloration. With omnidirectional mics, aiming matters far less—the capsules pick up equally in all directions, so spacing alone determines the stereo image. Either pattern can be used—omni is the classic choice for its natural low-frequency response and lack of proximity effect, while cardioid provides more isolation from room reflections and rear sources. (When mics are within twelve inches, the arrangement is called near-coincident; when the capsules touch or nearly touch, it is called coincident.) The spaced pair produces a wide, immersive stereo image, though it is generally less phase-coherent than coincident techniques.
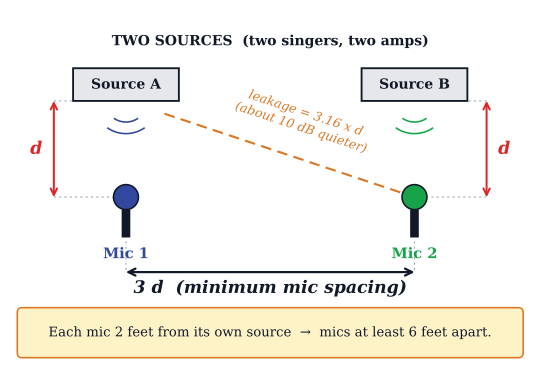
The spacing of a spaced pair is chosen for image width and character, not by formula—widen the mics until the image is as big as the music wants while it still collapses cleanly to mono. Do not confuse this with the three-to-one rule, which guards against comb filtering whenever two mics pick up the same sound—separate instruments bleeding into each other, or two mics on one source—not the width of a single stereo pair, where that spacing is the effect you want. The rule applies when several instruments are each close-mic'd in the same room: keep every mic at least three times farther from the other sources than from its own, so the bleed path is roughly 10 dB down and comb filtering stays inaudible (Owsinski, 2017) (a mic one foot from its source stays at least three feet from the next source). Reach for it on a drum kit or a live band tracking together—not to set the width of a spaced pair.
Panning refers to positioning a sound within the stereo field. With a spaced pair, the left mic is panned hard left and the right mic hard right. Moving the mics farther from the source and farther apart yields a wider image with more room sound. Moving them closer together and closer to the source yields a tighter image—but be mindful that bringing the mics closer together while keeping them close to the source can create phase issues. Always check in mono when adjusting spacing.
If a spaced pair will not collapse cleanly to mono because the mics sit too close together for the source, that is a signal to switch techniques. The next two configurations—XY and Blumlein—put the capsules at the same point in space, eliminating the time-of-arrival differences that cause comb filtering altogether. When the spaced pair will not behave, go coincident.
XY (Coincident Pair)
The XY technique uses two coincident cardioid microphones with their capsules positioned as close together as possible, angled at approximately 90–110 degrees apart. Because the capsules are coincident, XY produces the most phase-coherent stereo image with the least risk of comb filtering. The stereo width is narrower than a spaced pair, but mono compatibility is excellent. XY is recommended for sources that demand a clean, natural sound (orchestras, choirs, jazz) and for recordings that may be collapsed to mono (broadcast, podcast). The stereo image here comes entirely from level differences, not timing. Because the two cardioids are angled apart, a sound from the left hits the left-facing capsule on-axis (loud) and the right-facing capsule off-axis (rejected, quiet); a sound from the right does the reverse. The capsules share one point in space, so there is no time-of-arrival difference—the off-axis rejection of the two cardioids is the entire mechanism, which is exactly why XY stays phase-coherent and mono-compatible.
Blumlein Pair
The Blumlein pair (also called Stereosonic) is essentially XY's figure-8 cousin: the same coincident, 90-degree crossed configuration, but with bidirectional mics in place of cardioids. Because figure-8s pick up the rear as strongly as the front, the pair captures the back of the room as well as the front—which is why it captures significantly more room sound than XY, making it especially effective in great-sounding acoustic spaces—concert halls, churches, live rooms. It produces a remarkably natural, three-dimensional image but is less suitable when isolation is needed, since figure-8 mics pick up equally from front and back.
ORTF (Near-Coincident Pair)
The ORTF technique (named after the French national broadcasting organization that developed it) uses two cardioid microphones spaced 17 cm (about 6.7 inches) apart with an angle of 110 degrees between capsules. ORTF provides an excellent balance between the width of a spaced pair and the phase coherence of XY. It is widely used in classical, film scoring, and broadcast recording, and collapses to mono with minimal phase problems. ORTF is often considered the most “natural” sounding stereo technique because the mic spacing approximates the distance between human ears.
Mid/Side (M/S)
The M/S (Mid/Side) technique uses a coincident pair stacked directly on top of one another. A cardioid microphone (the “Mid”) faces the source, capturing the center image. A bidirectional microphone (the “Side”) faces sideways, capturing spatial information.
The two signals are decoded into standard left/right stereo using the M/S matrix: the Side signal is duplicated, one copy is phase-inverted, and the two copies are panned left and right. The Mid is centered. Modern DAWs and plugins automate this decoding. The great advantage of M/S is that stereo width can be adjusted after recording simply by raising or lowering the Side mic's level—the only technique where you can change the stereo spread in the mix. The Mid and Side mics can be different models, allowing you to blend different tonal characters.
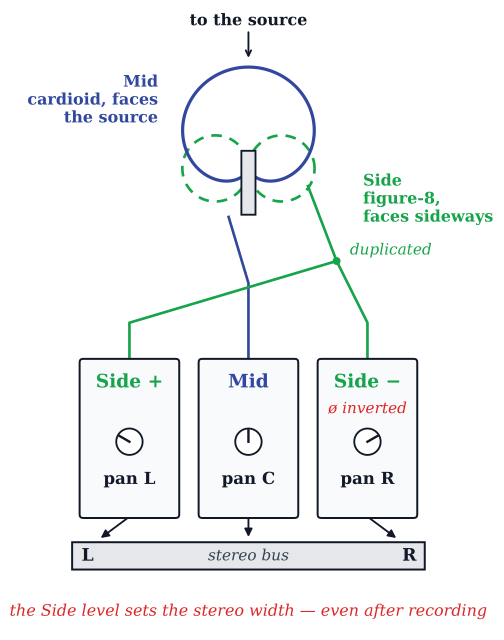
Be honest about the hassle, though: M/S leaves you managing a Mid track plus a Side track that has to be duplicated and polarity-flipped to decode, which is fiddly to rig by hand on every session. The practical fix is a dedicated M/S decoder plugin that performs the matrix for you and lets you keep the raw Mid and Side on a single track—the Waves MS Matrix is the one to reach for; Voxengo MSED (free) and the built-in M/S modes in many plugins (Brainworx, FabFilter) do the same job. Set the decoder up once and M/S becomes as easy to handle as any other pair; without it, the technique is powerful but genuinely annoying to live with.
Decca Tree
The Decca Tree is a classic orchestral recording technique developed by Decca Records in the 1950s. It uses three omnidirectional microphones arranged in a triangle: a center mic placed slightly forward, with the left and right mics about two meters apart—roughly one meter to either side of the center. The center mic maintains a solid mono image while the side mics provide width. It is primarily used for orchestral, film score, and large ensemble recording.
Boundary Mics, Baffled Pairs, Binaural, and Ambisonics
Not every stereo (or spatial) capture fits the patterns above. Four techniques belong in every engineer's toolkit even if they come up less often—and when a session calls for one of them, nothing else will do.
Boundary microphones (also marketed as PZM—Pressure Zone Microphone, a Crown trademark) solve a specific acoustic problem. Place any conventional microphone in a room and a reflected copy of every sound arrives at the capsule a fraction of a millisecond after the direct sound. That tiny delay causes comb filtering—peaks and dips smeared across the frequency response from the boundary nearest to the mic. A boundary mic eliminates the problem at one surface by mounting the capsule flush against a large rigid plate. Direct sound and surface reflection now arrive simultaneously at the diaphragm, constructively reinforcing each other rather than interfering. The result is approximately 6 dB of pressure-zone gain over the broadest portion of the frequency band, and the comb-filtering artifact from that boundary disappears entirely. The hemisphere that opens above the plate is the working half-space: everything above the surface is captured with even sensitivity, and the pattern collapses to omnidirectional within that hemisphere.
Boundary mic uses — Inside a kick drum (taped to the inside of the shell rather than suspended in front of the beater), the boundary mic eliminates the coloration from the head reflection while capturing the drum's full resonant volume. Taped to the underside of a closed grand piano lid, a boundary mic captures the soundboard's full radiation with minimal boominess. Conference and boardroom installations rely on boundary mics laid flat on table surfaces for transparent speech capture. Theater productions mount them along the stage lip (apron), invisible to the audience, covering the entire downstage area in mono or spaced pairs. In every case the logic is the same: use the surface rather than fight it.
Baffled pairs: Jecklin disc and dummy head. The previous stereo techniques rely on level differences (XY, Blumlein) or timing differences (spaced pair, ORTF) to create a stereo image. Neither mechanism encodes the spectral cues—the subtle frequency shadows that the outer ear and head cast on arriving sounds—that the human auditory system uses for true localization (Chapter 2). Baffled pairs simulate those cues in two distinct ways.
The Jecklin disc (developed by Swiss Radio engineer Jürg Jecklin in the early 1980s) in its original design mounts two omnidirectional microphones approximately 16.5 cm apart—human interaural spacing—on either side of a rigid, acoustically absorptive disc roughly 30 cm in diameter. The disc stands in for the acoustic shadow a human head casts between the two ears. Sound arriving from the left reaches the left capsule directly but arrives at the right capsule attenuated and slightly delayed by diffraction around the baffle—the same interaural level difference and time-of-arrival difference the auditory system uses to locate a real sound source. The result is a naturally wide, enveloping stereo image that reproduces convincingly on loudspeakers and is easy to decode. The disc is omni-based, so it captures the full low-frequency extension and absence of proximity effect that pressure transducers provide (see the pressure-mic discussion earlier in this chapter), with the spatial encoding layered on top.
Dummy-head binaural recording takes the principle further: a life-size replica of a human head and torso houses two miniature omnidirectional microphones—one at each ear canal entrance. The head's outer ears (pinnae) impose the full HRTF (Head-Related Transfer Function) on the arriving sound—the same frequency-dependent directional filters the auditory system evolved to use. A recording made this way, played back on headphones, produces stunning three-dimensional localization including front/back disambiguation and height information that no loudspeaker-based stereo technique can replicate. The critical constraint: the payoff is headphones only. Played back on loudspeakers, the HRTF from a foreign head's pinnae conflicts with the listener's own head, and the spatial illusion collapses. This is the same perceptual decoding challenge that Dolby Atmos's binaural renderer must solve—it applies a personalized HRTF to spatial audio objects to translate a speaker-based mix into convincing headphone depth (Chapter 18).
Ambisonics: capturing the whole sphere. Every technique above captures the sound field from a chosen perspective—a pair of directions, a baffle, a head. Ambisonics captures all of it: the complete sphere of sound around a single point, stored in a format you do not have to commit to until later. The capture tool is a tetrahedral array—four small matched capsules packed into one microphone body, each aimed at a different face of a tetrahedron. The raw four-channel recording straight off the capsules is called A-format; a manufacturer-supplied plugin converts it to B-format, the working currency of ambisonics: W (an omnidirectional sum—the overall pressure at the point), plus X, Y, and Z (three virtual figure-8s aimed front–back, left–right, and up–down). Together those four channels describe the full three-dimensional sound field at the mic position.
The decode side is where it pays off. From one B-format recording you can render a stereo pair, a virtual ORTF you re-aim after the session, a 5.1 or 7.1 surround bed, a Dolby Atmos bed (Chapter 18), or headphone binaural—and you can rotate the entire captured field in post, so if the action turned out to be behind the mic, you turn the room instead of re-recording it. Three arrays cover the working price range: the Sennheiser AMBEO VR Mic (with the free dearVR AMBI MICRO A-to-B plugin), the RØDE NT-SF1 (four matched capsules plus the SoundField by RØDE plugin—the first array to come in under $1,000), and the Zoom H3-VR, which builds the array into a handheld recorder for a few hundred dollars, converts to B-format onboard, and monitors in binaural in real time. Reach for ambisonics when the deliverable is spatial—VR and 360° video, game-audio ambiences, location beds for post-production (Chapter 20), or a concert-hall ambience you want to fold into an immersive mix later. Its honest limits: a first-order array localizes more softly than a dedicated multi-mic rig, and it captures a scene from one point—it is an ambience and perspective tool, not a substitute for close mics.
Choosing among these alternatives. The standard pairs in this chapter—XY, ORTF, spaced AB, Blumlein, M/S—are the right starting point for the vast majority of stereo recording because they reproduce well on both loudspeakers and headphones and integrate cleanly into multitrack sessions. Reach for a boundary mic when a surface is unavoidable or an asset—inside a resonant cavity, on a flat stage floor, under a piano lid. Reach for a Jecklin disc when you are recording a classical ensemble, jazz group, or acoustic field recording and you want a wide, natural loudspeaker image without the rear-lobe complications of Blumlein. Reach for dummy-head binaural when the final delivery is specifically headphone-based—immersive podcast, headphone album, game audio, or as a reference track alongside a conventional mix for the binaural fold-down described in Chapter 18. And reach for an ambisonic array when the deliverable is a spatial scene you may need to re-aim or re-format later—VR, games, or an ambience bed for an Atmos mix.
Instrument-Specific Microphone Techniques
suggest a correctionEvery instrument presents a unique challenge. Becoming expert at micing any given instrument takes practice and experimentation. Here is a guide to common mic selections and placements—but remember, these are starting points, not rules. The best engineers break every guideline in this section when the music calls for it.
Acoustic Guitar
Recommended mics: Neumann KM 184 (SDC), Neumann U 87 (LDC), or similar quality condensers.
The acoustic guitar resonates from all sides. Avoid pointing the mic directly at the sound hole—this produces a boomy, muddy sound dominated by the body's resonant frequency. The rookie move is to point the mic at the sound hole because that is “where the sound comes out”—and every booming, muddy, undefined acoustic guitar recording I ever helped fix as an assistant had been mic'd at the sound hole by someone who thought the same thing. The 12th fret is where the sound balances.
For a one-mic recording, aim a good condenser at the 12th fret, about 6–12 inches back—that single position gives you a balanced, professional acoustic sound. For a fuller two-mic capture, add a second mic down near where the strings meet the bridge (it picks up more body and low end), keeping the two mics at least three times as far from each other as each is from the guitar (the three-to-one rule) to avoid phase problems. The 12th-fret mic captures the bright detail of the strings; the bridge mic captures the body and low-end warmth—blend the two to taste. For a bigger, more ambient sound, add a mic near the performer's right ear angled down at the guitar. Acoustic guitar also records beautifully in stereo with XY or ORTF—just keep the pair backed off and angled across the guitar rather than aimed straight into the sound hole, or the boom takes over.
Electric Guitar Amplifier
Recommended mics: Shure SM57, Sennheiser MD 421, Neumann U 67, Royer R-121.
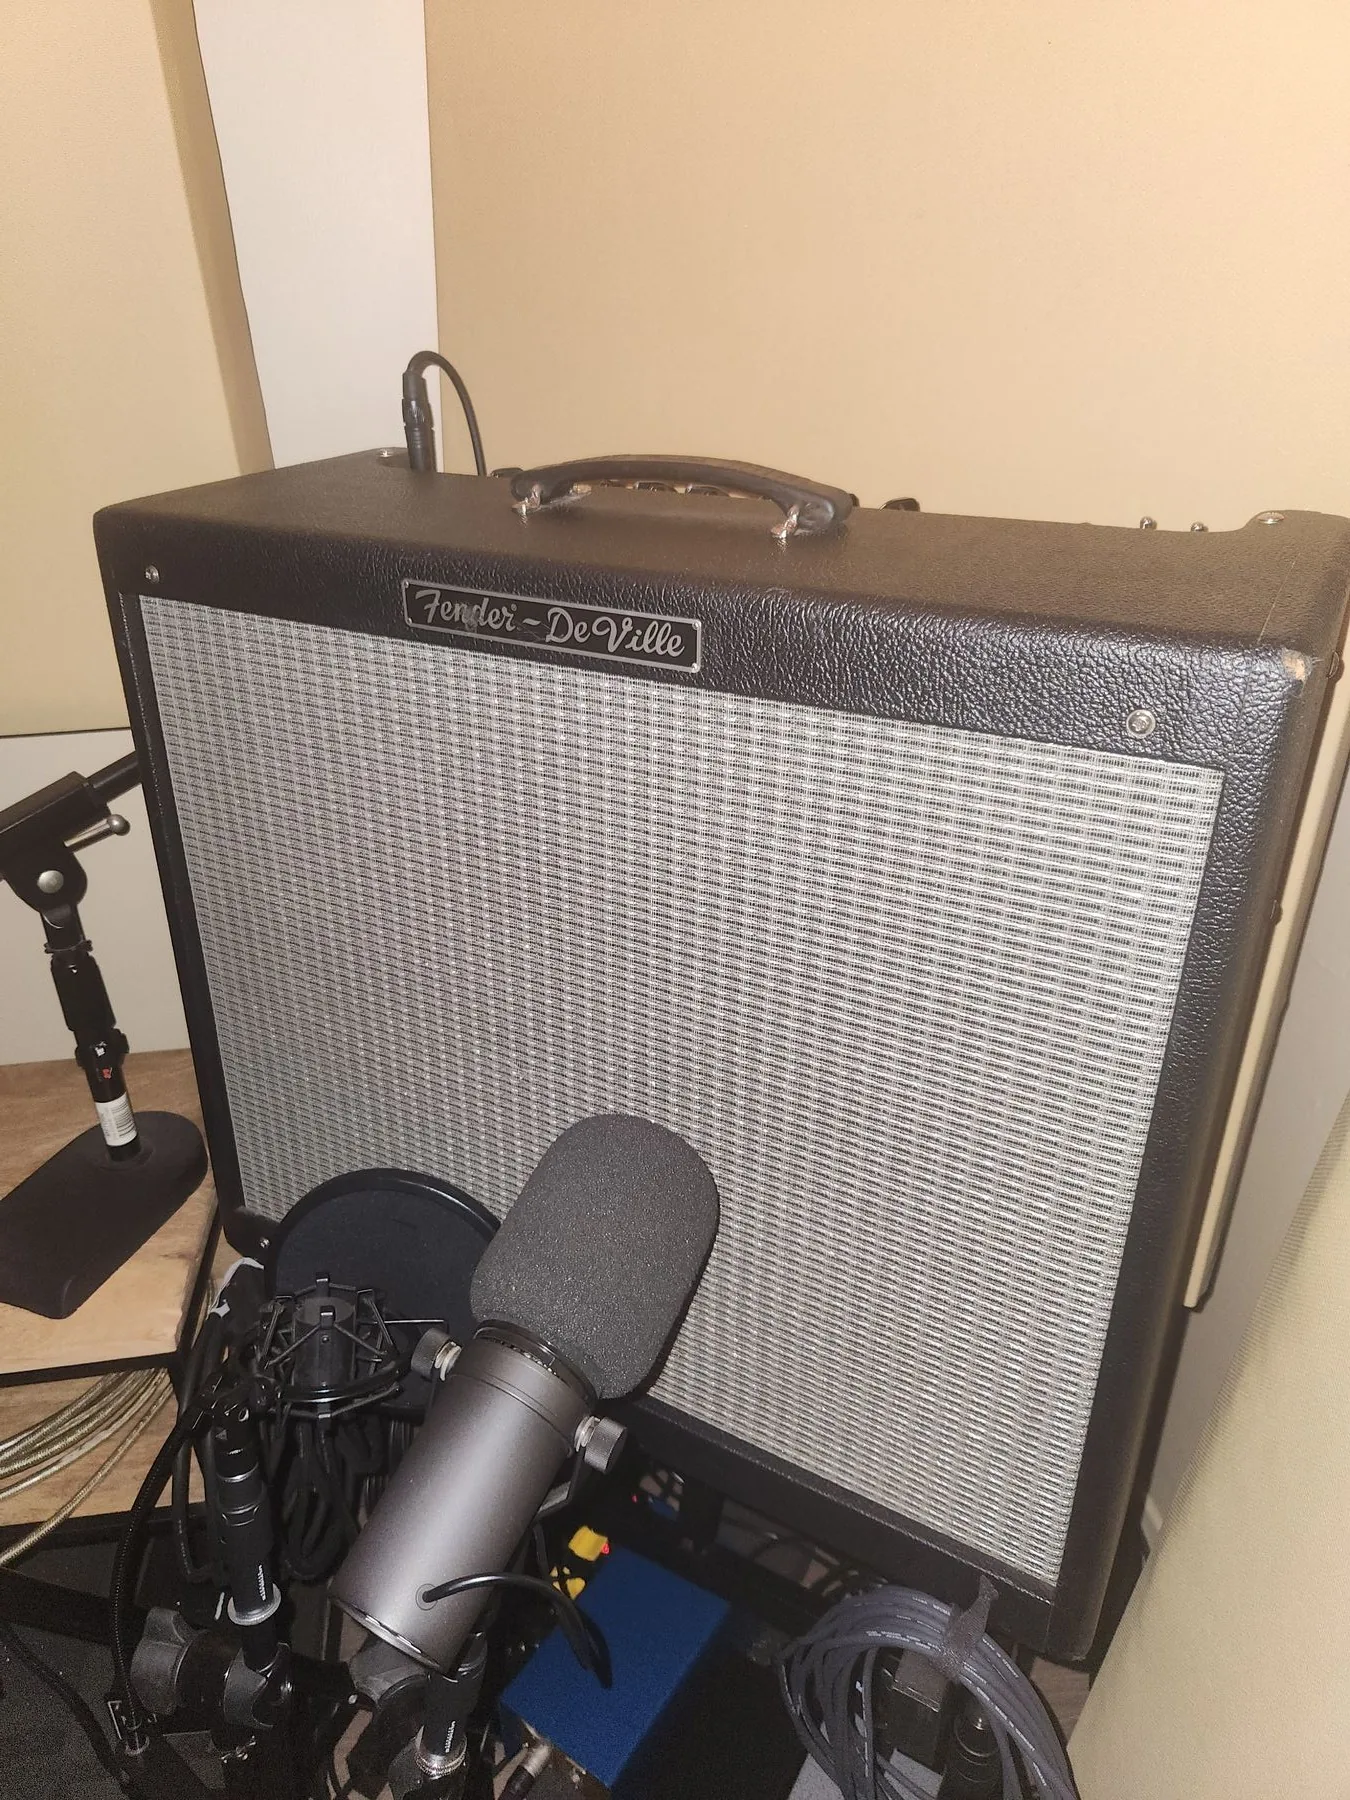
Much of the sound of an electric guitar is determined by the amplifier and speakers. Many amps have multiple speakers; focus on one.
Where you put the amp in the room matters as much as where you put the mic on the amp. Stick a 4×12 cabinet in a corner and the bass will explode out of the recording from boundary loading—two reflective walls behind the cab reinforce the low end into a boomy mess. Pull the cab three feet off the wall and the low end tightens immediately. The room is part of the sound for amp placement, for mic placement, and for everything else—which is why the placement section earlier in this chapter is not just for microphones.
On-axis placement (pointing the mic straight at the center of the cone) produces a cleaner, brighter, more present sound. Off-axis placement produces a darker, smoother sound.
Distance to the cone is the other major variable. With a cardioid mic an inch or two from the speaker grille, the proximity effect adds significant low-end thickness—often a feature for rock and metal tones, where that fatness is exactly what gives the amp its weight and authority. Pull the mic back two or three inches and the proximity-effect bass drops off, the low end tightens, and the tone gets more articulate. If a close-mic'd amp sounds boomy or muddy in the mix, the proximity effect is usually the cause—back the mic off, or engage the high-pass filter on the preamp.
A classic approach: SM57 on-axis close to the cone, an MD 421 equidistant but off-axis, and a condenser 3–4 feet back in omni mode for room sound. Blend to taste.
Reamping is a modern technique where the guitar is recorded dry through a DI during tracking, then the DI signal is sent back through an amplifier and re-recorded with microphones later. It lets you experiment with amp tones and mic positions without the guitarist present—but the bigger win is that you are never stuck. Commit to an amp sound while tracking and you are married to it; if that tone turns out wrong for the mix, there is no undo. Record the clean DI and the decision stays open: you can dial in exactly the right amplifier, gain, and mic placement later, when you can finally hear it in the context of the full production. Reamping separates the performance from the tone and gives you control over both independently—which is why it has become standard practice.
Virtual amplifier modeling (Neural DSP, Kemper Profiler, Line 6 Helix, Fractal Axe-FX) is increasingly common. Many engineers record through a DI and apply modeling in the DAW, preserving the option to reamp through real hardware later.
The reamping procedure itself is four steps. (1) Route the dry DI track to a spare interface output. (2) Run that output into a reamp box—which converts the balanced, line-level, low-impedance signal back into the unbalanced, instrument-level, high-impedance signal an amp input expects (Chapter 9 covers the boxes themselves)—and from the reamp box into the amplifier. (3) Mic the amp exactly as you would for a live guitarist, and record the mic to a new track while the DI plays. (4) Set the send level so the amp sees roughly what a guitar would deliver: start low, raise it until the amp's gain structure behaves familiarly, and let your ears—not the meters—decide. From there, every variable is yours to audition at mix time: amp, gain, cabinet, mic, placement, even the room. Print a few distinct options rather than endless variations; reamping's gift is the open decision, and its trap is never deciding.
Bass Guitar
Recommended: DI box, Neumann U 47 FET, Shure Beta 52A.
DI (Direct Injection) converts the high-impedance signal from a bass into a low-impedance, mic-level signal for the preamp. Bass often sounds cleaner, fuller, and more controlled through a DI than through a mic'd amp. But micing the amp adds grunge and character. The standard approach: record both a DI signal and a mic'd amp simultaneously, then blend in the mix. The Neumann U 47 FET is a legendary bass mic—its massive low-end response and ability to handle extreme SPLs make it the first choice in many professional studios for capturing the fullness of a bass cabinet.
On almost every bass recording I have done, the DI track is the one I trusted in the mix. The mic'd amp added flavor and edge, but the DI gave me the punch and the definition the song needed. Always record both—never make the choice for your future mix self before you know what the production actually needs.
Drums
“If you know the pattern of the microphone, what the microphone that you're using is actually seeing, and then you figure out the distance, you apply the angle of the capsule to the distance away it is, then you'll know what it's going to cover.”
—Glyn Johns (engineered Led Zeppelin, The Who, The Rolling Stones, The Eagles)
Drums are the hardest instrument to mic well, and they are also the source where the most decisions stack up: number of mics, polar patterns, distances, angles, phase relationships, room interactions. More mics give more control but more phase problems. Early Beatles recordings used only one or two mics on the entire kit; today, 8–16 mics on a single kit is common, with each one introducing another phase relationship to manage.
But before any mic goes near the kit, the drums must be in tune. A detuned head, a rattling rim, a squeaky pedal, a sympathetically vibrating snare wire—none of that is fixable in the mix, and all of it will dominate every microphone in the room. Spend time with the drum tech (or the drummer) before you hit record. Tighten lugs, check the bearing edges, dampen the tom resonant heads if the drummer wants the toms tight, replace dead heads. Once the kit sounds good acoustically—in the room, with no mics—you have something worth capturing. Skip this step and the most expensive mic locker in the world will not save the recording.
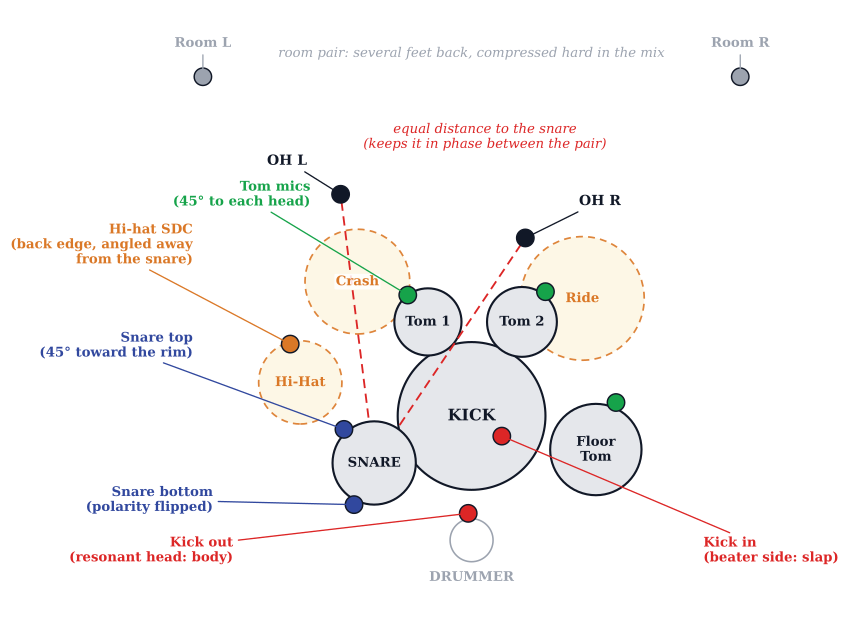
The kick drum. Every modern record begins here. For the classic rock “slap” sound, place a Shure Beta 52A, AKG D112, or Neumann U 47 FET inside the drum aimed at the beater head—the slap is the contact transient of the beater striking the head, and the mic needs to be close to capture it cleanly. For a rounder, fuller, jazz-leaning tone, place the same mic just outside the resonant head and let the air around the shell shape the signal. A sub kick mic—traditionally a low-frequency speaker driver wired in reverse to act as a microphone, capturing sub-frequencies below what a standard kick mic can reproduce—adds the chest-thump low-end “feel” that defines modern records. Modern dedicated subkick alternatives (the Solomon LoFReQ, or the now-discontinued Yamaha SKRM-100 that popularized the format) are easier to use than DIY speaker rigs and produce similar results. The Neumann U 47 FET outside the kick is another classic, capturing massive low end with the natural air of the room. When using two or more mics on the kick, always check phase between them—invert the polarity on one if the combined signal sounds thin, and listen for the “fattest” position before committing to the take.
The snare. Shure SM57, placed at roughly 45 degrees to the top head, has been the standard for over fifty years. Move it even an inch in any direction and the sound changes dramatically: closer to the rim brings out crack and stick attack, closer to the center brings out the body of the drum, farther back picks up more cymbal bleed. A second mic on the bottom head captures the snare wires' rattle and signature “crack”—always invert the phase on the bottom mic, since the bottom head moves opposite to the top, and combining them without the polarity flip will partially cancel rather than reinforce. Some engineers add a third condenser at the side of the shell to pick up the drum's resonance from a different angle for extra crispness in the mix.
The hi-hat. A Neumann KM 184 or similar SDC, placed close (a few inches) and nearly perpendicular to the back edge of the top hat (angled away from the snare side), captures the cymbal's shimmer without picking up too much snare bleed. Many engineers skip the dedicated hi-hat mic entirely—there is plenty of hi-hat in the overheads and snare mics already, and a separate hi-hat mic just adds another phase relationship to manage and another place for bleed to misbehave. A good rule: only add the hi-hat mic if you genuinely need the extra control in the mix, not by default.
The toms. Sennheiser MD 421s on each tom, top mic at roughly 45 degrees to the head, capture the attack and stick definition. An optional bottom mic with inverted phase captures the resonant head's deeper tonal information—the body, sustain, and pitch of the drum. Combining both gives toms a fullness and dimensional weight that no single mic position can deliver. On a touring kit with 4–6 toms, the bottom-mic technique can multiply your input count quickly, so save it for studio sessions where you have the channels to spare.
Overheads. A matched pair of SDCs (Neumann KM 184s) or LDCs (U 87s) above the kit captures the cymbals and a stereo image of the entire drum sound. Use a spaced pair (with the three-to-one rule observed against the snare distance), XY, or ORTF—but in any configuration, place both mics equidistant from the snare. The snare is the most common source of phase problems between overheads and close mics, and equal distance is the simplest fix. Ribbon mics like the Royer R-121 used as a matched overhead pair produce exceptionally smooth, natural sound—their gentle high-frequency rolloff tames harsh cymbals without any EQ. On bright kits with crash-heavy playing, ribbon overheads alone can be the difference between a recording that fatigues the listener and one that breathes. Just weigh the trade-off: ribbons are bidirectional, so ribbon overheads pick up the room behind and above them as much as the kit below. In a great-sounding room that extra ambience is a gift; in a poor one it is a liability, and you may be better off with cardioid condensers plus a little EQ to tame the cymbals.
Room mics. One or two condensers or ribbons placed several feet from the kit capture the room's natural ambience and the whole-kit sound from an audience perspective. Compress room mics aggressively (parallel or “New York” compression) and blend with the close mics in the mix—room mics add the size, energy, and depth that make modern rock, pop, and hip-hop drum recordings feel huge. John Bonham's “When the Levee Breaks” is the legendary example—largely the room mics, compressed hard and printed to tape at the source rather than summed in parallel underneath the dry kit. Steve Albini reached the same scale the opposite way: a large live room captured with little or no compression. The close mics give you definition; the room mics give you scale.
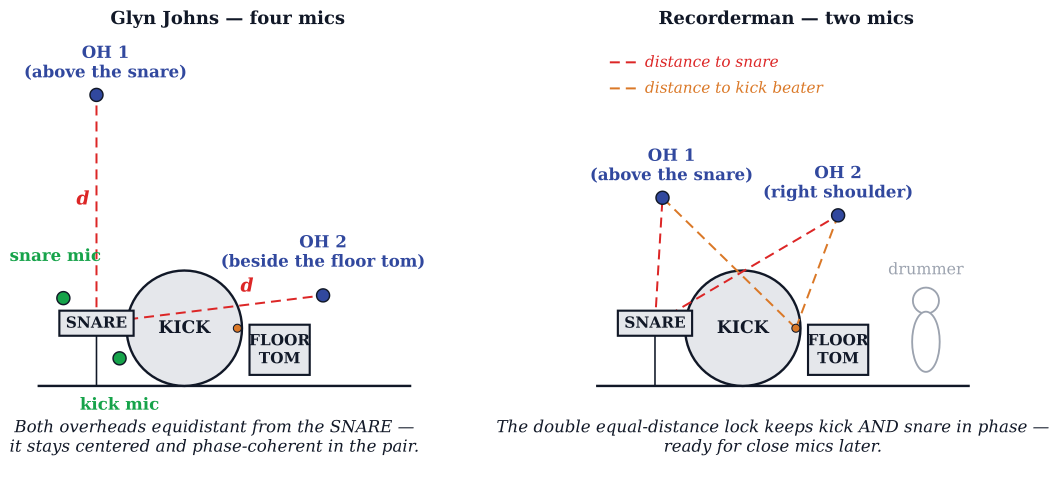
Two minimalist alternatives worth knowing. Before reaching for a 12-mic setup, every engineer should be familiar with two of the most influential drum-recording approaches in history.
The Glyn Johns technique uses just four mics: kick, snare, plus two overheads positioned so that each overhead is exactly the same distance from the snare drum (typically measured with a length of mic cable from the snare to each capsule). One overhead sits directly above the snare; the other sits to the right of the floor tom, pointing in across the kit. The equal-distance trick keeps the snare phase-coherent in both overheads, and the entire kit sounds remarkably balanced from just those four mics. Led Zeppelin I's drum sounds were largely captured this way. The technique is also a great teaching tool: if Glyn Johns can get John Bonham on tape with four mics, the modern impulse to throw 16 inputs at a kit deserves real scrutiny.
The Recorderman technique is even more minimalist—two overheads, designed to stay in phase with kick and snare close mics if you add them. One mic sits directly above the snare; the other sits over the drummer's right shoulder. Both sit two drumstick-lengths from the snare's center, then equidistant from the kick beater, locking the kit into phase via the equal-distance constraint. It is a great option for home studios with limited inputs, and many indie and lo-fi records use this approach. Recorderman teaches the same lesson Glyn Johns does: a great drummer in a decent room with two well-placed mics will outperform a mediocre drummer in a great room with sixteen.
Violin, Cello, and Other Strings
Recommended: High-quality LDC (Telefunken ELA M 251, AKG C 414), SDC (Neumann KM 184), or ribbon (Coles 4038, AEA R84, Royer R-121).
I once tried to mic a violinist with a brand-new C414 set to cardioid, on-axis, six inches from the bridge—convinced that “best mic, closest position” would give me the best recording. It sounded like a scratching cat. We swapped to a Coles 4038 ribbon, pulled it back two feet, and the violin sounded like it had walked into the room. Some sources punish proximity. Strings are one of them.
Strings are among the most dynamically expressive instruments, and the mic must be able to capture that range without adding coloration. Ribbon microphones are a classic choice for orchestral strings—the Coles 4038 has been the BBC's go-to string mic for decades. The ribbon's natural high-frequency rolloff smooths the harshness that aggressive bowing can produce through a bright condenser, and its low harmonic distortion preserves the subtle bow-noise textures that make strings feel alive in the room. For a grittier, more detailed sound, place one mic on-axis 8–10 inches from the bridge. For a smoother, more blended tone, pull the mic back 3–4 feet. For solo violin or cello, a single high-quality condenser or ribbon captures the instrument beautifully. For a string section, use a stereo pair (ORTF or spaced pair) placed high enough to capture the full ensemble with even coverage.
Brass and Woodwinds
Recommended: Neumann U 87, Sennheiser MD 421, Royer R-121, Shure Beta series.
Brass and woodwinds can produce extremely high SPLs, so choose mics that can handle the pressure without distorting. For saxophone, micing the side of the instrument captures key clicks and mechanical character; micing the bell about one foot away focuses on tone. Never place a mic directly inside the bell—too much wind noise. Clarinets, oboes, and flutes follow the same principle. Ribbon mics like the Royer R-121 are particularly well-suited for brass—their natural high-frequency rolloff smooths out the harshness that can make horns sound piercing through a condenser.
Piano
Recommended: KM 184s (SDC pair), U 47s (LDC pair), Royer R-121s (ribbon pair), or DI for digital keyboards.
The piano is one of the most complex instruments to record because sound radiates from the entire body—strings, soundboard, hammers, and lid reflections all contribute. Experiment with stereo techniques (XY, ORTF, spaced pair) at different positions: inside the case near the hammers (clearer, more detail, more hammer noise), near the pianist, or outside the back (more resonance, less attack). A spaced pair with one mic over the upper-mid hammers and another at the far end of the bass strings captures the full range. Ribbon microphones (Royer R-121, AEA R84) on piano are popular for jazz, rock, and ballad work—their warm, slightly rolled-off character tames the percussive hammer attack that can sound aggressive through a bright condenser, and the figure-8 pattern naturally blends in some of the room. For a more intimate, singer-songwriter sound, a single LDC over the open lid can work beautifully.
No acoustic piano? Use a virtual one. Most bedroom and project-studio productions never mic a real piano at all—a sampled or modeled instrument (Pro Tools' built-in Mini Grand, Native Instruments Noire, or Modartt Pianoteq) played from a MIDI keyboard delivers a tuned, pristine, mix-ready piano with none of the room, tuning, or mic-placement problems this section describes. Chapter 13 covers virtual instruments in depth. Reach for the micing techniques below when you have a real instrument worth capturing; otherwise a good piano library is the faster path to a usable sound.
Early in my career I tracked an entire session around an old upright piano—good mics, careful placement, takes we were happy with in the room. It was only later, trying to fit the piano against everything else, that the truth came out: the instrument had never been tuned properly, and no microphone choice or EQ move was going to make it sit with the rest of the record. We had to redo the whole thing. The lesson stuck—before you place a single microphone on a piano, confirm the piano is in tune. That is not something you can fix in the mix.
Grand vs. upright: the instrument is the first decision. A grand piano and an upright piano are not the same recording challenge wearing different clothes. On a grand, the strings run horizontally over the soundboard, and the primary radiation leaves upward through the open lid, which acts as a reflector and natural baffle. You can work inside the case, outside it with the lid propped, or with the lid closed and a boundary mic underneath. On an upright, the strings run vertically, the soundboard faces the wall, and almost all of the useful projection comes out the front—toward the player, not toward any easily accessible interior. Micing an upright from the front captures the mechanical noise of the hammers heavily; micing it from behind (moving the piano away from the wall and placing mics at the soundboard) captures more body and resonance with far less hammer clank. Neither piano is inherently easier to record well, but they demand completely different approaches.
Classic Placement Geometries
Spaced pair over the soundboard (grand piano). Open the lid to its highest prop. Place a matched pair of SDCs or LDCs—KM 184s, U 87s, or similar—inside the case, spaced over the length of the strings: one capsule roughly over the upper registers (treble strings, near the hammers) and the other over the lower registers (bass strings, toward the tail). A common starting point is capsules 8–12 inches above the strings, with the pair spread to cover the full string length (roughly 36–48 inches apart on a concert grand, less on a baby grand or studio upright). Pan the treble mic right and the bass mic left to match the pianist's perspective—or reverse for the audience perspective. The spaced pair gives you the widest, most natural image of the full instrument, but it is the most phase-sensitive configuration: check mono compatibility before committing to takes.
XY at the hammer line. Drop a coincident XY pair (two cardioids at 90–110 degrees, capsules touching) 6–10 inches above the hammers and angled slightly toward the strings rather than straight down. This position captures maximum attack detail—every hammer strike is immediate and present—and delivers excellent phase coherence and mono compatibility. The trade-off is character: XY at the hammers is the most percussive, most “close-up” piano sound, and in a mix it can feel right in the listener's face. Use it when you want the piano to cut, not sit back. Jazz comping and pop piano-driven tracks can thrive here; ballads and classical performances often want more distance and room.
The lid position: outside and over the open lid. Pull both mics outside the piano body, positioning the pair 12–18 inches above the open lid, angled down into the case. The lid itself acts as a first reflection surface, softening the attack and blending the registers more than the interior positions do. This is often the most “produced” piano sound—a little more distance and air—and it handles bright or over-present instruments particularly well. It also allows the room to contribute naturally, because the mics are out in the space rather than buried inside the case.
Close mic plus room mic. Record a close pair (spaced pair inside the case, or XY at the hammers) and simultaneously place one or two additional mics 6–10 feet from the piano to capture the room. Print both to separate tracks and blend in the mix. The close mics give you control, attack, and detail; the room mics give you size, air, and natural decay. This combination is the most flexible approach for any piano in a tracking session—you can push the close mics forward for a tight pop sound or ride up the room mics for a live, concert-hall feel. Always check the phase relationship between the close and room mics: the room mics receive the same sound later in time, which can cause comb filtering if the two signals are blended without attention. A simple alignment fix is to time-align the room mic track by nudging it earlier in the DAW until the combined signal sounds the fullest—or simply do a polarity check and listen.
Mono vs. Stereo by Genre
The choice between mono and stereo on piano is a production decision as much as a technique decision.
Classical and jazz. Stereo is almost always correct. A solo piano recital or a jazz trio wants spatial width and the sense of the instrument's physical size—the low strings to the left, the high strings to the right—and a spaced pair or ORTF over the soundboard delivers that naturalistically. Classical recordings often prioritize the room alongside the instrument, so a Decca Tree or a spaced pair with some distance gives you both.
Pop and rock. Mono is more common than most students expect. A piano that competes with guitar, bass, and drums in a dense mix often works better as a mono element—centered or slightly panned—because a wide stereo piano occupies enormous left-right space and can crowd out every other element in the arrangement. Record in stereo to keep options open, then decide at mix time whether to collapse to mono or use just one side of the pair. A mono center piano with a little room reverb added in the mix can lock into a dense production far more cleanly than a wide stereo spread.
Singer-songwriter and ballad. A single well-placed LDC—over the open lid, or at the hammers backed off to 12–18 inches—can be exactly right. The instrument does not need width to communicate; it needs intimacy and texture. A boundary mic taped to the underside of the closed lid (see the Boundary Mic discussion earlier in this chapter) is an underused option here: it picks up the full soundboard radiation without the lid-reflection comb filtering a suspended mic would suffer (the capsule sits right at the boundary), and the result is unexpectedly warm and full without any of the boominess that can come from mics too close to the bass strings.
Phase and the Three-to-One Rule in Piano Sessions
Multi-mic piano setups create phase relationships that require active management. The three-to-one rule applies directly when you are recording piano live alongside other instruments in the same room: if the piano mics are 12 inches from the strings, they should be at least 36 inches from the nearest other mic'd source (a guitar amp, a vocal, a drum kit overhead) to keep inter-source comb filtering inaudible. In a full band tracking session, that geometry is often impossible—which is why piano is frequently tracked in an iso booth or recorded separately.
Within a multi-mic piano setup itself, the specific concern is time-of-arrival differences between the close pair and any room mics. Comb filtering between a mic 10 inches inside the case and one 8 feet away is audible when both are played at comparable levels. The fix is not necessarily to align them mathematically: pull up both tracks, blend them at the approximate ratio you expect to use in the mix, then nudge the room mic track earlier until the combined sound is the fullest and most natural. Let your ears confirm it—that position is your alignment point.
Dealing With a Bright or Dull Instrument
The piano itself is your first variable—and you cannot always choose it.
A bright or harsh piano (older hammers compacted to felt-free hardness, or a piano that has simply been voiced bright) rewards mic placement farther from the strings and farther back from the hammers. The lid-up outside position, or a pair pulled back 18–24 inches above the soundboard rather than the standard 8–12, naturally softens the attack. Ribbon microphones are the other tool: a matched pair of Royer R-121s or AEA R84s tames high-frequency harshness through the ribbon's natural rolloff above 10 kHz, often without any EQ needed at all. Avoid close XY at the hammers on a harsh piano—that position maximizes exactly what you are trying to minimize.
A dull or deadened piano (old strings that have lost brilliance, or hammers that have been voiced soft) responds to closer placement and brighter microphones. Moving the mics inside the case toward the hammers—6–8 inches above the strings rather than 10–12—restores attack and brings out the upper harmonics. A bright SDC like the KM 184 or the AKG C 451 will capture more top-end detail than a large-diaphragm tube condenser. In severe cases, a gentle high-shelf boost at 8–10 kHz in the preamp chain at tracking can help—but fixing a fundamentally dead piano entirely in EQ is a losing battle.
I had a session once where the only piano in the building was harsh and brittle—voiced bright years past the point of pleasant—and there was no swapping it out. Close condensers at the hammers made it worse; every note came back like an ice pick. Switching to a pair of ribbons and pulling them back over the open lid tamed the top end before I touched a single EQ, and the distance let the room round off what was left. We got a usable, even warm piano out of an instrument I had written off an hour earlier—the microphone and its position were the fix, not the console.
Common Mistakes
- Micing the bass strings too closely. The low end of a grand piano's interior is enormous. A mic placed 6 inches from the bass strings captures a boomy, undefined low end that clogs the mix. Pull the bass-side mic back or angle it toward the midrange strings to balance the low-end weight.
- Ignoring the lid angle. A half-open lid and a fully open lid are two different instruments acoustically. The lid angle changes the reflection path and the amount of room the piano contributes. Decide on the lid position before placing mics, and do not move it mid-session.
- Skipping the mono check. A spaced pair that sounds wide and lush in stereo can collapse to a comb-filtered mess in mono. Always check before you commit to takes—many streams and broadcast platforms sum to mono at some point in the delivery chain.
- Leaving the piano untuned. A piano that is out of tune will expose every beat frequency between the strings when compressed in the mix. It is the engineer's responsibility to flag this before tracking begins. You cannot tune a piano in Pro Tools.
- Recording digital keyboards as if they were acoustic. A digital keyboard or stage piano goes DI, not through microphones. Micing the internal speakers of a digital instrument adds speaker coloration and room noise to a signal that was designed to be recorded direct. Use a DI box or a direct output if the instrument has one.
Vocals
Recommended: Sony C-800G, Telefunken ELA M 251, Neumann U 67, Neumann U 47, AKG C 12.
After drums, vocals are the most challenging source to record well. A mic that works beautifully on a deep male voice may not suit a soprano. Having a variety of microphones is important—this is why studios invest in mic collections.
A simple starting-distance trick that engineers have used for generations: extend your hand in a “shaka” (thumb out one way, pinky out the other, three middle fingers folded into the palm). The spread from thumb tip to pinky tip is about seven to nine inches for a typical adult—a quick, repeatable way to set the mouth-to-mic distance for the first take. From there, adjust based on what the source needs: closer for intimacy and proximity-effect bass, farther for less plosive risk and more room sound. For a deep, intimate sound, set the condenser to cardioid and have the artist sing closer than the shaka spread (3–4 inches from the mic) to lean into the proximity effect. If the sound is too muddy at that close range, back off another 4–6 inches. If the room sounds great, move back to about twelve inches to let the space contribute.
Tube vocal mics are typically mounted upside down because tube electronics generate heat that rises and can affect the diaphragm. The Sony C-800G addresses this with a built-in cooling system. Position the mic slightly above the performer to encourage them to look up and open their vocal cords—though some vocalists perform better with the mic at mouth level. Comfort always impacts performance.
A useful technique: place two very different microphones (for example, a C-800G and a Royer R-121) in a near-coincident arrangement facing the vocalist, then blend into a single mono track. This captures both a bright, harmonically rich signal and a warm, smooth one.
Guitar and Vocals Simultaneously
Recommended: Two bidirectional microphones (AKG C 414 in figure-8, AEA R44CE).
Recording guitar and vocals simultaneously captures a natural feel and performance energy that separate takes cannot replicate. The challenge is bleed: each mic picks up both sources. The solution is to exploit the bidirectional pattern's strongest null rejection at 90 degrees (the sides).
Place the guitar mic halfway between the sound hole and the 12th fret, angled so its null points toward the vocalist's mouth. Place the vocal mic near the mouth, angled so its null points toward the guitar. This maximizes isolation between the two sources. The AKG C 414, with its switchable polar patterns, is particularly useful here—you can dial in the exact rejection angle.
Choir and Large Ensemble
Recommended: Matched stereo pair (Neumann KM 184s—or the omnidirectional Neumann KM 183s, lovely for capturing the natural blend of an ensemble—Schoeps CMC6, Neumann U 87s, or Coles 4038s for ribbon warmth).
Recording a choir, gospel ensemble, big band, or any large group is a fundamentally different problem than close-micing soloists. Distance does the work. A single matched stereo pair (usually ORTF or Blumlein, occasionally a spaced AB) placed 8–15 feet in front of the ensemble at a height roughly equal to the average performer's head captures the natural blend the conductor hears—no single voice or instrument jumps out, the room contributes, and the recording sounds the way the performance actually felt. Resist the urge to put close mics on every section; the natural blend that emerges from a good room and a well-placed stereo pair is usually better than anything you can rebuild from individual close mics in the mix. For very large ensembles or productions that need a featured soloist plus chorus, add discreet accent mics on the soloists (close-mic'd and blended carefully against the main pair, exactly like the accent micing principle described earlier in this chapter).
Hand Percussion
Recommended: Sennheiser MD 421, Shure SM57, KM 184 (SDC), or a small ribbon for shakers.
Conga, bongo, djembe, shaker, tambourine, cabasa, and similar small percussion respond best to close-mic'd dynamics or condensers depending on the source's character and the room. Congas and bongos take an MD 421 close to the head—about three to six inches—to capture the slap and the tone. For djembe, stack two mics: one inside or just below the bottom port for the deep sub-bass thump, one on top angled across the head for the slap and the high crack. Shakers and tambourines are unforgiving on placement: too close and the high-frequency content becomes piercing; pull back ten or twelve inches and the sound rounds out into something musical. As with all percussion, listen to the source acoustically before you reach for a mic—a poor instrument or a tired player cannot be fixed by micing technique.
Microphone Maintenance
suggest a correctionAlways store mics in their cases when not in use. The charged diaphragm in condenser mics attracts dust, which degrades audio quality over time. Use a pop filter or windscreen when recording vocals up close, to protect the diaphragm from moisture and plosives—but you do not always need both, and on many sources you need neither. Match the protection to the source. Never connect or disconnect a condenser while phantom or tube power is engaged—this can damage the mic, preamp, or power supply. And be careful with +48 V phantom power around ribbon microphones: on a passive ribbon, a sudden DC current—from hot-patching, a miswired or unbalanced (TS) cable, or a faulty patchbay—can drive the ribbon like a speaker and stretch or tear it in an instant. A correctly wired modern passive ribbon sitting on already-stable phantom is usually fine; the real danger is at the moment of connection and from wiring faults. So switch phantom off before patching a ribbon, use known-good balanced cables, and check the manual.
For tube microphones, the quality of the tube has a significant impact on sound. Many modern production tubes may not meet vintage standards. Engineers frequently seek out NOS (New Old Stock) tubes—high-quality tubes originally manufactured by companies like Telefunken, GE, Mullard, Amperex, and Tesla in Germany, England, the United States, and Czechoslovakia. These are no longer in production but can still be found from reputable dealers.
The Art of Placement
suggest a correctionThat hour I spent watching an engineer move a mic around a guitar amp changed how I think about recording. Before that session, I thought the mic was just a tool for capturing sound. After it, I understood that the mic is a creative instrument—where you place it shapes the sound as much as which mic you choose or how you EQ it later.
There is no plugin that can recreate what the right microphone in the right position captures in the first place. Every decision in this chapter—which mic, how far, what angle, what pattern—shapes the raw material that every subsequent step in the production process builds on. Get it right at the source, and mixing becomes a joy. Get it wrong, and no amount of processing will fully recover what was lost.
I have spent twenty years watching engineers reach for plugins to fix problems they could have prevented with a five-minute mic move. Every hour you invest in learning microphone technique pays back a hundred times over the life of your career. The mic is not just where the signal starts—it is where the record starts. Treat that moment with the attention it deserves, and the rest of the chain becomes a lot more forgiving.
Review Questions
Work these before moving on — every question is answerable from this chapter. Written answers live in the instructor Answer Key, available to course adopters.
- What is the Good Rule?
- Define these terms: a. On-axis b. Off-axis c. Mono d. Stereo e. Panning f. Proximity effect g. Comb filtering
- What do a pop filter and a windscreen do?
- A spaced pair refers to: a. Two mics less than twelve inches apart b. One mic placed in the center c. Two mics on top of each other d. Two mics more than twelve inches apart
- The ______________ states that for every unit of distance between a mic and its source, the mics must be at least three times that distance apart from each other.
- How does the XY mic technique work?
- In M/S technique, the two mics are turned into a left-right stereo image by use of the ______________.
- Briefly explain how you would mic each of these instruments: a. Acoustic guitar b. Electric guitar amplifier c. Bass guitar d. Kick drum e. Snare f. Hi-hat g. Toms h. Overheads / cymbals i. Piano j. Vocals
- What are some precautionary measures you can take to protect your microphone?
- Explain the importance of microphone placement and define close micing, distant micing, accent micing and ambient micing.
- Explain the advantages of each of the three main polar patterns and describe a scenario in which each might be used.
- What does NOS stand for and how can NOS tubes improve your recordings?
- In the previous chapter you planned how to spend $5,000 on 8 mics and preamps. Now explain how you would set all of them up in a band recording situation with drums, vocals, two guitars and bass.
- List two ways that phase can be beneficial and two ways it can be detrimental in recordings.
- True or False: Anytime two or more mics are used it is a stereo microphone technique.
- True or False: When two cardioid mics are pointed facing one another, it is a good idea to flip the phase of one to avoid phase issues.
- What are the goals of stereo micing, and what situations warrant its use?
- Describe the ORTF stereo technique. How does it differ from XY?
- What is reamping, and why has it become a standard practice in modern studios?
- What are room mics and how are they used in modern drum recording?
- Watch IN THE STUDIO with Asaf Fulks: Episode 7 [Mono and Stereo Microphone Techniques]. List your favorite stereo micing technique and explain why.
- Describe the Blumlein pair technique. What type of microphones does it use, and when is it most effective?
- What is the Decca Tree, and what type of recording is it primarily used for?
- Explain how you would use bidirectional microphones to record guitar and vocals simultaneously while maximizing isolation between the two sources.
- What is virtual amplifier modeling, and how has it changed the way electric guitars are recorded in modern studios?
- When using a spaced pair, what is the difference between using omnidirectional and cardioid microphones? When might you choose one over the other?
- Why does close-micing a guitar amplifier with a cardioid microphone produce a different bass response depending on distance? Explain the role of the proximity effect, and describe one situation where you would lean into it and one where you would back the mic off to reduce it.
- When micing a tom with both a top and bottom microphone, what does each mic primarily capture? Why is the bottom mic's phase typically inverted, and what does combining the two give you that one alone cannot?
- Why are ribbon microphones a popular choice for recording orchestral strings, brass, and acoustic piano? Name one specific ribbon microphone commonly used on each, and explain what aspect of the ribbon's sonic character makes it suited to those sources.
- Describe the “shaka” (extended-hand) technique for setting a starting distance between a vocalist and a microphone. About how many inches does the shaka spread correspond to, and why is having a quick, repeatable starting distance useful in a session?
- The chapter describes both the Glyn Johns and Recorderman techniques as minimalist alternatives to a full close-mic drum setup. Compare the two: how does each achieve phase coherence between the overhead mics and the kick and snare? Then evaluate the conditions under which a minimalist approach is the better choice over a full 8–16 mic setup, and identify at least one situation in which minimalism would be the wrong call.
Studio Exercise: The Stereo Pair Shootout
The fastest way to learn the trade-offs between stereo techniques is to record the same source through several of them and compare.
Setup. Pick one source you can perform consistently. If you have any access to a drum kit, record drums—it is the single most valuable source to learn stereo micing on, and the one where these techniques matter most. A strummed acoustic guitar is the next best choice; a piano, room ambience, or a small ensemble also work. Use a matched pair of cardioid microphones (KM 184s, C 414s, or whatever you have). For the optional M/S pass, you also need a figure-8 capable mic (or an LDC switchable to bidirectional). A flat, full-range space is preferable, but any room will teach you something. No-studio option: no matched pair or room to track in? Free libraries offer the same source recorded through XY, ORTF, spaced, and M/S configurations—do the A/B listening, the mono fold-down, and the written reflection on those instead.
Method. Record the same musical passage three times—identical performance each time—through three different stereo configurations:
- XY (coincident): two cardioids at the same point, capsules touching, angled 90–110° apart.
- Spaced pair / AB: two cardioids more than 12 inches apart; check mono compatibility when adjusting the spacing.
- ORTF: two cardioids spaced exactly 17 cm apart, angled 110°.
- (Optional advanced) M/S: a cardioid mid mic and a figure-8 side mic stacked at the same point, then matrix-decoded in the DAW.
Match preamp gain across all takes so the loudest peaks land at the same level. Save labeled WAVs: xy.wav, spaced.wav, ortf.wav, and optionally ms.wav.
Listen. A/B all takes in stereo first. Where does each technique place the source in the image? Which is widest? Which is most focused? Which captures the most room? Then engage the mono fold-down on your master bus and listen again. Which technique survives mono best? Which collapses or thins out? This last test tells you which technique to choose when broadcast, podcast, or club playback (where mono compatibility matters) is part of the deliverable.
Submit. The labeled audio files plus a 100-word reflection on which technique you would choose for this source—addressing width, mono compatibility, room sound, and phase coherence in your reasoning.
This exercise teaches the practical trade-offs between coincident, near-coincident, and spaced techniques in a way no diagram can. By your fifth time through it on different sources, you will start to predict the result before pressing record.