Chapter 4 · Foundations
Analog and Digital Sound
“It will henceforth be possible to preserve for future generations the voices as well as the words.”
—Thomas A. Edison, “The Phonograph and Its Future,” North American Review, 1878
By the end of this chapter, you will be able to:
- Distinguish among the three domains of studio sound—acoustic, analog, and digital—and explain why every signal chain must begin and end in the analog domain regardless of the recording medium used in between
- Describe the role of transducers and AD/DA converters by tracing how microphones, speakers, ADCs, and DACs move a signal between the acoustic, analog, and digital domains
- Apply the sample-rate/bit-depth relationship to session setup by selecting 96 kHz/32-bit float as the music-production standard—stepping down to 48 kHz/24-bit when a delivery spec or limited processing requires it—and explaining why 32-bit float recording resists converter clipping
- Explain the Nyquist theorem and identify how aliasing, anti-aliasing filters, and oversampling each affect the accuracy of digital audio capture
- Identify the causes and consequences of digital clipping, dBFS, word clock synchronization errors, quantization error, and dither in a digital audio system
- Configure a tape session correctly by selecting tape speed (15 vs. 30 IPS), matching NAB or IEC EQ curves, running alignment tones, setting bias, and applying tails-out storage to minimize print-through
- Describe the three core components of a DAW, set buffer size to balance latency against CPU load during tracking and mixing, and identify the major DAW platforms used in professional studios
- Select the appropriate audio file format for each stage of production by distinguishing WAV/AIFF masters, FLAC/ALAC lossless archival formats, and MP3/AAC consumer delivery files, and apply true-peak headroom limits for streaming delivery
Spend five minutes in any studio and someone will tell you that analog sounds warmer. Spend five more and someone else will tell you that digital is cleaner, cheaper and more flexible. Both are right. Legendary records have been made on tape, and legendary records are being made right now entirely in a DAW—always through analog gear on the way in, and always through analog on the way back out to your ears. The debate is not really about which is better. It is about understanding what each one does, how they work, and how to use both to your advantage.
From Past to Present
suggest a correctionThe ability to capture, store, edit and play back sound is one of the most remarkable accomplishments in human history. When recording was brand new, the entire recorded output of the human voice amounted to a handful of cylinders. Today every phone in every pocket holds more music than any commercial library that existed in 1900. The compression of that arc into a hundred and fifty years is the most important context this chapter has to teach you—because every era of recording technology is alive in the signal chain you sit at today.
Sound as we hear it is wonderful, but it has limitations in the studio. We cannot simply capture air vibrations in a jar. To store, process, edit, or amplify sound, we have to convert it to another form of energy—and that act of conversion is what makes everything else in this book possible. In the studio, sound takes three primary forms:
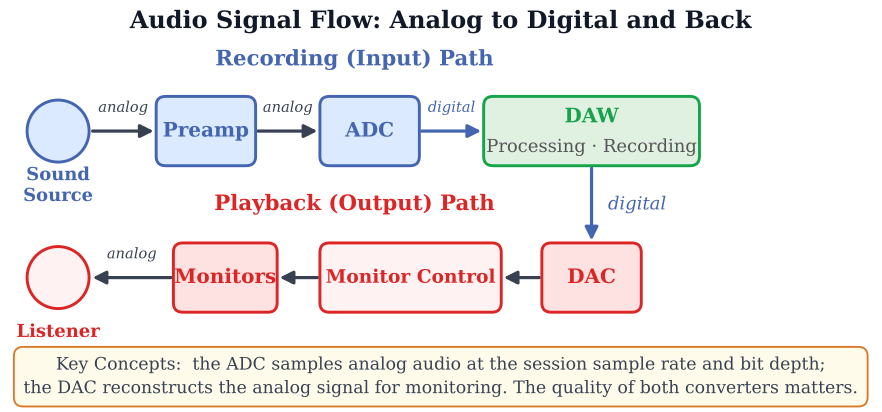
Acoustic energy is sound in its natural form—pressure vibrations traveling through air (or another medium) that we perceive as sound. Analog is sound in its electrical form: the voltage of an analog signal varies continuously with the pressure of the original sound wave, an “analogous” electrical representation of the acoustic energy. Microphones convert acoustic energy into analog; speakers convert analog back to acoustic. Digital is sound encoded as a series of binary digits—ones and zeros—that represent the varying voltage of the analog signal at successive moments in time. An Analog-to-Digital Converter (ADC) handles the conversion in; a Digital-to-Analog Converter (DAC) handles the conversion back out. Computers, DAWs, smartphones, and streaming platforms all live in the digital domain—but every chain begins and ends in acoustic and analog.
A transducer is any device that converts one type of energy into another. Common audio transducers include microphones (acoustic → analog), speakers (analog → acoustic), guitar pickups (mechanical vibration → analog) and our own ears (acoustic → nerve impulses). Understanding transducers is fundamental to understanding the studio signal chain.
The Birth of Recording
The original recording device was Thomas Edison's phonograph, invented in 1877. It consisted of a large horn connected to a rotating tinfoil cylinder. Speaking into the horn caused a needle to vibrate, indenting grooves into the foil that could later be played back by reversing the process. It was a purely mechanical system—no electricity, no amplification, no microphone. The sound pressure of the voice alone had to physically carve the groove. Alexander Graham Bell's Volta Laboratory improved the design in 1886 by using wax cylinders. Emil Berliner introduced the flat disc gramophone in 1887, which eventually evolved into the vinyl record—the dominant format for music consumption for most of the twentieth century, and still popular with audiophiles and collectors today.
It is hard to convey what an act of imagination Edison's phonograph required. Speaking into a horn to leave a permanent groove in tinfoil was the first time a human voice had ever outlived the moment it was made. Every recording you have ever loved sits on the lineage of that one machine.
The development of electrical recording in the 1920s—made possible by microphones and alternating current (AC) electronics—transformed the industry. For the first time, sound could be captured by a microphone, amplified electrically, and then cut into the disc with far greater fidelity and dynamic range than purely mechanical recording allowed. When sound is represented by AC electricity, the compression (high-pressure) portions of the sound wave correspond to positive voltages, and the rarefaction (low-pressure) portions correspond to negative voltages. The resulting electrical signal is said to be an analog (or “analogous”) representation of the acoustic sound wave.
Why does an audio engineer need any of this? Because every piece of gear in your rack is an electrical instrument. A preamp's whole job is raising a microphone's tiny voltage to a usable one. A fader scales voltage. A compressor measures voltage and pushes back against it. Gain staging—a skill you will use every working day—is nothing more than managing voltage so each device in the chain receives the level it was designed for. Clip a converter and you have literally run out of voltage. Even the professional line level printed on every spec sheet, +4 dBu, is just a voltage: 1.228 volts. The units below are not trivia—they are the vocabulary of every spec sheet, every interface manual, and every “why is this so quiet?” troubleshooting session of your career.
Analog signals travel through cable at roughly two-thirds the speed of light—hundreds of thousands of times faster than sound moves through air. Electricity is the flow of negatively charged particles called electrons. To understand how audio signals travel through the studio, you need to know the basic units of electricity:
| Term | Definition | Analogy |
|---|---|---|
| Voltage (V) | The “pressure” pushing electricity through a conductor | Water pressure |
| Current (I) | Rate of electrical flow, measured in amperes (A) | Flow rate |
| Resistance (R) | Opposition to flow in a DC circuit, measured in ohms (Ω) | Pipe diameter |
| Impedance (Z) | Opposition to flow in an AC circuit (ohms); accounts for resistance plus reactance. Critical for matching mics to preamps and speakers to amplifiers (see Ch. 5) | Pipe diameter (AC) |
| Watts (P) | Electrical power: P = V × I | Water force |
| Ohm's Law | V = I × R — the foundational equation relating voltage, current, and resistance | Pressure law |
The Tape Era
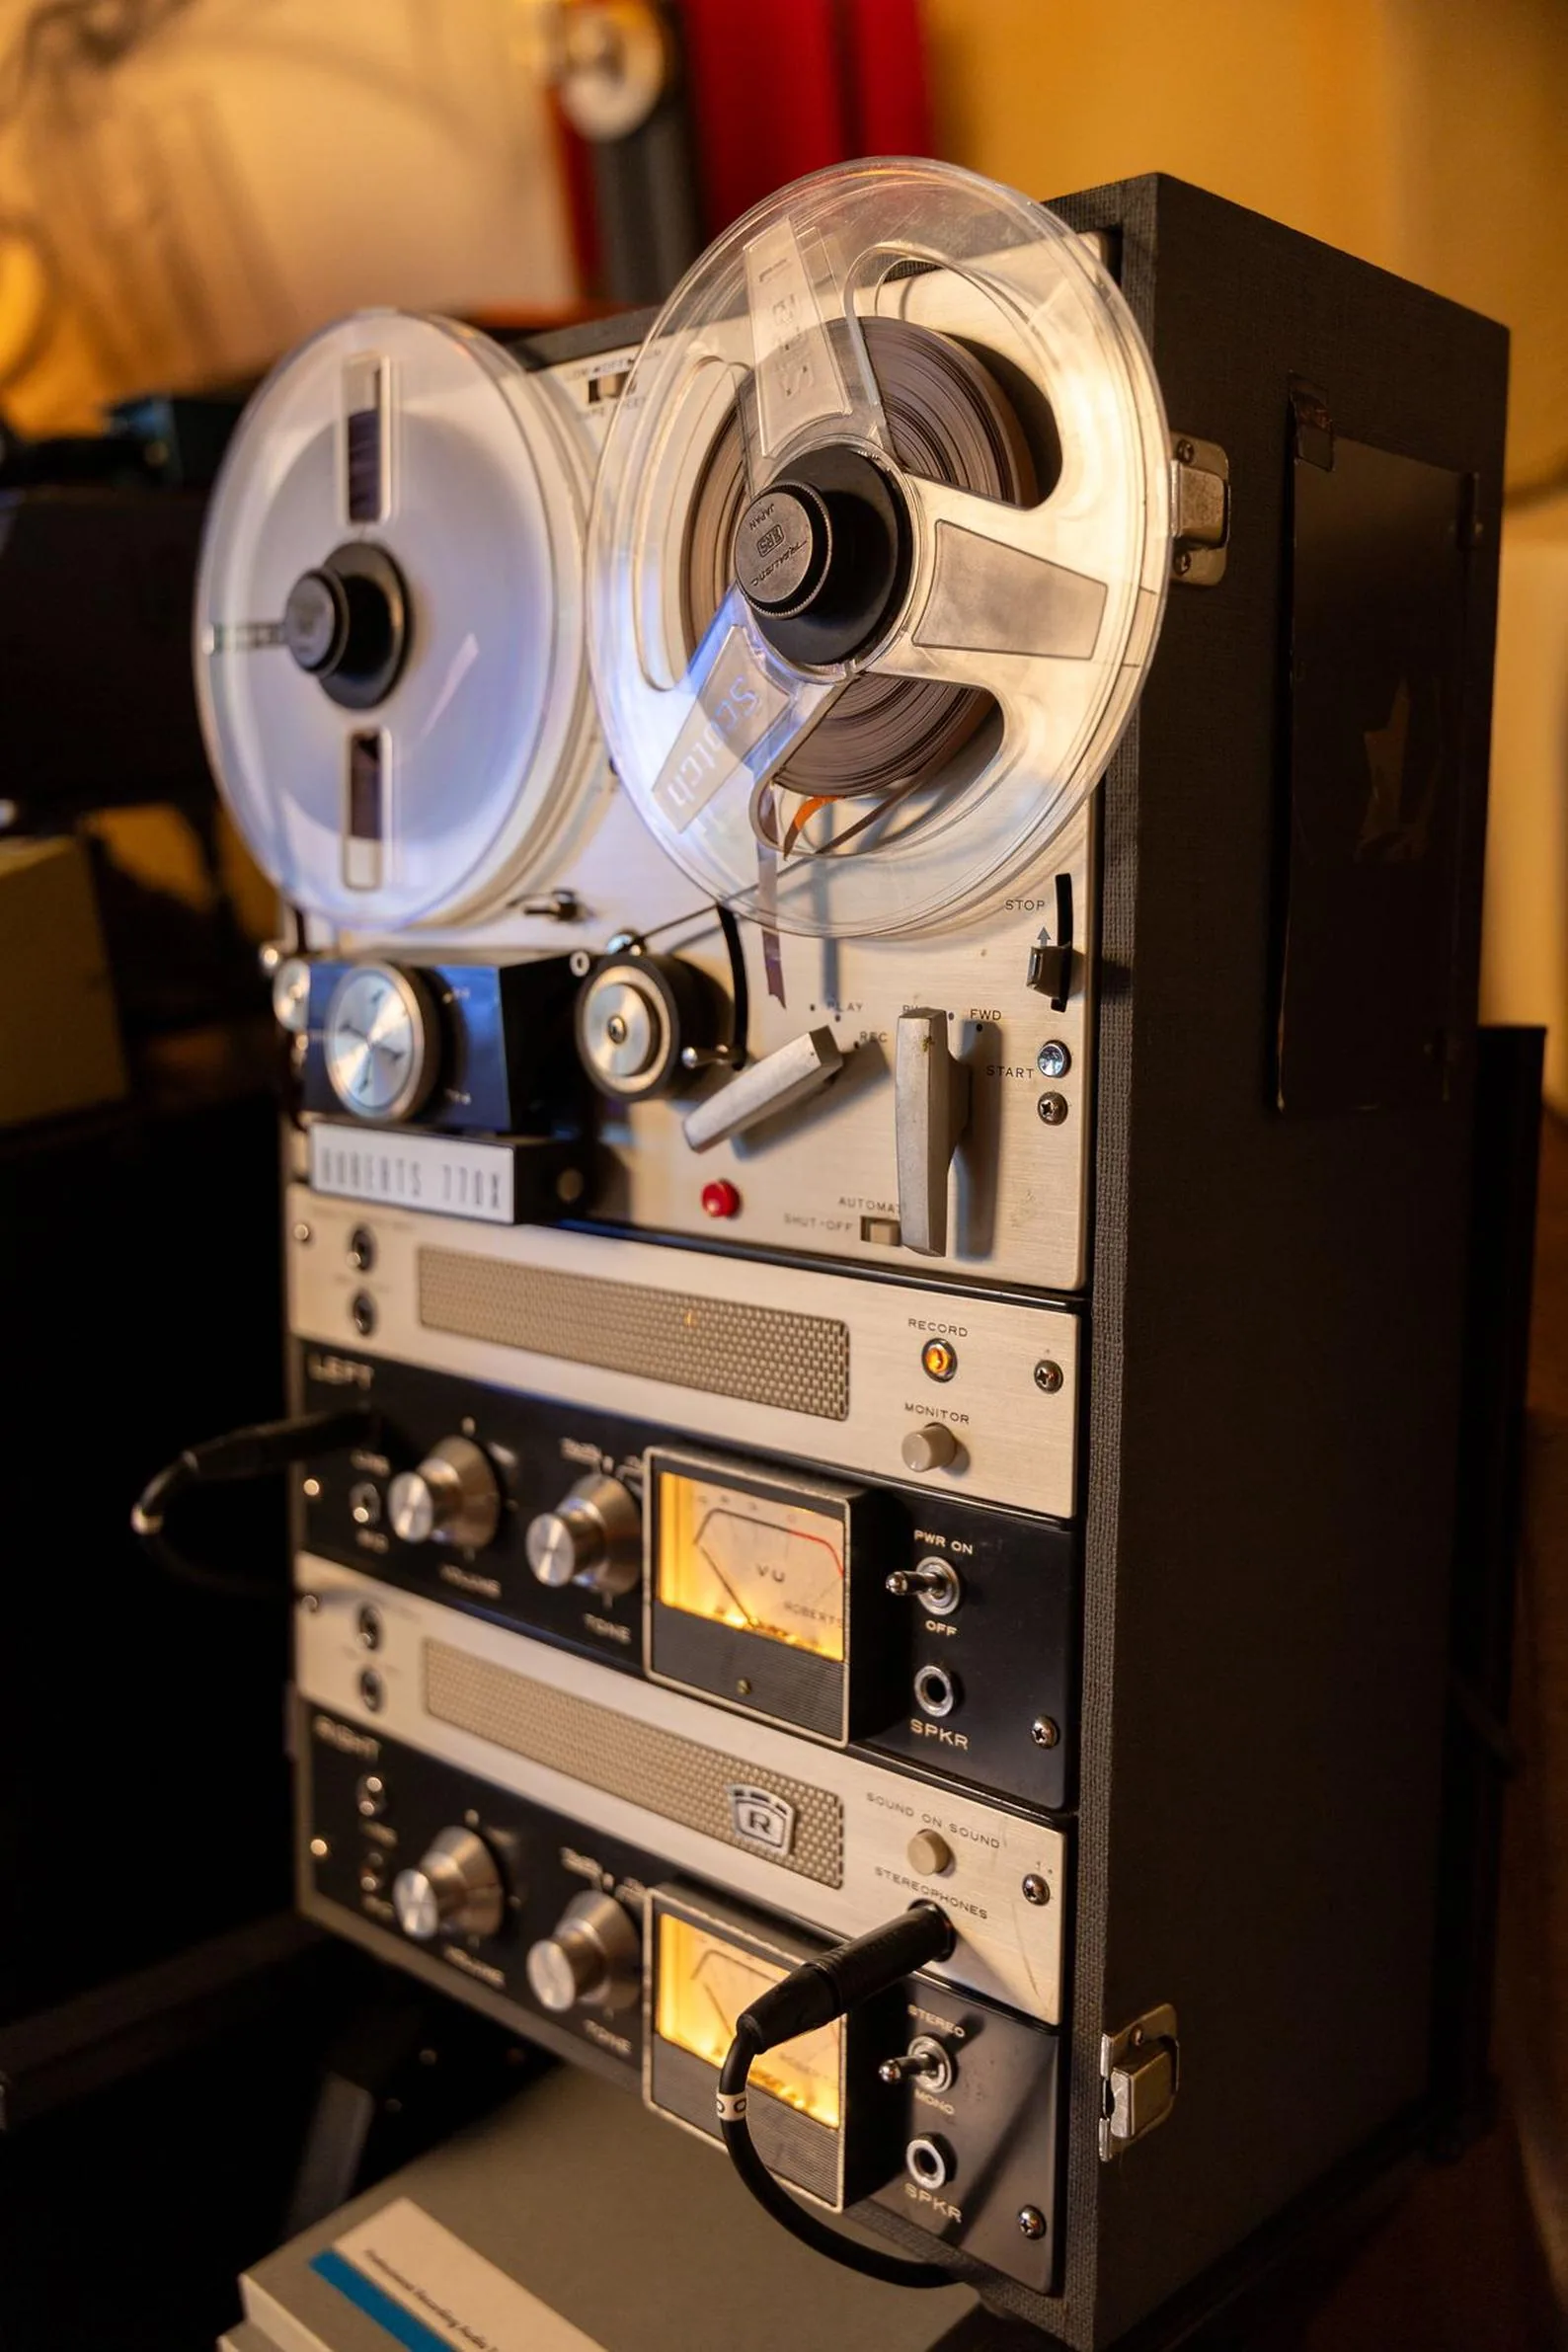
Fritz Pfleumer of Germany developed magnetic tape for recording sound in 1927, receiving a patent in 1928. This technology stored analog audio as electromagnetic particles on a strip of tape and later evolved into the reel-to-reel tape recorder. For the first time, recordings could be edited—physically cut with a razor blade and spliced back together—and erased and reused. Before tape, if a musician made a mistake during a recording, the entire performance had to be started over. Tape changed everything.
Ampex introduced the Model 200 tape recorder in 1948, championed by Bing Crosby who funded its development so he could pre-record his radio shows instead of performing live. Les Paul pioneered multitrack recording techniques—overdubbing performances on top of each other—that led to the development of 4-track, 8-track, and eventually 24-track machines. Multitrack recording allowed engineers to record instruments separately and mix them afterward, a revolutionary concept that fundamentally changed music production and gave birth to the role of the mix engineer. The Studer A800 MkIII (24-track, 2-inch tape) and Ampex ATR-102 (stereo mastering) became the gold standards of professional recording. As the technology matured, cassette tapes brought portable recording to consumers, eventually outselling vinyl records.
Tape also had practical limitations. It was expensive—a single reel of 2-inch tape cost hundreds of dollars and held only 15–30 minutes of audio. Tape degraded with each playback pass, and the machines required constant maintenance and calibration. Despite these costs, tape remained the dominant professional recording medium for over fifty years.
The first time I watched an engineer cut tape with a razor blade and splice it back together with a thin piece of white tape, I understood I was watching a craft on its way out. He was doing it for the feel. The same edit was available in Pro Tools in fifteen seconds. But the ritual mattered to him—the reels rewinding, the smell of the heads, the physicality of cutting time itself with a blade. Tape was a different conversation with sound. Most engineers under forty have never had it. Most engineers over sixty still miss it—the way you miss any tool you spent a lifetime mastering, gone now from the room.
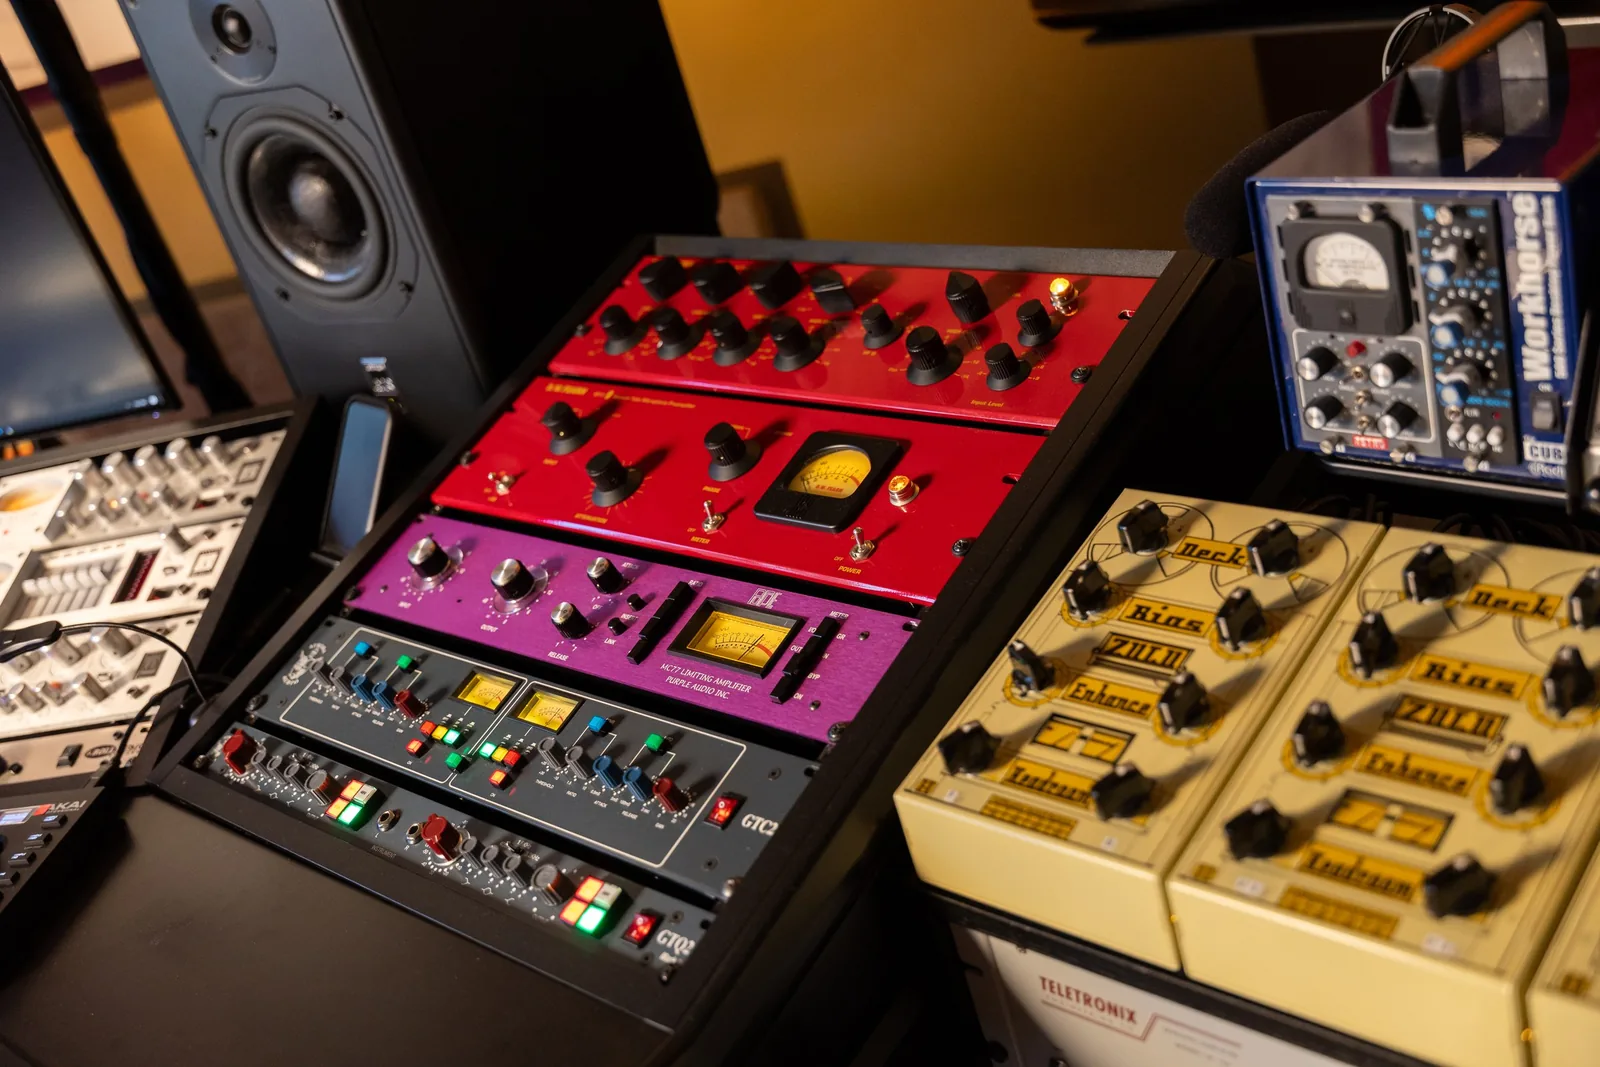
Many engineers still value the warmth and harmonic saturation that analog tape imparts to recordings—gentle odd-order harmonics (chiefly the third—the classic analog-tape signature), subtle high-frequency compression, and a natural fullness that digital recording does not inherently provide. When you push analog tape into saturation, the peaks compress gently rather than clipping harshly, which is why so many classic records have that warm, punchy character. This is why tape emulation plugins like Waves Kramer Master Tape, Universal Audio's Studer A800, and Waves J37 (modeled after the Abbey Road tape machine) remain essential tools in modern studios. The first time I A/B'd a clean digital mix against the same mix routed through a tape-emulation plugin set just kissing saturation, I heard the gap that purely digital records have spent decades trying to close. The plugin did not transform the mix. It gave the peaks somewhere soft to land and added a half percent of warmth across the midrange. It did the job—but it is still a model of the real thing. When a record deserves the best, real analog (a tape machine, or a saturation unit like the Handsome Audio Zulu) does what an emulation only chases. The plugin gets you most of the way; the hardware closes the gap.
Working With Tape: What You Need to Know
I once watched a session dissolve because the assistant engineer handed the engineer a reel of Ampex 456 that had never been aligned to the machine. The session notes said “tape ready.” It was not ready. Two takes of a live string ensemble, gone to distortion no one caught until playback. If you are ever in a room with a real tape machine—and some of you will be—what follows is what you actually need to know before you hit record.
Tape speed is the first decision. Professional multitrack and mastering machines run at either 15 IPS (inches per second) or 30 IPS. The physics are straightforward: faster speed means more tape passes the record head per second, which stretches the recorded wavelengths and improves high-frequency resolution and signal-to-noise ratio. At 30 IPS you get a cleaner top end, lower noise, and more dynamic headroom—but you burn through a reel in half the time and lose some of the low-frequency warmth that 15 IPS provides. At 15 IPS, the slower speed allows more low-frequency magnetic flux per unit of tape, extending the bass response and encouraging the natural compression and harmonic saturation that the previous section describes. Most tracking sessions on 2-inch 24-track machines historically ran at 15 IPS for exactly this reason—the saturation character and the economics both pointed the same direction. Mastering engineers more often chose 30 IPS for its cleaner noise floor and extended headroom. There is no universal right answer: 30 IPS for a clinical pop or orchestral master, 15 IPS when you want the machine's character in the track.
Equalization curves are the next thing to get right, and they are easy to get wrong. Because magnetic tape does not reproduce all frequencies equally, the record and playback electronics apply complementary EQ curves—boost the highs going in, cut them on playback—to achieve a flat overall response. Two competing international standards exist at 15 IPS: NAB (National Association of Broadcasters), the North American standard, uses time constants of 3180 µs and 50 µs, which produces a fuller low-end character. IEC/CCIR (the European standard, now formally designated IEC 1), uses a 35 µs high-frequency time constant at 15 IPS, which prints the high frequencies hotter and yields a slightly brighter, tighter sound with better high-frequency signal-to-noise ratio. At 30 IPS, there is no NAB standard—only the IEC 2/AES curve is used. Mismatching an IEC-recorded tape on a NAB machine at 15 IPS produces roughly a 2.5–3 dB treble boost and a corresponding bass cut—enough to wreck a mix. Before any tape rolls, confirm that the machine's playback EQ matches the standard the tape was recorded at, or that you are recording and playing back on the same machine in the same session.
Alignment — the process of calibrating a tape machine's record and playback electronics to a specific tape stock before any session audio is committed to tape. Every tape formulation has different magnetic properties—different coercivity, different output level, different optimal bias. Alignment is not optional; it is the single most important thing that happens before a session begins.
The procedure runs as follows. Using a signal generator, record three reference alignment tones: typically 100 Hz, 1 kHz, and 10 kHz (10 kHz is standard at 15 and 30 IPS; some engineers use 10 kHz and 16 kHz at 30 IPS). First, adjust bias at 10 kHz—bias is a high-frequency ultrasonic signal mixed with the audio during recording that optimizes the magnetic particles for the tape stock in use. The standard technique is to “overbias” slightly: bring the bias up until the 10 kHz level peaks and then drops by the manufacturer-specified amount (typically 1–3 dB depending on machine and tape). Then set the record level using the 1 kHz tone so that the VU meter reads 0 VU at the machine's operating level, expressed in nanowebers per meter (nWb/m). The standard North American operating level for professional multitrack work is 250 nWb/m at 0 VU (used with tape stocks such as Ampex 456); 320 nWb/m is a common alternative where engineers want a higher nominal level before the onset of saturation. Finally, trim the high-frequency record EQ using the 10 kHz tone to match playback. Label the alignment section of the tape with speed, EQ standard, operating level, tape stock, and whether noise reduction (Dolby A or SR, or none) is in use—and leave 30 seconds of 1 kHz on the top of every reel so the next engineer can set levels without hunting for a signal generator.
Recording level is a deliberate creative choice as much as a technical one. Tracking at nominal (0 VU at your aligned operating level) gives you a clean, controlled signal. Pushing 3–6 dB over 0 VU sends the tape into saturation territory—gentle peak compression, harmonic thickening, the “hot” character many engineers chase on drums and bass (as discussed in the saturation section above). There is no single correct answer; there is only the answer the song needs. What you cannot do is hit the tape with an uncalibrated signal and expect the machine to sort it out.
Print-through is the last tape behavior every assistant needs to understand. During storage, the magnetic signal from one layer of tape exerts a slow, low-level influence on adjacent layers—the result is a faint ghost copy of the audio appearing just before or after the original, called a pre-echo or post-echo respectively. The effect is subtle on modern tape stocks but audible on long-held silences before a loud downbeat. To minimize it, store all tape tails out: after recording, fast-forward the reel to the end and store it that way, so the last-recorded pass is on the outside. If print-through is present on a tails-out reel, the ghost copy falls after the main signal as a post-echo, which is far less perceptible to the ear than the pre-echo you hear on a heads-out stored reel (where the ghost arrives an instant before the sound that caused it). Store tape at room temperature, away from stray magnetic fields and direct sunlight, and let it acclimatize to the studio before use.
The Digital Revolution
Analog audio is an indispensable form of sound in the studio because it travels fast, can be easily processed and preserves a continuous representation of the original waveform. However, analog signals are subject to noise, degradation and distortion. These limitations drove the development of digital audio as a recording and storage medium—but make no mistake: there is no studio without analog. Sound enters the signal chain as acoustic energy captured by a microphone, which converts it into an analog electrical signal. That analog signal must exist before any digital conversion can take place—there is no such thing as an “acoustic-to-digital” converter. And at the other end, every digital signal must be converted back to analog before it can drive a speaker or headphone and reach your ears. Analog is not an optional vintage aesthetic. It is a physical requirement of every recording and playback system ever built, and it always will be. What has changed is the recording medium: tape has largely been replaced by digital, but the analog domain remains the beginning and end of every signal chain.
In 1979, the first major-label digitally recorded album (Ry Cooder's Bop Till You Drop) was released. By 1982, Sony and Philips introduced the compact disc (CD), bringing digital audio to consumers for the first time. In 1991, Digidesign released Pro Tools—initially a simple hard-disk recording system—which would eventually become the industry-standard DAW. In 1992, the ADAT (Alesis Digital Audio Tape) machine brought affordable 8-channel digital recording to studios, democratizing multitrack production and putting professional recording within reach of home studios for the first time. These milestones marked the gradual transition from analog tape to digital as the dominant recording medium.
Digital solved nearly every practical limitation of tape. Recordings no longer degraded with each playback pass. Editing became non-destructive—you could cut, move, copy, and undo without physically altering the original audio. Track counts were no longer limited to 24; a modern DAW session can hold hundreds of tracks. And the cost of the recording medium itself dropped to almost nothing: a hard drive that costs less than a single reel of 2-inch tape can store thousands of hours of audio.
Today, digital audio dominates recorded music. Most studios record digitally, and the vast majority of consumers access music through streaming platforms such as Spotify, Apple Music, Tidal and YouTube Music. Streaming now accounts for approximately 69% of recorded music revenue worldwide, according to the IFPI's 2025 Global Music Report. Digital recording is cleaner, cheaper and far easier to edit than analog tape, and digital files do not degrade over time. Many producers and audiophiles also appreciate the harmonic character that analog outboard equipment imparts, running digital recordings through analog compressors, EQs, and summing mixers before converting back to digital for the final mix. The modern studio is not analog or digital—it is both, by necessity.
I know engineers who track through a wall of Neve preamps one day and mix entirely in the box the next, bouncing a 32-bit float master straight to streaming. Both paths are valid—but neither one escapes analog. The microphone is analog. The speakers are analog. The medium in the middle is your choice; the two ends never are. Use whatever makes the song better, and respect the analog at both ends of the chain.
Getting the Sound in the Computer
suggest a correctionOnce an analog signal reaches the audio interface, the ADC takes over. Every session you ever record begins at exactly this moment: an analog waveform arrives, and from this point forward, your audio is math. (Most modern interfaces contain both an ADC and a DAC, which is why you will see them sold as AD/DA converters.)
The ADC captures snapshots of the incoming electrical voltage and encodes each snapshot as a sequence of binary code—the computer's language, consisting of only two digits: 0 and 1. Each 0 or 1 is called a bit of information. Bits are arranged in groups called strings or “words.” This whole method—measuring the analog voltage at evenly spaced instants and storing each measurement as a binary number—is called PCM (Pulse Code Modulation). It is the default language of digital audio: WAV, AIFF, and audio CDs are all PCM. Sample rate and bit depth, which we cover next, are simply the two dials that define a PCM stream.
Think of digital audio like a movie camera recording successive frames. When played back fast enough, the individual frames look like continuous motion. Digital audio works the same way, but captures far more “frames” (samples) per second.
Sample Rate
Here is the one-line mental model for this whole section: sample rate governs frequency (how often the waveform is measured in time), and bit depth governs amplitude (how precisely each measurement's loudness is captured). Sample rate is the horizontal axis; bit depth is the vertical. Keep that split in your head and everything below falls into place.
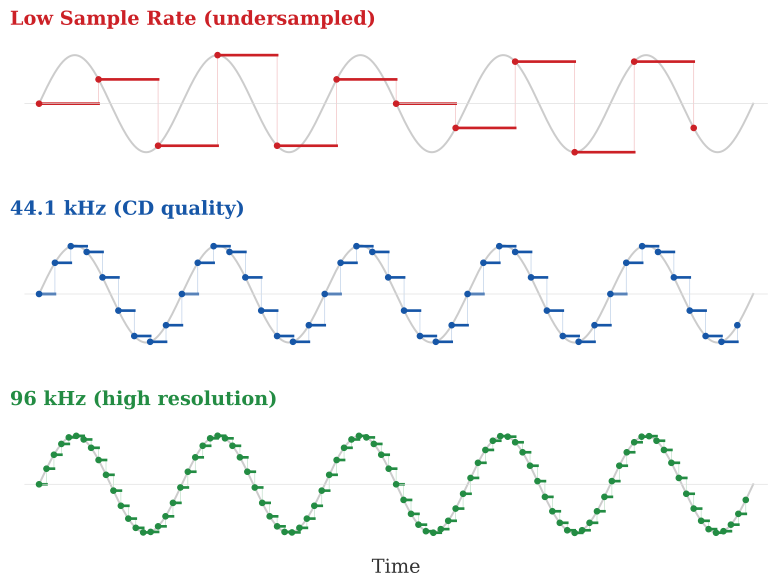
The sample rate is the number of samples captured per second, measured in hertz (Hz). The standard sample rate for audio CDs is 44,100 Hz (44.1 kHz)—meaning 44,100 snapshots of the audio waveform are taken every second. Each sample records the analog voltage at that instant, creating a series of data points that, when played back, reconstruct the original waveform. Common sample rates include 44.1 kHz (the audio CD standard), 48 kHz (the standard for video production, DVD, broadcast, and most professional audio interfaces), 88.2 kHz and 96 kHz (high-resolution recording), and 192 kHz (ultra-high-resolution, used in audiophile formats and specialized applications).
Match Your Session Rate
Here is something that will happen to you at least once: you set up a session at 48 kHz, but the audio files were recorded at 44.1 kHz—or vice versa. When the sample rates do not match, the audio plays back at the wrong speed and pitch. A 48 kHz file played back in a 44.1 kHz session will sound slower and lower in pitch; the reverse will sound faster and higher. It is one of the most common and disorienting mistakes in digital audio, and it is entirely preventable. Always confirm your session sample rate before you hit record.
Choosing a Sample Rate
Practical guidance for choosing a rate: I record music at 96 kHz / 32-bit float. The higher rate captures detail cleanly and gives nonlinear processing (saturation, distortion, heavy compression) room to oversample without artifacts, and a modern rig handles it easily. 48 kHz / 24-bit is the safe universal fallback—the broadcast and video standard, native on every consumer device, the rate most streaming services use internally—and the right call whenever a delivery spec demands it (film, TV, broadcast, Dolby Atmos) or your machine cannot sustain the higher rate. 44.1 kHz remains the right choice if you are mastering specifically for a CD release or working in genres (lo-fi, certain classic-leaning hip hop) where the legacy rate carries cultural weight. 192 kHz is rarely justifiable outside specialized audiophile or archival work—storage doubles, CPU load roughly doubles, and the audible benefit on most playback systems collapses to nothing. The honest test is whether the project and your playback chain actually benefit; if not, a higher rate is mostly costing you storage, CPU headroom, and grief—and on a busy session, the processing hit alone can be enough to make a lesser machine stutter.
The Nyquist Theorem
The Nyquist theorem states that the highest frequency that can be accurately captured is exactly half the sample rate (Pohlmann, 2010). At 44.1 kHz, the theoretical maximum frequency is 22.05 kHz—safely above the roughly 20 kHz upper limit of human hearing. At 48 kHz, the limit is 24 kHz. Recording at higher sample rates does not extend the audible frequency range—your ears still cap at roughly 20 kHz no matter how fast the converter samples. What higher sample rates do improve is the resolution of the highest audible frequencies. A 20 kHz tone captured at 44.1 kHz gets only about 2.2 samples per cycle—barely above the Nyquist floor—and the anti-aliasing filter has to work hard right at the edge of human hearing. The same 20 kHz tone at 96 kHz gets nearly 5 samples per cycle, with the filter pushed well above the audible range. The result: cleaner top end, fewer filter-induced artifacts, and better behavior when plugins do nonlinear processing (saturation, compression) that can otherwise generate aliased harmonics.
Bit Depth
Recall the split: sample rate handled frequency (the horizontal, time axis); bit depth handles amplitude (the vertical, loudness axis).
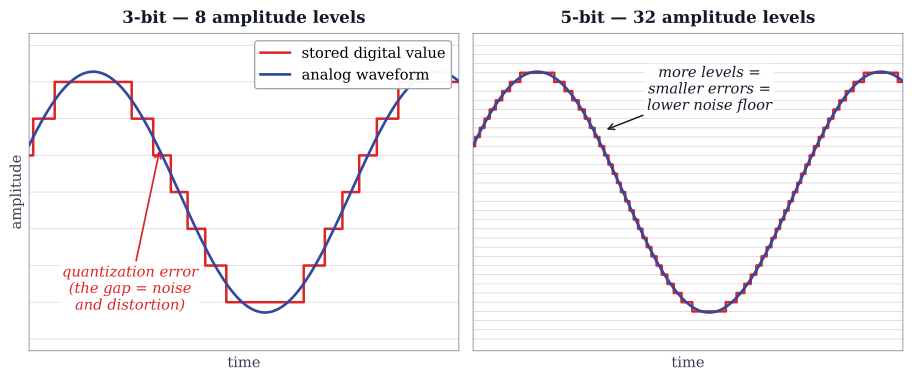
Digital audio systems also specify a bit depth—the number of bits used to represent each sample. A higher bit depth means more possible amplitude values, resulting in finer resolution and a greater dynamic range (the difference between the loudest and quietest sounds the system can represent). Each additional bit increases the dynamic range by approximately 6 dB (Rumsey & McCormick, 2021).
| Bit Depth | Possible Values | Dynamic Range |
|---|---|---|
| 8-bit | 256 | 48 dB |
| 16-bit | 65,536 | 96 dB (CD standard) |
| 24-bit | 16,777,216 | 144 dB (professional recording standard) |
| 32-bit float | 4,294,967,296 | 1,528 dB (internal DAW processing) |
The standard bit depth for CDs is 16-bit (96 dB dynamic range). Most professional studios record at 24-bit (144 dB dynamic range), which provides significantly more headroom and a lower noise floor. Modern DAWs like Pro Tools process audio internally at 32-bit floating point, which provides virtually unlimited headroom during mixing. The final mix is then exported at the appropriate bit depth for the delivery format. (One note on the table's 32-bit float row: its roughly 1,528 dB range comes from the floating-point exponent, not from evenly spaced steps like the integer formats above it—float packs enormous precision near zero and spreads it out at high levels, which is why it delivers practically limitless headroom rather than finer loudness resolution.)
In practice, I have not recorded at 24-bit in years. My rig captures 32-bit float, which makes clipping on the way in essentially impossible—the singer can scream into the mic and there is simply nothing to panic about on the meters. 24-bit is still the most common professional standard, and it is perfectly safe: its 144 dB of dynamic range is far more than any analog front end will ever deliver. But if your interface supports 32-bit float recording, there is little reason not to use it. Either way, the 96 dB of CD-quality 16-bit is fine for delivery; it is not enough for a record being made.
32-bit floating point is a different beast from fixed-bit-depth formats. Instead of using all 32 bits for amplitude resolution, it splits them between an exponent (which scales the magnitude) and a mantissa (which carries the precision). The result: extremely loud and extremely quiet signals are represented with consistent precision, and clipping inside the DAW becomes nearly impossible because the format simply rescales rather than running out of headroom. This is why a Pro Tools mix bus can absorb a dozen plugins with internal gain stages without ever clipping—the math is happening in float space, and the only place clipping is real is at the converter on the way back to analog.
To summarize the relationship between the analog and digital domains: as we move from an analog waveform to a digital representation, frequency corresponds to sample rate and amplitude corresponds to bit depth. The higher the sample rate and bit depth, the more accurate the digital representation—and the better the audio quality. However, higher settings also mean larger file sizes and greater demands on storage, processing power and system bandwidth. A single minute of stereo 192 kHz/32-bit audio is nearly nine times the size of 44.1 kHz/16-bit. In practice, the audible improvement beyond 48 kHz/24-bit is subtle for most listeners and most playback systems. Engineers should weigh the benefits against the practical costs and choose settings appropriate for the project.
Timing, Distortion, and Errors
suggest a correctionDigital audio lives or dies by timing. Every sample has to land exactly where it belongs, and every device in the chain has to agree on when that is. This section covers the clock that keeps everything aligned—and what you hear when it slips.
Word Clock
Word clock is a timing signal used to keep multiple digital audio devices perfectly synchronized. The word clock generator is built into every AD/DA converter—it has to be, since a converter can't sample without a clock. In a multi-device setup, the master converter's clock is simply the one all the others are told to follow. It sends a steady stream of timing pulses that contain no audio data, ensuring all connected devices sample at exactly the same rate. Word clock is transmitted over a 75-ohm BNC cable. One device is designated as the clock leader; all others follow. Choose your highest-quality converter as the leader, since clock jitter—tiny timing errors in the clock signal—directly affects audio fidelity. Failing to sync properly results in random clicks, pops and audible artifacts that sound like someone crumpling cellophane inside your mix.
What jitter actually does. A converter is supposed to take each sample at a perfectly even interval. When the clock wobbles, samples are captured a few picoseconds early or late—and since the converter stores each value as if it had been taken on time, the timing error becomes an amplitude error baked into the audio. The result is not clicks (that is outright sync failure) but something subtler: noise and false sidebands smeared around the real signal, heard as a faint harshness, a loss of depth, and stereo images that will not quite focus. Two practical consequences follow. First, jitter only matters at the moment of conversion—once audio is a file, it is just numbers, and copying, bouncing, or streaming those numbers cannot add jitter. Second, this is why the leader clock should be your best converter rather than an afterthought: at the AD stage, jitter is recorded into the take forever, and no plugin removes it.
Worth knowing: word clock matters in real sessions only when you are chaining multiple converters together—adding outboard A/D, slaving a digital console, integrating a separate mastering-grade clock, or sharing audio between two interfaces over ADAT or AES/EBU. If your entire signal chain runs through a single audio interface, the interface's internal clock handles synchronization automatically and you never need to think about it. The first time I had to chase a series of random clicks in a session, the cause turned out to be two devices each trying to be the leader. Once I designated one as the leader and the others as followers, the clicks vanished. Word clock is invisible until it is not.
Digital Clipping and dBFS
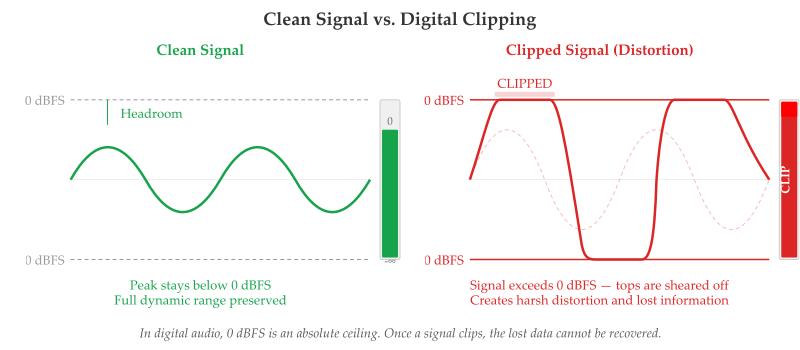
Unlike analog distortion—which can introduce pleasant harmonic warmth—digital distortion (or clipping) is almost never desirable. It occurs when the incoming analog signal exceeds the maximum level the ADC can represent. The converter runs out of bits, and the signal is simply chopped off at the ceiling, producing harsh cracks, pops and severe quality loss. Once digital clipping is recorded, it generally cannot be undone.
In Pro Tools and other DAWs, volume is measured in dBFS (decibels relative to Full Scale). 0 dBFS is the absolute maximum level before digital clipping occurs. Everything below 0 is a negative number; negative infinity (−∞ dBFS) represents complete silence. On the Pro Tools classic peak meter, the point where green meets yellow is −12 dBFS, and red indicates the signal is at or above 0 dBFS. Do not wait for red. By the time the meter goes red you have already hit 0 dBFS and clipped—the damage is done and recorded. The moment the signal starts riding up into the yellow, that is your cue to pull it down. Track in the green, watch the yellow, and never let it reach red.
Quantization and Dither
When converting audio between different sample rates or bit depths, small rounding errors are introduced. Each sample must be rounded to the nearest available amplitude value, which is why a digital waveform looks like stair-stepped blocks when you zoom in on the DAW display. (The analog signal that comes out of the DAC after reconstruction is smooth—those steps are how the DAW visualizes discrete samples, not how the audio actually plays back.) The difference between the original analog value and the nearest digital value is called the quantization error. Left unaddressed, quantization errors can produce audible distortion at low signal levels.
To mitigate this, engineers apply a very low-level random noise called dither during bit-depth conversion (for example, when converting a 24-bit recording to 16-bit for CD). Dither randomizes the quantization error, replacing a potentially tonal distortion with a nearly inaudible noise floor. It may seem counterintuitive to add noise to a recording, but dither actually preserves low-level detail and improves perceived quality.
Aliasing
As discussed earlier in this chapter, the Nyquist theorem requires a sample rate at least twice the highest frequency you want to capture. But what happens when a frequency above the Nyquist limit enters the system? It does not simply disappear—it folds back into the audible spectrum as a false frequency that was never in the original signal. This is called aliasing, and it sounds harsh, metallic, and unnatural. To prevent aliasing, every AD converter includes an anti-aliasing filter that removes frequencies above the Nyquist limit before sampling occurs. This is one reason higher sample rates (96 kHz, 192 kHz) can sound cleaner—the anti-aliasing filter can be placed much further above the audible range, reducing any artifacts it might introduce within the hearing spectrum.
Aliasing also shows up in a place beginners do not expect: inside their plugins. When a saturation, distortion, compression, or amp-simulator plugin generates new harmonics through nonlinear processing, those harmonics can extend above the Nyquist limit of the host session. Without protection, they fold back as aliased frequencies that were never in the source—a brittle, glassy shimmer most easily heard on cymbals and vocals. Modern plugins address this with an oversampling (sometimes labeled HQ or High Quality) mode that internally raises the sample rate during processing, generates the harmonics in that headroom, and downsamples back to the session rate. Most professional plugins (FabFilter Pro-MB, Pro-L, Saturn; oeksound soothe; iZotope Ozone; Soundtoys' modeled compressors) expose oversampling as a switch.
I once chased a brittle, glassy artifact on a hi-hat for an afternoon. Tweaking the EQ did nothing. Replacing the sample did nothing. It turned out to be a saturation plugin earlier in the chain generating aliased harmonics. Turning on the plugin's HQ mode cleared it instantly. Oversampling is now the first thing I check when a digital mix sounds harsher than the source warrants.
The DAW
suggest a correction“Recorded music, in certain of its aspects, is an entirely different art form from traditional music.”
—Brian Eno, “The Studio as Compositional Tool” (1979)
Once audio has been converted to digital data, it is sent to the DAW (Digital Audio Workstation). I tell my students the DAW is the modern equivalent of an entire studio compressed into a single piece of software—tape machine, mixing console, effects rack, multitrack recorder, signal generator, instrument, all of it. The room you walk into when you sit down at a DAW is bigger than any commercial studio that existed thirty years ago. Its three essential components are the audio interface, the recording software and the computer.
The Audio Interface
The audio interface is the hardware bridge between the analog world (microphones, speakers, outboard gear) and the digital world (the computer). At minimum, it contains ADC and DAC converters. Many interfaces also include microphone preamps, headphone outputs, monitor outputs and MIDI I/O. Entry-level interfaces like the Focusrite Scarlett series or the Universal Audio Volt provide excellent quality for home studios and portable setups. Larger professional studios often use dedicated high-end converters (such as those from Lynx, Apogee, Prism Sound or Antelope), separate preamps (Neve, API, Universal Audio, Avalon) and dedicated monitor controllers.
When students ask me which interface to buy first, I tell them the same thing I say about microphones: the right one is whichever one keeps you working. A Focusrite Scarlett has put more first records into the world than any boutique converter ever sold. Buy enough to learn on. Upgrade when the interface, not your knowledge, is what is limiting you—and that moment usually arrives years later than students expect.
Modern interfaces connect to the computer via USB-C, Thunderbolt or, in some professional setups, PCIe-based systems like Avid HDX. Thunderbolt and USB-C offer very low latency and high channel counts, making them the standard for most new studio installations.
Latency—the delay between an audio signal entering the interface and being heard back through the monitors or headphones—is one of the most important performance considerations in a DAW setup. Latency is primarily determined by the buffer size setting in the DAW. A smaller buffer (e.g., 64 or 128 samples) reduces latency but demands more processing power; a larger buffer (e.g., 1024 or 2048 samples) is easier on the CPU but increases the delay. During recording, low latency is critical so that the performer hears themselves in real time—a singer who hears their own voice even 20 milliseconds late will instinctively pull back or sing off time, and they will let you know about it. During mixing you move to a high buffer—and not just because real-time monitoring no longer matters. A mix loaded with plugins demands the extra buffer; the CPU needs that headroom to process everything without glitching. The largest buffer your system offers scales with sample rate and hardware: at 48 kHz, Pro Tools typically tops out at 1024 samples, while at 96 kHz you can often push to 2048. When I mix, I set it as high as the rig allows and let every plugin breathe.
The math, in case the samples-to-milliseconds conversion is not yet automatic for you: at 48 kHz, a 64-sample buffer is roughly 1.3 ms of one-way latency; 128 samples is about 2.7 ms; 256 samples is 5.3 ms; 1024 samples is about 21 ms. Roundtrip (input to output) is roughly double those numbers, plus a few milliseconds of driver overhead. I track on an HDX system, which handles input monitoring on dedicated DSP—so I can leave the buffer high and still give the singer near-zero-latency monitoring. On a native (non-HDX) rig, the move is the classic one: drop the buffer to 64 or 128 samples for tracking, accept that you cannot run a full mix's worth of plugins, then raise it back up to mix. Either way, the principle holds: low latency when a human is performing, maximum buffer when you are processing. Trying to mix at 64 samples will turn even a powerful computer into a stuttering mess; trying to track at a huge buffer on a native rig will make any singer hate you—and hate the take they were supposed to give you.
The Recording Software
The recording software (the DAW application itself) is where you record, edit, mix and master audio through a graphical interface. Pro Tools (Avid) is the long-standing industry standard for professional recording, mixing and post-production, used in the majority of commercial studios worldwide and the primary focus of this book. Logic Pro (Apple) is a powerful, full-featured DAW available only in Apple's ecosystem (macOS and iPadOS), popular with songwriters and producers. Ableton Live is widely used for electronic music production, beat-making and live performance. FL Studio (Image-Line) is extremely popular in hip-hop, trap and electronic production, known for its intuitive pattern-based workflow. Studio One (PreSonus, now Fender Studio Pro) offers a streamlined interface with strong mixing and mastering tools. Cubase and Nuendo (Steinberg) are long-established DAWs popular in Europe and in film scoring. Reaper (Cockos) is a lightweight, low-cost, highly customizable DAW that has earned a devoted following—especially in podcast, broadcast, and live-sound environments where flexibility and affordability matter.
All of these programs offer professional-quality recording and mixing capabilities. The best DAW is the one you know well—and the worst DAW is the one you have only half-learned. I have watched students bounce between Logic, Ableton, and FL Studio for three years, never fluent in any of them, blaming the software for what was actually a fluency gap. Pick one. Spend a year inside it. The rest of your career will follow. That said, Pro Tools remains the most universally compatible format in commercial studios, which is why it is the focus of this book.
The Computer
The computer is the engine that powers the DAW. The CPU (processor) is the brain—more cores and higher clock speeds mean more tracks, plugins and virtual instruments can run simultaneously. Modern audio workstations benefit from processors like the Apple M-series (M3, M4, and M5 Pro/Max), Intel Core Ultra Series 2, and AMD Ryzen 7/9 chips. For high-core-count professional workstations running large sessions, AMD Threadripper has become a studio standard—it is what I run. RAM (memory) is temporary storage for active data. 32 GB is the minimum I recommend for professional audio work; 64 GB is the comfortable working standard; and 128 GB is where serious professional rigs land—especially for large sessions with many virtual instruments and big sample libraries that stream from memory. I have watched a session crash mid-take because the computer ran out of memory loading a sample library partway through a record. The performer was already gone for the day. We rebuilt from a save and learned the lesson the expensive way: RAM is the cheapest insurance you can buy for a workstation.
For storage, use an SSD (Solid State Drive) or NVMe drive for your operating system and active sessions—SSDs are dramatically faster than traditional hard drives. Keep a separate drive for audio files and a backup drive for archiving. For backups and archiving specifically, traditional spinning hard drives are still common and sensible: they cost far less per terabyte than SSDs, and an archive drive doesn't need SSD speed—it just needs to hold a lot, cheaply. The GPU (graphics card) matters for smooth display performance, especially when running video alongside audio in post-production workflows, and is increasingly critical for running local AI models—stem separation, noise reduction, generative audio and other AI-powered tools rely heavily on GPU acceleration. For the operating system, macOS (Sonoma, Sequoia, or later) and Windows 11 are the current standard platforms for professional DAWs—always verify that your DAW and audio interface have certified driver support for your specific OS version.
Both Mac and PC platforms are fully capable of professional audio production. Apple's M-series processors offer exceptional single-core performance and power efficiency, making them excellent for audio. PCs offer more customization and often more performance per dollar. The most important thing is to research compatibility with your chosen DAW and interface before purchasing.
I have run sessions on every platform that has touched a recording booth in the last twenty years. The Mac-versus-PC argument is the second-most-tedious argument in audio (after analog versus digital itself). Pick what works for your existing tooling, your budget, and your DAW preference. None of the great records of the last decade were great because of the OS that bounced them.
File Types
suggest a correctionDigital audio file types fall into three categories: uncompressed, lossless compressed and lossy compressed.
Uncompressed Formats
Uncompressed formats preserve every sample exactly as recorded. These include WAV (the standard on Windows and in Pro Tools), AIFF (historically favored on macOS) and BWF (Broadcast WAV). These formats are always preferred for recording, mixing and archiving because no audio data is discarded. The tradeoff is larger file sizes: one minute of stereo 24-bit/48 kHz WAV audio is approximately 17 MB. The audio CD format uses uncompressed audio at 16-bit/44.1 kHz—the Red Book standard established by Sony and Philips in 1980, which is why 44.1 kHz remains a common sample rate in music production today.
Lossless Compressed Formats
Lossless compressed formats reduce file size without losing any audio data. When decompressed, the audio is bit-for-bit identical to the original. How is that possible? The same way a ZIP file shrinks a document without dropping a single character: the encoder finds patterns and redundancy in the audio and stores them more efficiently, then perfectly reconstructs every original sample on playback. Nothing is thrown away—the data is just packed smarter, the way you can fold a shirt to take less space without cutting off the sleeves. FLAC (Free Lossless Audio Codec) is the most widely supported lossless format and is used by streaming services such as Tidal, Amazon Music HD and Qobuz. ALAC (Apple Lossless) is Apple's equivalent, used by Apple Music for lossless streaming. Lossless files are typically 50–70% the size of the uncompressed original.
Lossy Compressed Formats
Lossy compressed formats achieve much smaller file sizes by permanently discarding audio data that psychoacoustic models predict will be least audible. MP3 is the most recognized lossy format. AAC (Advanced Audio Coding) offers better quality than MP3 at the same bitrate and is the default format for Apple Music and is widely used by YouTube and most streaming platforms. Ogg Vorbis is used by Spotify. At high bitrates (256–320 kbps), lossy formats can sound remarkably close to the original, but they always discard some information—particularly in the highest frequency ranges.
DSD: A Different Approach
DSD (Direct Stream Digital), developed by Sony and Philips for Super Audio CD (SACD), uses a fundamentally different approach than PCM (the standard sample-and-store method behind WAV, AIFF, and CDs described earlier in this chapter). Instead of multi-bit samples at moderate rates, DSD uses a single-bit stream at an extremely high sample rate (2.8224 MHz for standard DSD64, or 5.6448 MHz for DSD128). While DSD has a dedicated audiophile following, PCM at high resolutions (96 kHz/24-bit and above) remains the standard for professional recording and mixing. In practice, you are most likely to meet DSD when mastering a reissue sourced from SACD masters or delivering to an audiophile label that requires DSD64 or DSD128—at that point, your converter's DSD support and your DAW's import path become relevant, and not before.
Delivery: Masters and True Peak
One rule I tell every student: never let a lossy file be the master. I once delivered a final mix as a 320 kbps MP3 because the client said it would “just be played on YouTube.” Two months later they cut a vinyl pressing from that file. The vinyl exists, somewhere out there, encoded with audio that had already discarded its top end. Here's the distinction that trips people up. A lossy file is for consumer listening—a quick reference for the artist's phone, an email to a client, a rough to text to a friend. It is not what you upload to a distributor. When you deliver to a distributor (DistroKid, TuneCore, a label, a mastering engineer), you hand them the WAV or FLAC—they encode the lossy versions for streaming on their end. So the WAV (or FLAC) is the master for everything that matters: distribution, mastering, vinyl, sync, and every future use you have not imagined yet. The lossy file is only ever the last, consumer-facing copy—never the source.
A related trap is the inter-sample peak—a peak in the analog reconstruction of a digital signal that exceeds the digital sample values. A waveform sampled at 0 dBFS digital can reconstruct to a peak above 0 dBFS analog, and a lossy codec encoding such a master may introduce audible distortion that was not in the source. This is why mastering engineers leave a small margin of true-peak headroom (typically targeting −1 dBTP) on streaming masters: the headroom protects against inter-sample reconstruction overshoot through the listener's DAC and through codec re-encoding. Most modern limiters expose true-peak metering and a true-peak ceiling control. Use them on anything destined for streaming or a lossy delivery format.
Recording on Phones and Tablets
suggest a correctionA songwriter I know tracked the demo that got her signed on an iPhone 15 Pro plugged into a Focusrite Scarlett Solo in the back of a tour van, session at 48 kHz/24-bit, project opened in Logic Pro on the Mac the same afternoon. Nobody at the label asked what it was recorded on. The song was the song.
The phone in your pocket is a legitimate capture and sketching platform—not a toy, not a last resort. Understanding where it fits (and where it does not) is a useful extension of everything this chapter has covered about converters, sample rates, and DAWs.
The operating system. Apple's Core Audio framework handles all audio I/O on iOS and iPadOS. It is the same low-level engine that runs on macOS, and it is class-compliant by design: any USB Audio Class 2.0 (UAC2) compliant interface connects without a driver, and iOS routes it as a standard input source in every recording app. On iPhone 15 and later (USB-C port) and on all USB-C iPads, Core Audio supports 24-bit/96 kHz recording through class-compliant hardware—the same spec you would use on a desktop session.
The software. Apple's GarageBand is free on iOS and iPadOS and is the right entry point: it records multitrack audio, includes a library of software instruments, handles basic editing, and exports stems or a bounce directly to Files. For more serious work, Logic Pro for iPad (available through Apple's Creator Studio subscription at $12.99/month or $129/year as of early 2026; the former $4.99/month standalone tier continues only for existing subscribers) runs on iPad Pro, iPad Air, and iPad mini with an M-series chip. The iPad version shares Logic's core engine with the Mac—the same channel strip, the same plugin formats, the same project file—with some interface and workflow differences from the Mac version. Projects transfer between iPad and Mac via AirDrop or iCloud Drive with all assets embedded; you open the Logic package on the Mac and pick up exactly where you left off.
Interfaces. Three current options worth knowing:
- Focusrite Scarlett Solo (4th Gen) — UAC2 class-compliant, bus-powered over USB-C, connects directly to a USB-C iPad with no adapter. One mic/line input with a 48 V phantom power switch, 24-bit/192 kHz converters. A natural choice if you already own one for desktop work.
- Apogee Duet 3 — Two combo inputs, 24-bit/192 kHz, class-compliant, USB-C bus-powered by all USB-C iPads. Apogee's Control 2 iOS app provides gain control and routing; the preamps are a noticeable step up from the Scarlett tier.
- IK Multimedia iRig Pro I/O — Pocket-sized XLR/¼” combo plus MIDI I/O, 24-bit/96 kHz, ships with USB-C and Lightning cables. Runs on bus power from the device. Useful when the smallest possible rig matters—a field interview, a rehearsal sketch, a location vocal.
Class-compliant interface — A hardware device that conforms to the USB Audio Class standard and communicates with the host OS through built-in drivers, requiring no proprietary software to operate. On iOS and iPadOS, only class-compliant interfaces function as audio inputs.
Latency. Core Audio on a modern iPad running a class-compliant interface at a 64- or 128-sample buffer delivers roundtrip latency in the 5–12 ms range—workable for tracking with in-ear monitoring, though not at the sub-millisecond floor of a dedicated HDX rig. For vocals and solo instruments, it is transparent enough in practice. For live-played MIDI or real-time amp simulation, test your specific interface and app combination before committing.
For field and podcast work, Ferrite Recording Studio (Wooji Juice; free with a $30 Pro upgrade) is the iPad-native editor of choice among journalists and podcasters. It supports up to eight-channel recording, strip-silence, auto-leveling, EQ and compression, and lossless WAV export. The Pro tier adds noise reduction. Ferrite requires iOS/iPadOS 17.6 or later.
Where mobile falls short. Track counts are effectively limited by the iPad's thermal ceiling—a full Logic session with dozens of software instruments and heavy plugin stacks will push an M2 or M3 chip hard, and you will hit CPU warnings before you hit them on a desktop. Storage fills up fast: 17 MB per minute of stereo 24-bit/48 kHz WAV (as noted earlier in this chapter) compounds quickly on a 128 GB device shared with photos and apps. Move sessions to a desktop or an external SSD early; do not wait until the device is full to migrate. And phantom-powered large-diaphragm condensers draw more current than a phone's USB-C port can supply: bus-power limits are real, and some interfaces require external power for 48 V operation on mobile.
The mobile setup does not replace a professional room—it cannot fix an untreated acoustic space, and it cannot match the headroom and monitoring accuracy of a real studio. What it does is eliminate the gap between the idea and the recording. When a melody arrives at 2 AM or on the road between dates, the correct move is to capture it at full quality—not to hum it into a voice memo and hope you remember it in the morning. That is not a compromise—it is the tool doing its job.
Why Mobile Recording Means iOS—For Now
This section has not mentioned Android. That is not an oversight or fanboyism—it is a consequence of how the two platforms handle audio at the operating-system level.
On iOS and iPadOS, Core Audio is the single audio engine for every app on every qualifying device. Apple controls both the hardware and the OS, and Core Audio has been optimized for low round-trip latency across a small, known set of chips—A-series and M-series. When you plug a class-compliant interface into a USB-C iPhone or iPad and hit record in Logic, GarageBand, or any other Core Audio app, the audio path is consistent, predictable, and well-characterized. Serious music apps ship iOS-first because the target is a handful of known chips and one audio engine.
Android is a different engineering problem. The Android ecosystem spans thousands of hardware combinations—hundreds of chipsets, dozens of manufacturers, and driver implementations that vary from device to device and build to build. Until Android 8 (Oreo) introduced the AAudio API, low-latency audio was essentially unavailable on most Android hardware. Subsequent versions have improved the situation, and Oboe (Google's open-source audio library) abstracts the best available path on any given Android device. But the fundamental constraint remains: no developer writing a serious tracking app can guarantee latency behavior across the Android hardware space the way they can on iOS. The operating system's audio engine—not the phone's processor or its spec sheet—is what decides whether the take survives.
What exists on Android. BandLab (BandLab Technologies) is a free cross-platform DAW available on Android that handles multitrack recording, mixing, and cloud collaboration—it is a capable sketching and collaboration tool. FL Studio Mobile (Image-Line) is available on both iOS and Android, and its Android build is a legitimate beat-making and composition environment. For field capture, voice memos, and sketching ideas—capturing a melody, recording a rehearsal, logging a sonic reference—any modern Android phone with its built-in microphone or a clip-on mic is perfectly fine. The question of platform only becomes critical when you are committing a real take through an external interface at session resolution, with a performer monitoring in real time.
The principle is simple: when you need to capture something professionally on mobile—a session-quality vocal, a clean instrument track, a producer demo that might end up on the record—the iOS platform is the current standard because its audio engine delivers consistent, professional-grade latency across devices. Android keeps improving, and the gap has narrowed—but until its audio-stack consistency matches Core Audio on Apple silicon, the professional mobile recording workflow runs through iOS. That may change. It has not changed yet.
From Cylinders to Code
suggest a correctionFrom Edison's tinfoil cylinder to a 96 kHz/32-bit floating-point session in Pro Tools, the goal has always been the same: capture sound and reproduce it in the most compelling way possible. Sometimes that means faithful—an orchestra, a great singer, a great room, captured exactly as it happened. Just as often it means better than the source: tuning the pitch, shaping the tone, turning a rough take into something that moves people. Trust me, you have not heard some of the singers I have had in this room—you would not want them played back exactly as they came in. Fidelity is a tool, not the goal. The goal is a record worth hearing. The tools have changed beyond recognition, but that principle has not.
Consider what happens the moment you hit record. A vocalist sings into a microphone—acoustic energy becomes analog. That analog signal travels down an XLR cable to a preamp, which boosts it to line level. The line-level signal reaches the audio interface, where the ADC samples it thousands of times per second at whatever bit depth and sample rate you chose when you created the session. The digital data streams into your DAW, where it is stored on an SSD as a WAV file. When you play it back, the DAC converts those ones and zeros back to analog, the analog signal drives your monitor speakers, and the speakers push air—acoustic energy again. Analog to digital to analog. That is the signal chain you just learned, end to end.
Every concept in this chapter—sample rate, bit depth, clocking, conversion, dither, aliasing, file formats—will follow you through every session you ever work on. When you set up a session, you are choosing a sample rate and bit depth. When you connect an external converter, you are choosing a clock leader. When you bounce a mix for streaming, you are choosing a file format and applying dither. When a plugin introduces a harsh metallic artifact, you may be hearing aliasing. These are not abstract concepts—they are decisions you will make every day in the studio.
The analog world gave us warmth, harmonic saturation, and the sound of tape. The digital world gave us unlimited tracks, perfect recall, and lossless editing. The best studios use both. Master the principles of each, and you will always know which tool to reach for—and why.
Review Questions
Work these before moving on — every question is answerable from this chapter. Written answers live in the instructor Answer Key, available to course adopters.
- Define the term transducer and list three examples of transducers used in audio.
- What is an ADC? What is a DAC? Explain what each does.
- True or False: Digital audio data is transmitted as binary ones and zeros—discrete states—rather than as a continuously varying analog signal.
- Define sample rate and explain why it matters for audio quality.
- What is the sample rate of a standard audio CD?
- 24,000 Hz
- 44,000 Hz
- 96,000 Hz
- 44,100 Hz
- What does the Nyquist theorem tell us about the relationship between sample rate and the highest recordable frequency?
- Define bit depth. How does it affect dynamic range?
- Fill in the blank: Frequency is to __________ as __________ is to amplitude.
- True or False: A word clock is used to avoid data errors by keeping a perfectly timed and constant sample rate between multiple digital devices.
- What happens when digital clipping occurs? Why is it generally worse than analog distortion?
- On the Pro Tools classic peak meter, the point where the green meets the yellow is:
- −6 dBFS
- −12 dBFS
- 0 dBFS
- −∞ dBFS
- Intentionally applied noise used to smooth out quantization error is called __________.
- List and briefly describe the three essential components of a DAW.
- List and define the three categories of digital audio file formats and give at least one example of each.
- What is the difference between FLAC and MP3? When would you use each?
- Why do higher sample rates improve the resolution of the highest audible frequencies, even though they do not extend the audible frequency range?
- What is latency in a DAW, and how does buffer size affect it?
- Research current computer specifications recommended for running Pro Tools (or your preferred DAW) and spec your ideal studio build. Justify each major choice using concepts from this chapter: tie your RAM to sample-library streaming and track count, your CPU and drive choice to buffer size and latency, and your storage to file-format sizes. Show why, not just what.
- With respect to electricity, define: Voltage (V), Current (I), Resistance (R), Impedance (Z), Watts (P), and Ohm's Law.
- Name at least four DAW applications other than Pro Tools and briefly describe what each is known for.
- Explain why engineers apply dither when converting from 24-bit to 16-bit audio. What would happen without it?
- What is aliasing, and how do AD converters prevent it?
- Name three popular tape emulation plugins, and explain what “harmonic saturation” means and why engineers value it on digital recordings.
- Why does the chapter argue that “there is no studio without analog” even though most modern recording is digital? Trace a vocal from microphone to monitor speaker, naming each domain along the way.
- What are the tradeoffs of recording at higher sample rates and bit depths? Why might an engineer choose 48 kHz/24-bit over 192 kHz/32-bit?
- Why are GPUs becoming increasingly important in modern audio production beyond video work?
- A producer hands you two reels of tape and says: “Use whichever setup sounds best for this project—a warm, dense rock record with lots of distorted guitars and pounding drums.” Reel A is marked 15 IPS / NAB; Reel B is marked 30 IPS / IEC. (a) Explain the sonic and technical tradeoffs between the two speed/EQ combinations described in this chapter. (b) Recommend one for the project and justify your choice using the chapter's description of how tape speed affects harmonic saturation, low-frequency character, noise floor, and tape consumption. (c) Before you record a single note, what alignment steps must you complete—and what is the consequence of skipping them?
Studio Exercise: Hear the Difference (Or Don't)
The goal of this exercise is to test, with your own ears and your own playback system, whether higher sample rates and bit depths actually sound different on the work you do. Pretty much every digital-audio debate eventually lands on this question. The only honest way to answer it is to listen.
Required:
- Pick a source file. A 30–60 second piece of music with a wide frequency range and dynamics—an acoustic recording with cymbals, a chamber ensemble, or a busy mix you know well.
- Render three versions of the same source from your DAW:
- 44.1 kHz / 16-bit (CD standard)
- 48 kHz / 24-bit (broadcast and video delivery)
- 96 kHz / 24-bit (high-resolution recording)
- Convert all three to a common playback rate—48 kHz / 24-bit using your DAW's high-quality sample-rate conversion. (This is what your converter would do during real-time playback anyway.)
- Blind A/B/C listen through your best playback chain—studio monitors first, then headphones. Have a partner randomly cue them so you do not know which is which.
- Document. Which version (if any) you could identify reliably, and what specifically you heard that distinguished it (if anything).
Optional:
- Add a 32-bit float master as a fourth condition. Compare against the 24-bit version.
- Add a lossy version—the same source as a 320 kbps MP3 and a 256 kbps AAC. Where do those land relative to the uncompressed renders?
- Repeat the test through earbuds or laptop speakers. Often the differences that exist on a well-treated room collapse on consumer playback.
Deliverable: A 200-word written reflection on which differences you heard, which you did not, and what sample-rate / bit-depth combination you plan to use as your default session settings going forward—and why. There is no wrong answer; engineers reach different conclusions, and the answer depends on your work and your room. The goal is to make the choice consciously.