Chapter 16 · Mixing & Processing
Dynamics Processing
“I would rather compress a vocal hard to get some personality out. It's like putting a snazzy jacket on a guy when he goes out at night—it adds attitude.”
—Chris Lord-Alge
By the end of this chapter, you will be able to:
- Identify the six core compressor controls—threshold, ratio, attack, release, knee, and makeup gain—and read a gain-reduction meter to determine how much compression is being applied
- Explain how attack and release settings determine the balance between punch and control: a slow attack preserves transients while a release timed to the song's tempo prevents audible pumping
- Distinguish broadband, frequency-sensitive (de-esser), and multiband compression by how each targets the frequency spectrum, and select the appropriate type for a given source and problem
- Describe limiting as compression at ratios of 10:1 through brickwall infinity:1, including its roles in clipping prevention and loudness maximization and its relationship to the loudness wars
- Configure side-chain compression and dynamic EQ to achieve kick-and-bass separation and creative ducking by routing a key-input trigger to the detector of a compressor or frequency band
- Compare parallel and serial compression as complementary strategies—parallel blending an unprocessed signal with a heavily compressed copy for punch and body, serial chaining multiple light stages for transparency and tonal shaping
- Identify the four compressor circuit types—opto, FET, VCA, and variable-mu—and describe the harmonic fingerprint and dynamic behavior each imparts, using the LA-2A, 1176, SSL G-Series, and Manley Variable Mu as reference examples
- Apply expanders, noise gates, transient designers, and iZotope RX spectral noise reduction to control unwanted noise, shape transient envelopes, and repair audio that cannot be re-recorded
The last chapter taught you to shape tone—to carve frequency, to sculpt the spectrum so every instrument has its own real estate. This chapter teaches you to shape volume. Where EQ controls what frequencies live in your mix, dynamics processing controls how loud those frequencies are at any given instant. The two work together: EQ gives each track its space, compression makes that space consistent.
Listen to any record on the radio right now. The vocal sits perfectly on top of the beat—never too loud, never buried. The kick drum hits with consistent punch on every single beat. The bass is controlled and tight, never booming out of proportion. None of that happened by accident. Behind every polished mix is a compressor doing work that most listeners will never notice—and that is exactly the point.
A compressor is a device that automatically reduces the dynamic range of sound passing through it—the difference in dB between the loudest and softest passages. If our loudest part reaches −5 dBFS and our softest hits −20 dBFS, our dynamic range is 15 dB. The compressor reduces this number by turning down only the parts that exceed a chosen threshold, leaving everything below untouched. After compression, the overall signal can be raised, bringing up the quiet parts and making the whole performance sound louder, more controlled, and more present.
Think of a compressor as an automatic moving fader. You are mixing the lead vocal of a pop singer. Throughout the verse, she is sometimes soft and other times belts at full volume. You could ride the fader manually—turning it down when she belts, turning it up when she whispers—but the singer might start a word quietly and end it screaming, making manual automation painfully time-consuming. A compressor does this work for you, reacting in milliseconds to changes that would take you hours to automate by hand.
That said, a compressor is not a substitute for fader automation—the best mix engineers use both, often in that order. Riding the fader (or clip-gain) before the compressor evens out gross level swings so the compressor handles only the moment-to-moment dynamics, not all the work at once. Automation also handles the song-level energy moves the compressor cannot: raising a chorus, pulling back a bridge, pushing a final hook.
Beyond level control, compression can also reshape the volume envelope of a sound (affecting its attack, sustain, and decay), add harmonic distortion and warmth (we will explore this in the Saturation section later in this chapter), and alter the tonal character of a signal—heavy compression often rolls off high frequencies, which can be a problem or a creative tool depending on the context.
Controls of a Compressor
suggest a correctionThe first 1176 I sat in front of had no threshold knob—just an input dial—and I spent ten minutes searching for one before realizing the input was the threshold. Different circuits, different controls, same underlying job. Every compressor looks different, but they all share the same core controls. Understanding what each one does—and how changing it affects the feel of the sound, not just the level—is what separates someone who uses compression from someone who understands it.
Hear Compression
A synthesized drum groove through a real compressor. Pull the threshold down, push the ratio up, and watch the gain reduction meter work.
Threshold — The level where compression begins. If the threshold is set at −12 dBFS, any signal above that point gets compressed; anything below passes through untouched. The threshold is the most fundamental control—it determines how much of the signal the compressor actually affects. Set it too low and you compress everything, including the quiet parts. Set it too high and the compressor barely engages.
Some compressors have a variable threshold that you adjust directly—the Avid Compressor/Limiter Dyn 3 is a common example. Others, like the 1176 and its recreations (including the BF-76 included with Pro Tools), have a fixed threshold—instead of lowering the threshold, you increase the input gain to push the signal past it. The result is the same; the workflow is different.
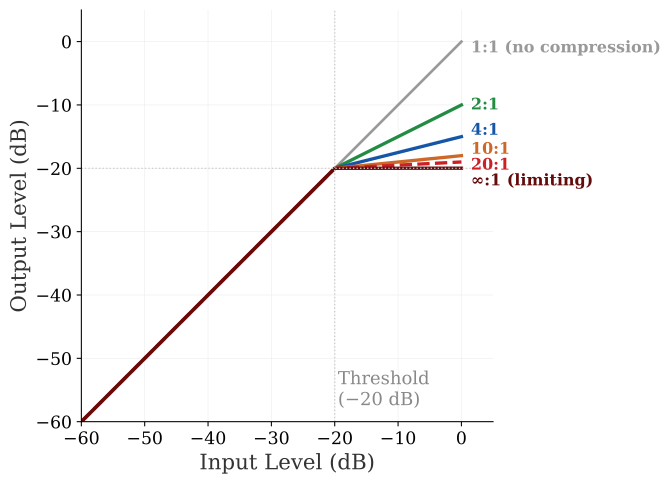
Ratio — How much the signal is reduced once it exceeds the threshold—the strength of compression. A 2:1 ratio means it takes 2 dB of signal over the threshold to produce 1 dB of output over the threshold. Example: threshold at −10 dBFS, signal reaches −8 dBFS (2 dB over). At 2:1, the output is −9 dBFS (only 1 dB over instead of 2). At 10:1, the same 2 dB over threshold produces only 0.2 dB of increase—the signal is barely moving. At infinity:1, the signal will not pass the threshold at all.
When the ratio reaches 10:1 or higher, the compressor becomes a limiter. Brickwall limiters at infinity:1 ensure the signal absolutely cannot exceed the threshold (Izhaki, 2023)—essential for preventing clipping and for loudness maximization in mastering.
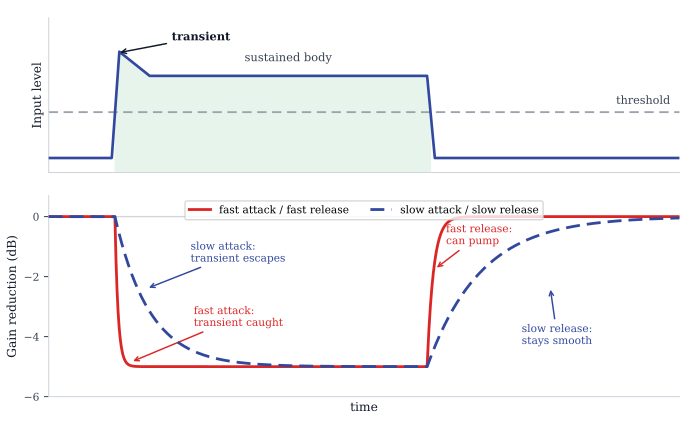
Attack — How fast the compressor reacts once the signal crosses the threshold. This is where compression becomes an art. A fast attack catches the transient immediately—great for controlling dynamics, but it clamps down on the initial punch of a drum or the pluck of a guitar, making the sound duller and more controlled. A slow attack lets the transient through before the compressor grabs, preserving the snap and punch of the performance. This is one of the most important decisions you will make on every compressor you use: do you want control or punch? The answer depends entirely on the source and the song. Counterintuitively, a slow enough attack can actually increase dynamic range: it lets the loud transients pass uncompressed while still clamping the body that follows, so the peaks stay tall and the sustained parts get pulled down—widening the gap between loudest and softest. That is not a bug; on drums it is often exactly the punch you want.
Release — How fast the compressor lets go once the signal drops below the threshold. A fast release recovers quickly, bringing out the sustain and tail of the sound—it makes drums ring longer and vocals feel more present. But too fast and you hear the compressor “pumping” as it rapidly grabs and releases, which can sound like distortion. A slow release holds the compression longer, creating a smoother, more controlled sound—but it can squash the life out of a performance if the compressor is still clamped down when the next note arrives. The best release settings are often timed to the tempo of the song, so the compressor breathes with the music.
Knee — Determines how gradually the compression engages. A hard knee applies the full ratio the instant the signal crosses the threshold—it is more aggressive and audible, adding punch and edge. A soft knee starts compressing gradually as the signal approaches the threshold, creating a smoother, more transparent transition. Soft knee is generally preferred for vocals and mix-bus compression where you do not want the listener to hear the compressor working.
Makeup Gain (Output) — Compression reduces peak levels, which makes the signal quieter overall. Makeup gain brings the compressed signal back up to its original level—or higher. This is why compression makes things sound louder: the peaks have been turned down, the overall signal has been brought back up, and now the quiet parts are closer to the loud parts. The dynamic range is smaller, and the perceived loudness is greater. On stereo sources, also check the stereo link setting: linked, both channels compress identically (keeping the stereo image stable—the right call for buses and masters); unlinked, each channel compresses on its own and a loud hit on one side can momentarily tug the image sideways.
Meter — Shows how much compression is being applied. When set to Gain Reduction (GR), the meter displays the amount of reduction in real time. Watch this constantly—it tells you exactly what the compressor is doing. If you are seeing 10 dB of gain reduction and only wanted 3, something needs to change.
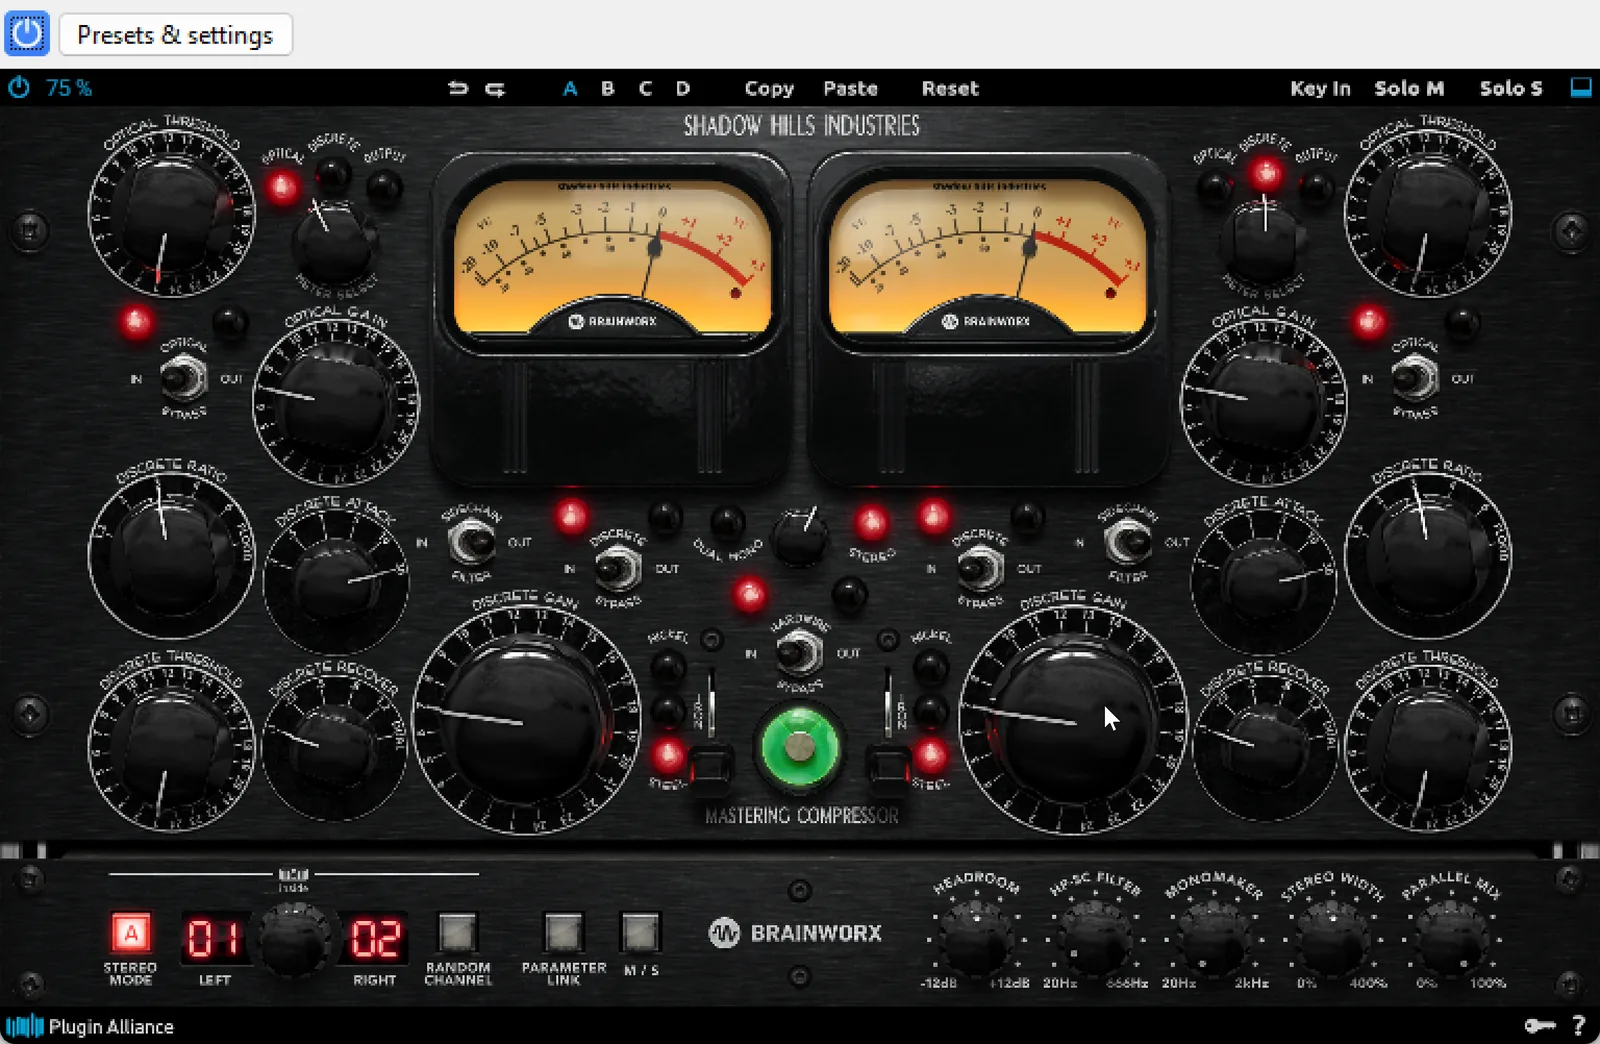
Detection Mode — How the compressor's detector circuit measures the incoming signal before deciding whether to compress. Two modes appear on most compressors, and they sound different even when every other knob is identical. Peak detection responds to instantaneous signal peaks—it grabs the exact moment the waveform crosses the threshold. Fast and reactive, peak detection is the right choice when your primary goal is control: preventing a vocal from clipping, stopping a snare from poking, catching a transient before it damages anything downstream. The trade-off is that a single loud spike can trigger the compressor even if the overall level is low, which can make peak-detected compression feel choppy on material that is dynamically uneven. RMS detection (Root Mean Square) averages signal level over a short window of time—typically a few milliseconds—so the compressor responds to loudness, not individual spikes. Two compressors set to identical ratio, attack, and release but running in peak versus RMS mode will behave differently on the same material: the RMS unit sounds smoother, more musical, and more transparent because it is not chasing every transient. Vocals, mix buses, acoustic instruments—anywhere you want the compression to track the way a listener's ear tracks loudness—benefit most from RMS detection. Transient-heavy sources where you specifically need to catch the hit often prefer peak mode. In hardware terms: FET compressors like the 1176 are peak-reactive, optical units like the LA-2A use a program-dependent optical cell, and most modern plugins default to RMS with a switchable peak mode. One more design split worth knowing: feed-forward compressors analyze the incoming signal (predictable, often faster—the modern digital norm), while feedback designs analyze their own output (self-regulating, and part of why the 1176 and LA-2A behave so musically).
Lookahead — A third detector option available on many modern compressors and nearly all brickwall limiters. The detector receives a pre-delayed copy of the signal and analyzes it slightly before the actual audio arrives, so the compressor can respond at—or even fractionally before—the threshold crossing instead of after. The cost is latency: the audio path is delayed to match the analysis window (typically 1–5 ms, sometimes up to 20 ms on limiters), which Pro Tools' Delay Compensation handles automatically. Lookahead makes a compressor more transparent because it never has to play catch-up on a transient it missed. It is essential on true-peak limiters—the subject of Chapter 19's loudness chain—where catching inter-sample peaks before they cause distortion in the delivery file is the entire job. Related: some compressors (opto circuits and their emulations especially) feature program-dependent release, automatically shortening or lengthening the release based on how long and how hard the compression was—so a brief peak releases quickly while a sustained loud passage releases gradually, keeping the compression feeling natural without manual adjustment.
Types of Compression
suggest a correctionThere was a rock mix I fought for hours where the choruses kept losing impact. Levels were right, EQ was right, but each chorus felt smaller than the one before. The problem turned out to be my mix-bus compressor: the bass guitar's sustained chorus notes were triggering it so consistently that the cymbals and lead vocal stayed buried underneath. Swapping in a multiband bus compressor—low band riding the bass, the rest of the spectrum left untouched—restored the chorus impact in two minutes. Not all compressors treat the frequency spectrum the same way. Understanding the difference between broadband, frequency-sensitive, and multiband compression tells you which tool to reach for in any given situation.
Broadband Compression
The most common type. A broadband compressor reacts to the entire signal—all frequencies summed together trigger the detector, and all frequencies are compressed equally. This is what you are using 90% of the time. The trade-off: if a loud bass note triggers the compressor, the highs get compressed too, even if they were not the problem. On a full mix, a booming kick can cause the vocals and cymbals to duck. This is not always a problem—sometimes it is the “glue” you want—but it is important to understand why it happens.
Frequency-Sensitive Compression (De-Essing)
A variation of broadband compression where the detector listens to only a specific frequency range, but the compression still affects the entire signal. The most common example is a de-esser—it monitors the sibilant range (typically 4–10 kHz) and compresses the full signal only when those frequencies exceed the threshold. The result: “sss” and “shh” sounds are tamed without affecting the rest of the vocal. Some de-essers offer a “split” mode that compresses only the targeted band, leaving everything else untouched.
Excessive sibilance is not just annoying—it can be physically piercing at high volumes and can cause damage to tweeters. To set up a de-esser:
- Insert the de-esser on the lead vocal track, post-EQ.
- Solo the vocal and find a passage with prominent “sss” sounds.
- In Listen mode (most de-essers offer one), sweep the detector frequency between 4 kHz and 10 kHz until the sibilance is loudest—usually 5–8 kHz for women, 4–7 kHz for men.
- Set the threshold so the meter shows 3–6 dB of reduction only on sibilant peaks, not on the body of the vocal.
- Toggle bypass while the chorus plays. The vocal should still feel bright—you are taming sibilance, not killing it.
De-essers I rely on include the FabFilter Pro-DS and the Eiosis E2 De-Esser.
Multiband Compression
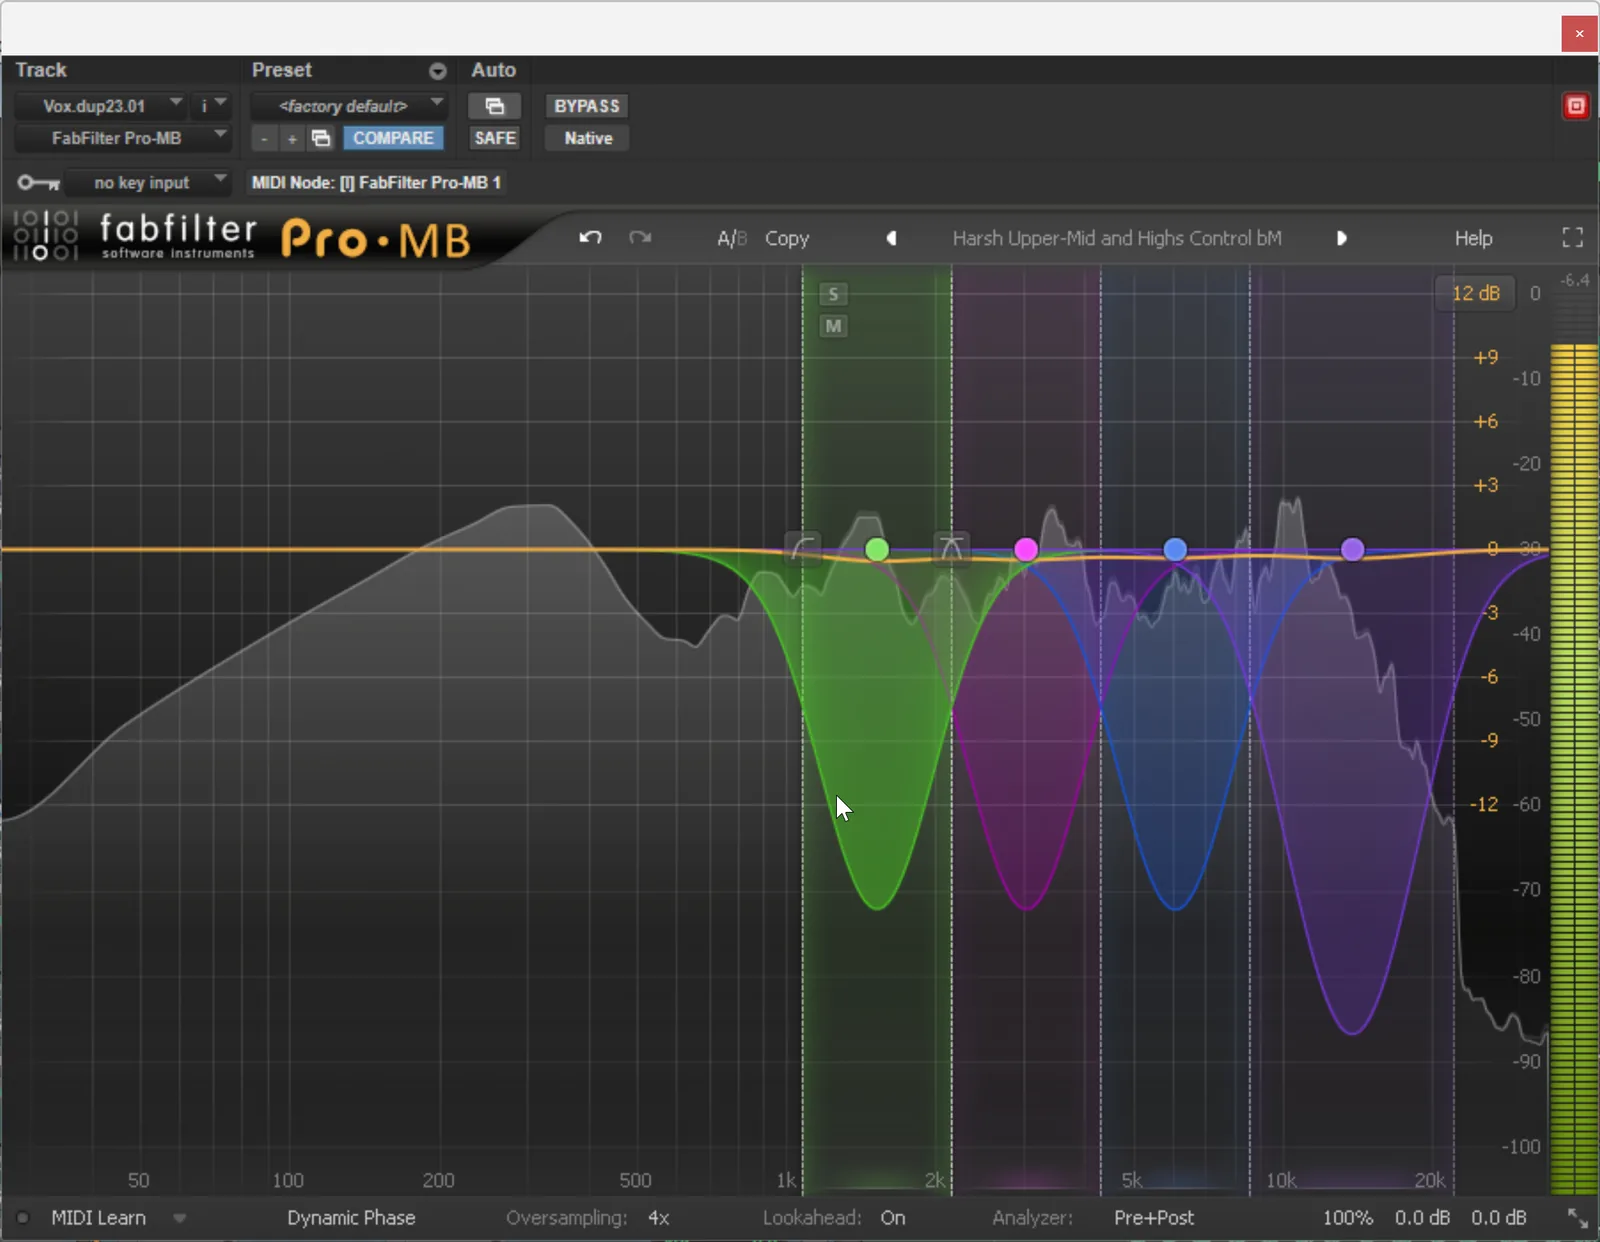
A multiband compressor splits the frequency spectrum into separate bands—typically four (low, low-mid, high-mid, high)—and compresses each one independently. This solves the fundamental problem of broadband compression: the kick no longer causes the vocals to duck, because the low band and the high band have separate thresholds, ratios, and gain reduction.
Multiband compression is essential in mastering, where you need precise control over the entire frequency range without one element affecting another. It is also powerful on vocals (taming low-end proximity effect in the verse without dulling the bright chorus), drum buses (controlling the low end without squashing the cymbals), and full mixes. The trade-off is complexity—four compressors to set instead of one—and the risk of over-processing if you compress every band aggressively. FabFilter Pro-MB and the Waves Linear Phase Multiband Compressor are industry standards.
Side-Chain Compression
suggest a correctionThe first record I used side-chain compression on was a hip-hop track where the kick and the 808 bass were occupying the exact same frequency range and turning the low end into mud. Every fix I tried with EQ either thinned the kick or drained the bass. Side-chaining the bass to the kick took five minutes to set up and the low end opened up like a door swinging wide. That was when I understood why this technique is on virtually every modern pop, hip-hop, and electronic record.
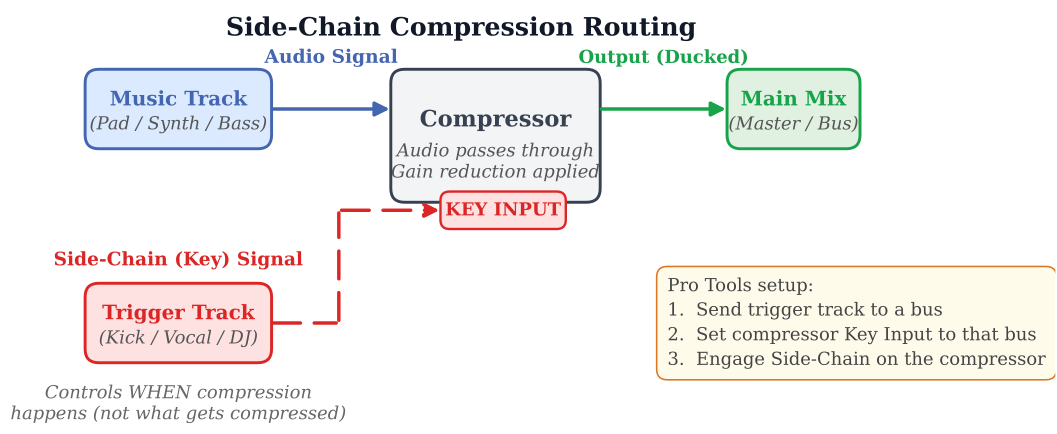
Side-chain compression is one of the most creative tools in your arsenal. Instead of the compressor listening to the signal it is compressing, it listens to a different signal—called the key input—and uses that to trigger compression. The compressed signal has no idea what is controlling it. The key input pulls the strings.
The Kick and Bass Setup
The most common use: kick and bass. If the two are fighting in the low end, place a compressor on the bass and set the kick as the key input. Every time the kick hits, the bass ducks slightly—creating space for the kick to punch through, then releasing so the bass fills back in between hits. The listener hears both elements clearly without one masking the other.
In Pro Tools, set it up like this:
- On the kick drum track, add a send to an unused bus (e.g., Bus 3). Set the send level to unity (0 dB) and pre-fader.
- On the bass track, insert an Avid Compressor/Limiter Dyn 3 (or any compressor with a key-input option).
- In the compressor, click the Key Input selector and choose Bus 3.
- Click the Side-Chain (or external key) button to engage the side-chain detector.
- Set the compressor for fast attack (~5 ms), medium release (~80–120 ms), ratio 4:1, and lower the threshold until the bass ducks 3–6 dB on each kick hit.
- Listen with both tracks playing. Adjust release until the bass returns naturally between hits—too fast and it pumps audibly, too slow and the bass never recovers.
Beyond Kick and Bass
Once you understand the principle, side-chain compression unlocks a dozen other moves:
Vocal ducking the reverb return. Place a compressor on the vocal reverb AUX, key it from the dry vocal. The reverb tail ducks while the vocal is singing and blooms in the gaps between phrases—giving you a wet, spacious sound that never washes out the lyrics.
Snare ducking the room mics. Key the room mic compressor off the close snare mic. The room ducks every time the snare hits, then breathes back in between, exaggerating the front-to-back depth of the kit.
DJs and broadcasters use the same principle—called ducking—by side-chaining the music to their microphone. When they speak, the music automatically drops so the audience can hear them.
Pad and synth pumping for EDM and modern pop. Compressing an entire pad or chord stack keyed to the kick creates the rhythmic “pumping” effect that defines tracks like Eric Prydz's “Call on Me” or any Daft Punk record. Plugins like Xfer Records LFOTool and Cableguys VolumeShaper simulate this effect without complex routing by syncing directly to the session tempo.
Mid/Side side-chain. Modern compressors like FabFilter Pro-MB let you key only the mid (or only the side) channel from a different track—useful for ducking a mono kick out of the center while leaving the stereo width untouched.
Side-Chain Dynamic EQ
Side-chaining is not limited to compressors. Dynamic EQ plugins (FabFilter Pro-Q, TDR Nova, oeksound soothe) let you side-chain a specific frequency band from one track to another. Example: place a dynamic EQ on the bass with a band centered at 60 Hz; key it from the kick. Now the bass dips 60 Hz only when the kick hits, leaving every other frequency untouched. This is more surgical than full-band side-chain compression and increasingly common in modern mixing—all the separation, none of the pumping.
Parallel Compression
suggest a correctionParallel compression (also called New York compression, or upward compression) is a technique I cannot stress enough—most of my compression during mixing and mastering is done in parallel. The concept: blend an uncompressed version of the signal with a heavily compressed copy. The original preserves the natural transients and dynamics. The compressed copy brings up the quiet details—the room tone around a drum kit, the breath in a vocal, the sustain of a guitar note. When you mix them together, you get the best of both worlds: the punch and dynamics of the original with the body and sustain of the compressed version.
Here is why it works: traditional compression turns down the loud parts. Parallel compression effectively turns up the quiet parts—without touching the peaks. The human ear perceives this as louder, fuller, and more natural because the transients are intact. I use it on drums more than anything else—a drum bus with heavy parallel compression sounds massive and punchy in a way that no amount of direct compression can achieve without destroying the transients.
Mix engineers like Michael Brauer have built entire careers around parallel compression. His “Brauerize” multi-bus technique runs the lead vocal through five compressors in parallel simultaneously, each contributing a different tonal character, and blends their outputs to construct the final vocal sound. You do not need a five-bus chain to start, but the principle scales: more compressors, more tonal options, more nuanced control over how the compression sounds.
Setting Up Parallel Compression
- Create a stereo AUX track and assign its input to a stereo bus (e.g., Bus 5–6).
- On the source track, add a send to that bus, post-fader, set to unity.
- On the AUX, insert a compressor and set it for aggressive compression: fast attack, fast release, high ratio (8:1 or higher), threshold low enough for 10+ dB of gain reduction.
- Pull the AUX fader all the way down, then raise it gradually while playing the song until you hear the compressed signal supporting the original without overpowering it.
- A/B with the AUX muted to confirm you are adding body and sustain, not muddying the source.
Many modern plugins like FabFilter Pro-C include a built-in dry/wet mix that puts you in parallel mode instantly—set the dry/wet Mix control on a single insert and you are there, no AUX routing required.
Serial Compression
suggest a correctionSerial compression means using multiple compressors in sequence on a single track, each doing a small amount of work. Instead of one compressor doing 10 dB of gain reduction (which sounds obvious and harsh), two compressors each doing 3–4 dB sound far more natural and transparent. Each compressor can also serve a different purpose: the first controls dynamics, the second shapes the envelope, a third adds character.
My most-used serial chain is an 1176-style FET compressor into an LA-2A-style optical compressor. The 1176 has a fast attack and grabs the transients—it controls the peaks and adds energy. The LA-2A is slower and smoother—it evens out the overall dynamics and adds warmth. Together, they produce a vocal that is controlled, present, and warm without sounding compressed. By the end of most of my mixes, every important track has passed through at least two compressors.
The guiding idea is to stage different jobs rather than ask one box to do everything. Keeping each stage gentle—3–4 dB of gain reduction, then another compressor when you need more control—is a reliable default. But plenty of pros break it on purpose: a fast FET compressor catching 6–10 dB of peaks into a slower optical leveler doing 2–3 dB is a classic vocal chain. What matters is that each stage has a distinct purpose, not the exact number on any one meter. Three compressors each doing about 3 dB (roughly 9 dB of gain reduction total—the dB add up; it is the ratio that compounds across stages, not the reduction) usually sound more natural and transparent than one compressor doing all 9 dB at once. “Usually,” not always—one compressor doing 9 dB can be the right call when you want obvious, aggressive compression as an effect.
Limiting
suggest a correctionThe first time I A/B'd a 1996 CD against a 2010 master of the same song, I lost my mind. The 2010 version was almost twice as loud—and you could hear the limiter eating the drums on every chorus, transients flattened into a single horizontal smear. The loudness wars, audible in a single A/B. A limiter is a compressor with a ratio of 10:1 or higher—all the way to infinity:1. Originally developed to prevent clipping and protect equipment from sharp transients, limiters are now essential tools for loudness maximization. When you hear a song described as “squashed” or “smashed,” a brickwall limiter was pushed too hard, leaving almost no dynamic range.
The relationship between compression and limiting is a spectrum, not a switch. At 2:1, you have gentle compression. At 4:1, moderate. At 10:1, you are limiting. At infinity:1, the signal physically cannot exceed the threshold—nothing gets past the wall. For certain genres like electronic music, hip-hop, and pop, heavy limiting is part of the sound. For classical, jazz, and acoustic music, it generally destroys what makes the performance special. Knowing where your genre sits on this spectrum is critical.
Compressor Types by Circuit Design
suggest a correction“I'm using compressors, but I'm not always using compression. I use compressors a lot more as a form of tone than waiting for it to slam.”
—Michael Brauer (Tape Op #37, 2003)
Not all compressors are created equal. The circuit design determines the character of the compression—how fast it reacts, how transparent it sounds, and what harmonic color it adds. Brauer's point lands exactly: the gain reduction is only half of what a compressor does. The other half is the harmonic fingerprint the circuit imparts as the signal passes through. Knowing which type to reach for in each situation is one of the things that separates a working engineer from a student with a plugin folder.
Optical (Opto) Compressor
Uses a light-dependent resistor and an LED or electroluminescent panel to control gain. The light intensity increases as the signal gets louder, causing the resistor to reduce the gain. Because light does not respond instantly, opto compressors have a naturally smooth, musical compression character with a program-dependent response—the attack and release change based on the signal itself.
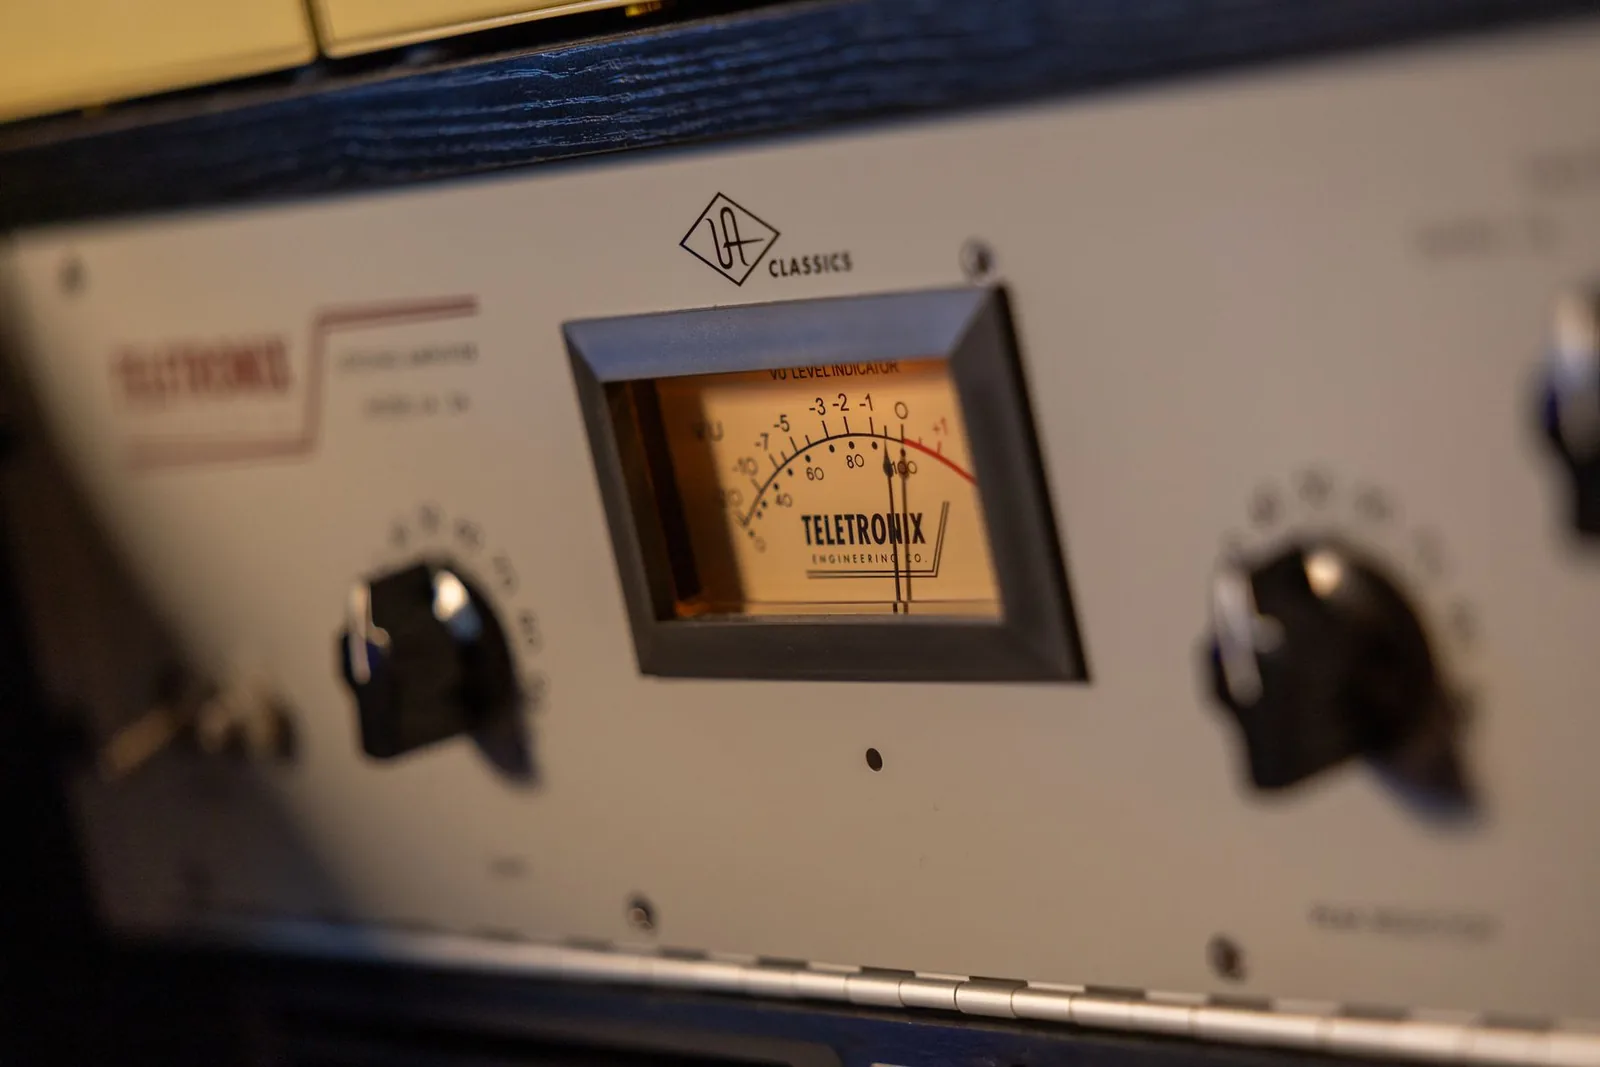
The Teletronix LA-2A is the most famous opto compressor ever made—it has only two knobs (Peak Reduction and Gain), and it sounds incredible on vocals. The LA-2A specifically has no attack or release knobs—its optical cell sets them program-dependently, which is part of its charm. But do not mistake “opto” for “automatic”: plenty of optical compressors (and modern opto-style plugins) give you full attack and release control. “Opto” describes the gain-reduction element, not the absence of controls. The warm, smooth, slightly colored character of the LA-2A has defined the sound of lead vocals for decades. Reach for an opto compressor when you want smooth, transparent, program-dependent compression—vocals, bass, acoustic guitar, anything that needs control without sounding compressed.
FET Compressor
Uses a field-effect transistor for gain reduction. FET compressors are fast—much faster than optical circuits—and can add aggressive harmonic character when pushed hard.
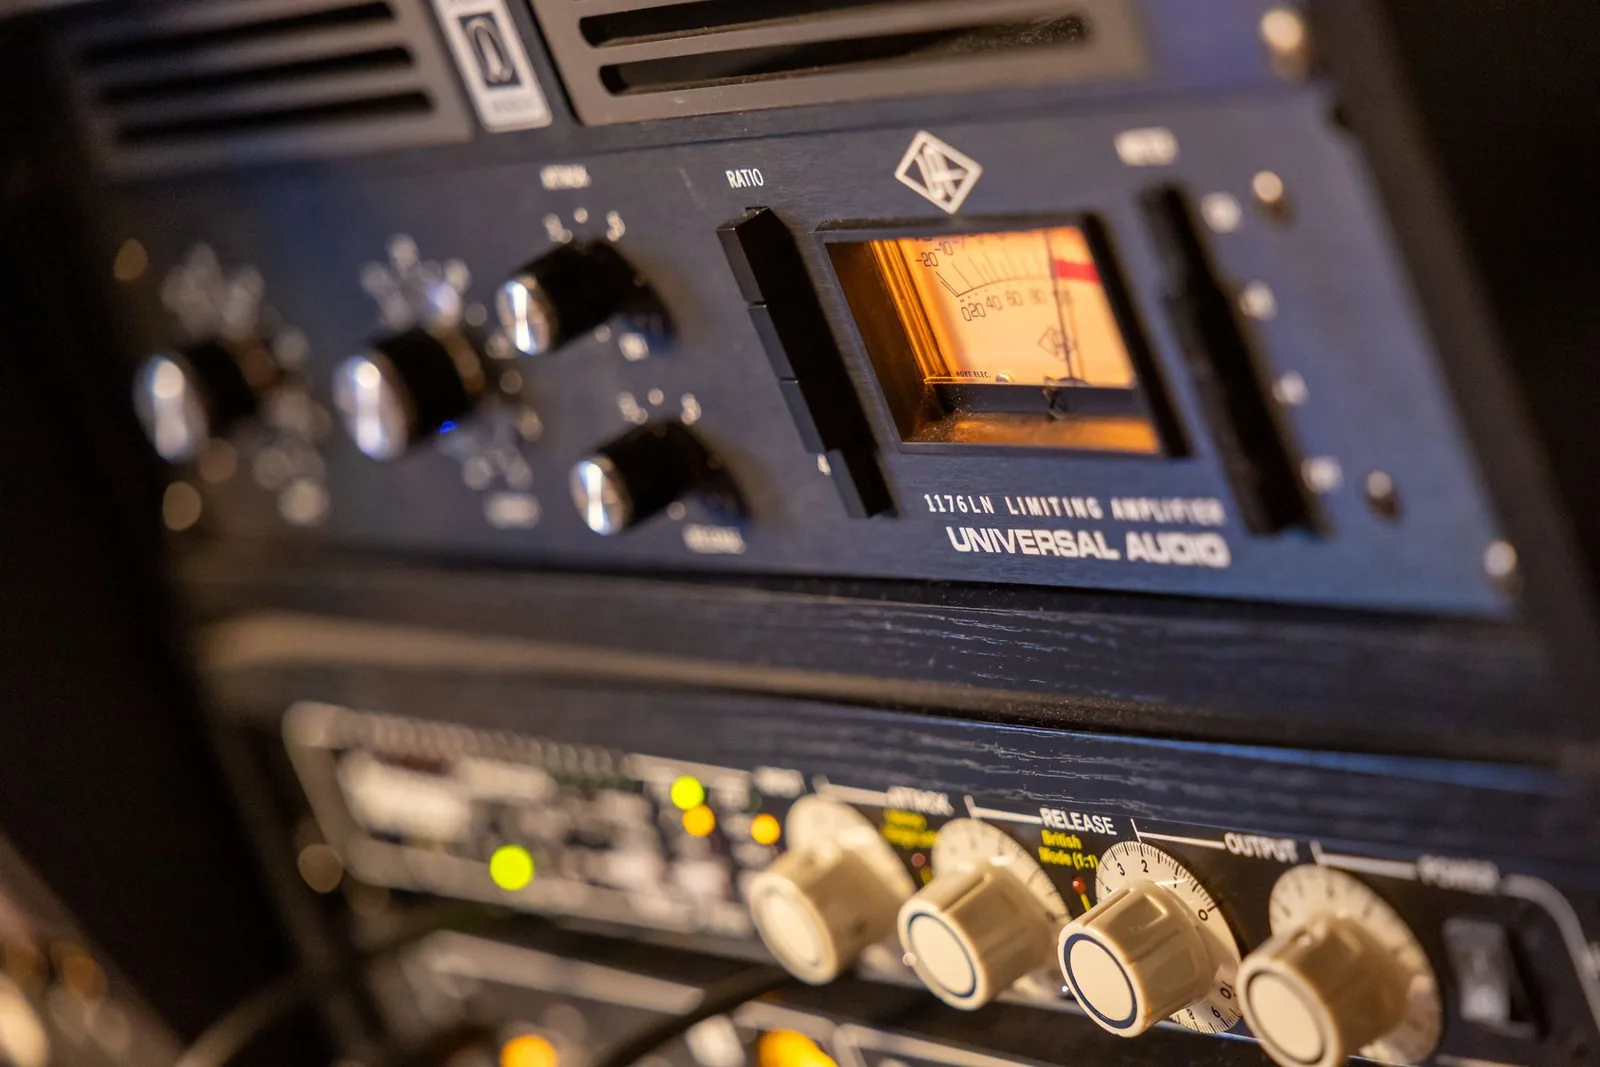
The Universal Audio 1176 is the most iconic FET compressor. It is known for its lightning-fast attack, punchy character, and the legendary “All Buttons In” mode—pressing all four ratio buttons simultaneously overdrives the circuit and produces an aggressive, distorted compression that has been used on everything from Led Zeppelin drums to modern hip-hop vocals. The 1176 is the opposite of the LA-2A: where the LA-2A is smooth and gentle, the 1176 is fast and in your face. Reach for a FET compressor when you need speed, punch, and attitude—drums, aggressive vocals, electric guitars, anything that needs to hit hard.
VCA Compressor
Uses a voltage-controlled amplifier to adjust gain. VCA compressors are precise, fast, and clean—they compress the signal with minimal coloration, making them the most transparent option. They also excel at bus compression because their consistent behavior holds a group of instruments together without imposing a strong character on the sound.
The SSL G Series Bus Compressor is the most famous VCA compressor and has been the standard mix-bus compressor for decades—the “glue” that holds together countless hit records. The API 2500 is another respected VCA compressor with a more aggressive, punchy character. Reach for a VCA compressor when you want clean, precise control—mix bus, drum bus, instrument buses, or any source where transparency matters more than character.
Variable Mu (Tube) Compressor
Uses vacuum tubes to control gain. As the input signal increases, the tube's bias changes, reducing the gain. This is the oldest form of compression, and it produces the smoothest, most gradual compression of any design. Variable-mu compressors are inherently slow and gentle—they cannot grab fast transients the way a FET can, but they excel at adding warmth, depth, and subtle tonal color.
The Manley Variable Mu and the Fairchild 670 (the most expensive vintage compressor in existence, with originals selling for six figures) are the most famous examples. Reach for a variable-mu compressor when you want warmth, depth, and gentle program-dependent compression—mastering, mix bus, orchestral recordings, anything that needs to be handled with a velvet touch.
Saturation and Harmonic Distortion
suggest a correctionHearing a clean digital signal next to the same signal run through a real tape machine, I understood why analog gear gets fetishized. The digital signal was technically perfect—and lifeless. The same signal through tape had a softness on the transients, a glow in the midrange, and a low end that felt like it had weight. Nothing had changed except harmonic content. Every compressor you just read about produces that same harmonic distortion as a byproduct of its circuit. When the LA-2A is described as “warm,” when the 1176 in All Buttons In mode sounds “aggressive,” when the Manley Variable Mu adds “depth”—those are all descriptions of saturation. Understanding what it is and why it sounds good is essential to understanding why different compressors sound different.
Saturation occurs when a signal is pushed into the nonlinear region of an analog circuit. In the linear region, what goes in comes out at the same shape, just louder or quieter. In the nonlinear region, the circuit cannot reproduce the waveform perfectly—the peaks get softly rounded off, and the signal generates additional frequencies called harmonics that were not in the original. This is distortion, but not the ugly, clipping kind. It is the musical kind.
The type of harmonics determines the character. Even-order harmonics (2nd, 4th, 6th) are perceived as warm, full, and pleasing—this is the sound of single-ended tube stages. Odd-order harmonics (3rd, 5th, 7th) are perceived as edgier, more aggressive (Izhaki, 2023), and eventually harsh—this is the sound of transistor clipping and digital distortion pushed too far. In small amounts, though, a gentle low-order third—the kind analog tape and transformer circuits add—reads as warmth and fullness rather than edge, which is why tape saturation flatters a mix instead of fraying it. Most analog compressors produce a blend of both, weighted toward the even side, which is why running audio through analog gear “sounds better” to many engineers—the circuits are adding subtle harmonic content that the human ear finds pleasing.
There is real psychoacoustics underneath those preferences. Low-order harmonics sit close to the parent tone, inside the ear's masking window, so the brain folds them into the note—heard as body, not as distortion. Hard digital clipping is different in kind, not just in degree: the converter simply runs out of numbers and slices the peaks flat, spraying high-order harmonics and intermodulation products far outside that masking window, where nothing covers them. That is the whole difference between driving a tube and slamming 0 dBFS—one adds energy the ear accepts as part of the sound, the other adds energy the ear hears as damage.
This is why circuit design matters so much. A tube-based variable-mu compressor saturates differently than a FET circuit, which saturates differently than a VCA. The compression itself—the gain reduction—is only half the story. The other half is the harmonic character the circuit imparts to the signal as it works. When you choose a compressor, you are choosing both a dynamic behavior and a tonal color.
Saturation is also used as a standalone effect, separate from compression. Tape emulation plugins (Waves Kramer Master Tape, Universal Audio Studer A800), saturation modelers (Soundtoys Decapitator), tube emulators (Soundtoys Radiator), console emulators (Waves NLS) all add controlled harmonic distortion to make digital recordings sound warmer and more analog. We will explore saturation as a mixing tool in detail in the upcoming Mixing and Mastering chapters. Like compression, saturation raises a sound's perceived loudness and aggression without raising its peak level—it adds harmonic energy and softly rounds the peaks rather than turning anything up. It is one of the most effective ways to make a track feel louder and cut through a busy mix without eating headroom.
Expander and Noise Gate
suggest a correctionThe first session where I gated a kick drum properly, the entire kit transformed. Before the gate, the kick mic was full of snare bleed—and the second I dropped a compressor on the kick bus, the snare came up with it. After gating the kick to silence anything below the kick-hit threshold, the compressor finally did what I wanted: it punched the kick without dragging the snare along for the ride. Gates are not glamorous, but on a multi-mic drum kit they are the difference between a mix that sits together and one that fights itself.
If a compressor turns down signals that are too loud, an expander turns down signals that are too quiet. It is the mirror image: everything above the threshold passes untouched, but when the signal drops below the threshold, the expander reduces it further—increasing the dynamic range instead of decreasing it.
A noise gate is an expander with a ratio of 10:1 or higher—the same way a limiter is a compressor at extreme ratios. When the signal drops below the threshold, the gate slams shut, cutting the sound to silence (or near-silence). Gates are indispensable on drum kits: they isolate the kick from snare bleed, cut the hi-hat from the snare mic, and silence the toms between hits. Without gates on a drum recording, every compressor you apply will amplify the bleed—and suddenly the hi-hat is louder than the snare.
The controls are similar to a compressor, with a few key additions:
Threshold — The level below which the gate activates. Set it just above the bleed level but below the quietest hit you want to keep. This takes careful adjustment—too high and you lose quiet ghost notes; too low and the bleed passes through.
Range/Depth — How much the gate reduces the signal when closed. Full range cuts to silence. A lower range (say, −20 dB) reduces the bleed without completely silencing it, which often sounds more natural than a hard cut.
Attack — How quickly the gate opens when the signal crosses the threshold. Too slow and you lose the initial transient of the drum hit—the click of the kick or the snap of the snare gets clipped off. Fast attack is almost always the right choice for drums.
Hold — How long the gate stays open after the signal drops below the threshold. This prevents the gate from chattering open and closed on a sustained note. On toms, a short hold lets the resonance ring before the gate closes.
Release — How fast the gate closes after the hold period. A fast release creates an abrupt cutoff; a slow release fades the signal out more naturally.
Key Input — Just as with compression, the key input enables side-chain gating. You can trigger the gate on one track using a signal from a different track—for example, using a clean kick sample to trigger the gate on a messy kick mic, ensuring the gate opens perfectly on every hit.
Upward expansion: the un-compressor. The expander above is technically a downward expander—it pushes quiet material further down. Its rarer sibling, the upward expander, raises material above the threshold instead: a gentle below-1:1 ratio applied to peaks restores the transients and dynamic contrast that earlier compression flattened. Mastering engineers reach for it when a mix arrives over-compressed and a remix is off the table—a dB or two of upward expansion can put air and punch back into material that was squeezed lifeless. It is a rescue tool, not a default: applied to a healthy mix it just makes levels unstable. But knowing it exists changes how you hear “the loudness is baked in”—sometimes, carefully, it is not.
Micro and macro: two kinds of dynamics. It is worth separating two things this chapter's tools affect, because they call for different tools. Microdynamics are the moment-to-moment contrasts—the snap of a transient against the note behind it. Compressors, expanders, and the transient designers below live here. Macrodynamics are the section-to-section contrasts—how much louder the chorus is than the verse, how far the bridge drops down. Those belong to arrangement and fader automation (Chapter 18), not to any processor with a release knob. Diagnosing which kind of dynamics problem you have is half the fix: a chorus that does not lift is a macro problem no compressor can solve, and a snare with no crack is a micro problem no fader ride will save.
Transient Designers
A close cousin to gates and expanders, transient designers (SPL Transient Designer, Waves Smack Attack) shape the attack and sustain portions of a sound independently of overall level. Boost attack to make a snare snap harder; cut attack to soften a click. Boost sustain to extend a note's tail; cut sustain to tighten a kick. Unlike a compressor, a transient designer does not depend on threshold or ratio—it analyzes the envelope of the sound itself. Reach for one when you want to reshape a hit's character without affecting overall dynamics.
Practical Tips and Ear Training
suggest a correction“At Media Sound, which is where I learned, I couldn't hear compression for the first two or three years.”
—Michael Brauer (Tape Op #37, 2003)
Compression is the hardest effect to hear and the most important to master. Brauer is one of the most respected mix engineers alive, and he could not hear compression for years—this is normal. Unlike reverb or delay, where the effect is obvious, good compression is invisible. The listener should never think “that sounds compressed.” They should think “that sounds professional” without knowing why.
The Starting-Point Workflow
Whatever compressor you reach for, start the same way:
- Set the ratio to 2:1.
- Set attack and release to medium.
- Lower the threshold until you see 2–3 dB of gain reduction on the meter.
- Ask yourself: control or shape? If control, increase the ratio. If shape, keep the ratio low and adjust attack and release.
- Ask yourself: punch or smoothness? For punch, slow the attack so the transient passes through before the compressor grabs. For smoothness, speed up the attack to clamp down on peaks.
- Adjust the attack faster until the sound starts to lose its edge—its “pop” or “snap.” If it was already too dull, slow the attack.
- Adjust the release faster until the sound feels punchy and alive. If you hear it “pumping” (rapid gain changes that sound like breathing), slow the release.
The Bypass Test
If you are unsure whether your compression is helping:
- With the compressor active, note the average output level.
- Adjust the compressor's makeup gain so that toggling bypass produces the same perceived loudness (your ear is the judge).
- Toggle the bypass switch repeatedly while the song plays.
- If the compressed version sounds better at matched loudness, the compression is helping. If it sounds the same or worse, you are processing for the meter, not the ear.
The compressed signal will usually seem louder because the dynamic range is smaller—this can trick you into thinking it sounds “better” when it is actually just louder. Match the level first, then judge.
Compression is also used as an intentional effect—where the sound of compression is the goal, not just the control. An 1176 in All Buttons In mode squashing a drum room mic by 15–20 dB is not transparent compression; it is an effect. Parallel compression on a vocal, blending a crushed copy underneath the original, is an effect. Know the difference between using compression as a tool and using it as a color.
Dynamics Tools in Pro Tools
suggest a correctionPro Tools ships with several dynamics processors. The Compressor/Limiter Dyn 3 and BF-76 (1176 emulation) cover most needs. The Avid Channel Strip combines dynamics and EQ in a single interface with a transfer curve display. For more advanced processing, the Avid Complete Plugin Bundle adds the Pro Compressor, Pro Expander, Pro Multiband, and Pro Limiter (with LUFS and True Peak metering for streaming delivery) (ITU-R BS.1770-5). Clip Effects can also apply dynamics at the clip level—non-destructively, without using insert slots.
For third-party plugins, FabFilter Pro-C has become a modern standard with 14 compression algorithms, built-in parallel mix, and Dolby Atmos support. Universal Audio's 1176 and LA-2A emulations remain the benchmarks for hardware modeling. The Waves SSL G-Master Buss Compressor is a staple on mix buses worldwide. oeksound soothe acts as an intelligent frequency-specific compressor, dynamically suppressing resonances that would otherwise require tedious manual EQ work.
Spectral Noise Reduction
suggest a correctionA few years ago, I was sent vocal stems from a session recorded in a hotel room. Beautiful performance, ruined by an air conditioning unit cycling on and off through every take. There was no way to re-record. Forty minutes in iZotope RX—a noise profile from the bridge where the singer paused, Spectral De-noise applied at conservative settings, a touch of De-reverb to tighten the room—and the vocal sounded like it had been recorded in a treated booth. RX has saved more sessions for me than I can count.
Noise reduction is, at its core, a form of dynamics processing—it controls the level of unwanted signal just as a compressor controls the level of wanted signal. A gate closes when the signal drops below the threshold. An expander reduces the level of quiet passages. Both are effective for dealing with noise between phrases—the hiss between vocal lines, the bleed between drum hits. But what about noise that exists at the same time as your desired signal? A constant air conditioning hum under a dialogue recording. Traffic noise bleeding through a window during a vocal take. A persistent electrical buzz riding on top of an acoustic guitar. For these problems, you need spectral noise reduction.
Spectral noise reduction works by analyzing the frequency content of the noise (called a “noise profile” or “noise print”) and then subtracting that profile from the signal in real time. The processor identifies which frequencies and amplitudes belong to the noise, and which belong to the desired audio, and surgically removes only the noise. When done well, it sounds like magic. When done poorly (too aggressively), it introduces metallic, watery artifacts often called “musical noise” or “birdies.”
iZotope RX is the industry standard for spectral noise reduction and audio repair. Its key modules include:
- Spectral De-noise: Learns a noise profile from a selection of “noise only” audio and subtracts it from the entire signal. Adaptive mode continuously updates the noise profile for changing noise environments.
- De-hum: Removes electrical hum (60 Hz in the US, 50 Hz in Europe) and its harmonics with surgical precision.
- De-reverb: Reduces room reflections and reverb, tightening dialogue recorded in echoey spaces.
- De-click / De-clip: Two modules—remove clicks from vinyl, and repair digital clipping.
- Spectral Repair: A visual editor that lets you literally paint away unwanted sounds in a spectrogram view—like Photoshop for audio.
- Dialogue Isolate: Uses machine learning to separate speech from background noise—incredibly effective for cleaning production dialogue.
- Mouth De-click: Targets wet mouth clicks and lip smacks in close-mic'd vocals—I run it on nearly every lead.
- Breath Control / De-breath: Detects and turns down (not removes) breaths automatically.
Spectral noise reduction is not limited to post-production. Mastering engineers use it to clean up noise floors. Podcast producers use it on every episode. Music producers use it to salvage recordings made in less-than-ideal environments. If you plan to work in any area of audio, learning iZotope RX is not optional—it is expected.
The Invisible Art
suggest a correctionDynamics processing is arguably the most difficult skill to master in audio engineering—not because the tools are complicated, but because the results are subtle. The difference between no compression and well-applied compression is far less obvious than a dry signal versus one drenched in reverb, yet it is often what separates an amateur mix from a professional one.
I spent years thinking I understood compression before I actually did. I could set a threshold and a ratio, watch the gain reduction meter move, and hear that the signal was “different.” But I could not articulate what had changed or why it was better. The breakthrough came when I started compressing with my eyes closed—ignoring the meters entirely and listening for the moment the performance felt more controlled, more present, more alive. That is the real skill: not knowing how to set a compressor, but knowing how a compressor feels when it is working.
Train your ears by compressing deliberately, then bypassing. Listen for the change in transient character—did the snap of the snare get rounder, or did it disappear? Listen for the shift in sustain—does the note ring longer, or did the compressor choke it? Listen for the overall energy—does the track feel more controlled, or more lifeless? That instinct, built through thousands of A/B comparisons, is what makes a great mixing engineer. No plugin, no preset, and no AI can replace a trained ear.
Here is the drill I give every student: pick one commercial record you know cold and listen to just the lead vocal, only for its dynamics. Not the tone—the level. Notice how it never jumps out on a consonant and never sinks under the guitars on a held note. That evenness is not the singer; it is a compressor doing its job so well you cannot hear it working. When your own mixes start sounding like that—movement you can feel but cannot point to—you have crossed from operating the tool to actually using it.
Now that you understand how to control the dynamics of your audio, it is time to learn how to give it space, depth, and dimension. In the next chapter, we will explore time-based effects—reverb and delay—the tools that turn a flat, dry signal into something that lives and breathes in a three-dimensional world.
Review Questions
Work these before moving on — every question is answerable from this chapter. Written answers live in the instructor Answer Key, available to course adopters.
- What is a compressor, and what do its core controls (Threshold, Ratio, Attack, Release, Knee, Makeup Gain) do?
- True/False: A variable threshold compressor already has the threshold set, while a fixed threshold compressor allows the engineer to adjust the threshold point. If false, explain why.
- What is the difference between broadband compression, frequency-sensitive compression, and multiband compression?
- What type of compressor helps to reduce sibilance, and how does it work?
- What is a limiter and at what ratio does a compressor become a limiter?
- How would you set the attack and release on a compressor: a) attack to bring out punch, b) attack to control dynamics, c) release for a punchier feel, d) release for a smoother feel?
- Explain side-chain compression and how you could use it to enhance your mix. Include the role of the key input and one practical example beyond kick-and-bass.
- What is a noise gate, what are its controls, and how can it enhance a mix?
- True or False: Compression makes signals sound louder even though their peak level has not changed. Explain.
- What is a brickwall limiter and why is it used?
- Describe serial compression and parallel compression.
- What is saturation and how does it relate to compression? Explain the difference between even-order and odd-order harmonics and why analog compressors are valued for their harmonic character.
- When would you reach for an opto compressor versus a FET compressor versus a VCA compressor? Give a practical example for each.
- How does spectral noise reduction differ from a noise gate, and what causes “musical noise” artifacts?
- Name four audio repair modules in iZotope RX and describe what each one does.
- A compressor's detection mode determines whether it responds to instantaneous peaks or to an average of signal loudness over time, and its topology determines whether it analyzes its input or its own output. (a) Explain the difference between peak detection and RMS detection, and describe a situation where each is the better choice. (b) Explain the difference between feed-forward and feedback compressor topologies, and describe how each affects the character of the compression. (c) You have two compressors with identical threshold, ratio, attack, and release settings—one running in peak mode (feed-forward), one in RMS mode (feedback). You apply them to the same lead vocal. Predict how they will behave differently on a phrase that starts quietly, builds to a belted high note, and ends with a long, soft tail. Which would you choose, and why?
Studio Exercise: Track 5 — Compress Your Mix
Track 5 of the song-build pipeline. Open the EQ session you saved at the end of Chapter 15. You will now apply dynamics processing to every track and document your decisions. By the end of this exercise, you will have a session where every important element has at least one compressor or gate working in service of the song.
Setup
Open your Chapter 15 EQ session and save it as “[Song Title]_v5_Compression.” Insert dynamics processing on every important track. Do not insert dynamics on tracks that do not need them—this is not a checklist exercise.
Part A: Lead Vocal
Insert a compressor of your choice (Avid Dyn 3, BF-76, FabFilter Pro-C, or any opto-style emulation). Use the starting-point workflow from this chapter (ratio 2:1, medium attack/release, threshold for 2–3 dB GR). Then run the bypass test with matched output gain. Document: which compressor, threshold, ratio, attack, release, makeup gain, average GR.
Part B: Side-Chain Compression
Set up at least one intentional side-chain compression move—kick into bass, kick into pad, vocal into reverb send, or your own creative routing. Use the numbered procedure from this chapter to set it up in Pro Tools. Document: trigger track, target track, bus number, attack, release, ratio, threshold, average GR per trigger hit.
Part C: Drum Gate or Expander
Apply a noise gate or expander to one drum track (kick, snare, or tom) to clean up bleed. Set the threshold so quiet bleed is removed but every musical hit (including ghost notes) opens the gate. Document: threshold, range/depth, attack, hold, release.
Part D: Saturation or Transient Move
Add one saturation or transient-shaping move somewhere in the mix—tape emulation on the drum bus, transient designer on the snare, FET-style 1176 in All Buttons mode on a parallel drum bus. Document: which plugin, what you did, why.
Part E: Document Submission
Submit:
- Dynamics-processed stems (every track bounced individually, post-compression).
- A settings document (PDF or text file) listing every compressor, gate, and saturator you used, with the parameter values from Parts A–D.
- One paragraph describing what changed musically. Did the verses feel less sloppy? Did the chorus hit harder? Did the kick punch through that wasn't punching before? Be specific.
Optional Stretch
- With $4,000 to invest in compression, what would you buy and why? Cover at least three compressor types (FET, optical, VCA, or variable-mu). Justify each choice with a use case.
- Watch IN THE STUDIO with Asaf Fulks: Episode 11 [Analog vs. Digital] on YouTube and discuss your favorite compressor in class.
Common Pitfalls
- Over-compressing the vocal. If the chorus sounds duller than the verse, you are crushing the transients. Back off.
- Side-chain release too slow. The bass never recovers between kick hits. Speed up the release until the bass blooms back in fully before the next hit.
- Gate cutting off ghost notes. Threshold is too high. Lower it until quiet hits open the gate, then raise the range/depth instead.
- Boring the listener. Compression should serve the song's energy. If your compressed mix feels less alive than the EQ'd version, you went too far.
What You Are Building Toward
You now have a session that breathes consistently. Every important track is in a controlled dynamic range. The kick punches. The vocal sits. The bass is locked to the kick. Save this session as your starting point for Chapter 17's time-based effects pass—reverb and delay are about to add space to the dynamic foundation you just built.