Chapter 10 · Capturing Sound: Microphones, Acoustics & Gear
Instruments and MIDI
“I build stuff for people who want to play the stuff I build.”
—Robert Moog (Tape Op #41, 2004)
By the end of this chapter, you will be able to:
- Classify acoustic, electric/analog, and digital instruments by the way each enters the recording chain—microphone, DI/amp, or MIDI/audio
- Categorize acoustic instruments by sound-generation mechanism, identifying examples of chordophones, aerophones, membranophones, and idiophones
- Distinguish the three electric and analog instrument families—magnetic-pickup instruments, electromechanical keyboards, and analog/modular synths with CV/gate—and describe how each generates and outputs its signal
- Trace a synthesizer signal from oscillator through filter, VCA, ADSR envelope, and LFO, and compare the six synthesis methods (subtractive, additive, FM, wavetable, granular, and physical modeling) by how each generates sound
- Explain MIDI as a performance-data protocol rather than audio, identifying the function of Note On/Off with velocity, Control Change, Pitch Bend, Aftertouch, and System messages
- Configure a multi-timbral MIDI routing using the 16-channel architecture, applying General MIDI conventions including Channel 10 for drums
- Compare MIDI 1.0, MPE, and MIDI 2.0 by resolution, per-note control capability, and bidirectional negotiation, and identify expressive instruments that exploit these features
- Describe the lineage from early hardware samplers to modern virtual instruments, articulate the hardware-equals-plugin principle, and explain the legal requirement to clear samples before commercial release
When I started producing, everything was MIDI and hardware. My studio was a maze of five-pin DIN cables—those weird-looking round plugs that carry MIDI between gear—running between a keyboard, a drum machine, a sound module, and a sequencer. If one cable came loose, the whole system went silent. I spent more time troubleshooting connections than making music. Today, a single USB cable replaces that entire web, and a laptop loaded with the right software gives you access to more virtual instruments than the rack of MIDI hardware I started with. The studios I work in still have plenty of real drums, real guitars, real keyboards—physical instruments that matter and always will—but the digital side has changed beyond recognition. The principles behind those instruments, though—how they generate sound, how MIDI tells them what to play, how you control them as a producer—have not. This chapter covers the instruments you will use and the protocol that connects them all.
Musical Instruments: Three Categories
suggest a correctionEvery instrument you will encounter in a studio falls into one of three categories: acoustic, electric/analog, or digital. Understanding these categories matters because each one enters the recording chain differently—acoustic instruments need microphones, electric instruments need DI boxes or amplifier mics, and digital instruments need MIDI or audio connections to your DAW.
Acoustic Instruments
suggest a correctionAcoustic instruments produce sound through physical vibration—no electricity required. A guitar string vibrates and the wooden body amplifies it. A drum head vibrates when struck. A column of air vibrates inside a trumpet. These are the oldest instruments in human history, and they remain the foundation of most music. Anything that makes a sound can be an instrument—a recording engineer's job is to capture it.
Percussion: Drums (kick, snare, toms, cymbals), timpani, marimba, vibraphone, congas, djembe, shakers, tambourine, and dozens of others. Percussion is the rhythmic backbone of nearly every genre. Do not overlook unconventional percussion—stomping on a wooden floor, hitting a trash can lid, or shaking a bag of coins can produce sounds that no sample library can fully replicate.
Strings: Violin, viola, cello, double bass, acoustic guitar, harp, banjo, mandolin—and yes, the acoustic piano and harpsichord. The piano is technically a string instrument: hammers strike steel strings stretched across a wooden frame, and the body resonates the result. The harpsichord is the same family with a different mechanism—quills pluck the strings instead of hammers striking them. We tend to put both in a “keyboard” bucket because of the player interface, but mechanically they are chordophones, like any guitar or violin. The piano is also arguably the most versatile acoustic instrument ever built—it covers nearly the full range of human hearing and appears in every genre from classical to hip-hop.
Woodwinds: Flute, clarinet, oboe, saxophone, recorder. Sound is produced by blowing air across an edge or through a reed.
Brass: Trumpet, trombone, French horn, tuba, flugelhorn. Sound is produced by buzzing the lips into a metal mouthpiece.
Other Wind Instruments: The pipe organ produces sound by air flowing through pipes; the accordion, harmonica, and concertina produce sound by air from a bellows or breath vibrating free reeds. All are aerophones (sound from vibrating air), in the same broad family as the woodwinds and brass, but rare enough in modern recording that they sit in their own corner.
Voice: The human voice is the original instrument. Every person carries one, and no two sound alike. Voice runs through this entire book—from microphone selection to recording to pitch correction to mixing.
Notice the pattern: every acoustic instrument is classified by how it makes sound, not by what it looks like or how you play it. Strings vibrate strings (the chordophones). Winds vibrate air (the aerophones). Membranes vibrate under percussion (drums—the membranophones) and solid bodies vibrate (cymbals, marimbas—the idiophones). The keyboard is just an interface—the piano is a chordophone, the organ is an aerophone. Classify by sound source and the acoustic world clicks into place. The same logic carries through to the electric and digital instruments we cover next.
Recording acoustic instruments is covered in detail in Chapters 5 and 6 (microphone techniques).
Electric and Analog Instruments
suggest a correctionElectric and analog instruments split into two distinct families: the ones that convert physical vibration into an electrical signal (guitars, basses, electric pianos), and the ones that generate signal directly inside electronic circuits without any vibration at all (analog synthesizers and modular gear). Both end up as voltage moving down a cable, but the path from idea to signal is fundamentally different.
Electric Guitar uses magnetic pickups to convert string vibration into an electrical signal through electromagnetic induction. A TS cable connects the guitar to a DI box, amplifier, or audio interface.
Electric Bass works the same way, tuned an octave lower, and is the rhythmic and harmonic bridge between drums and harmony instruments.
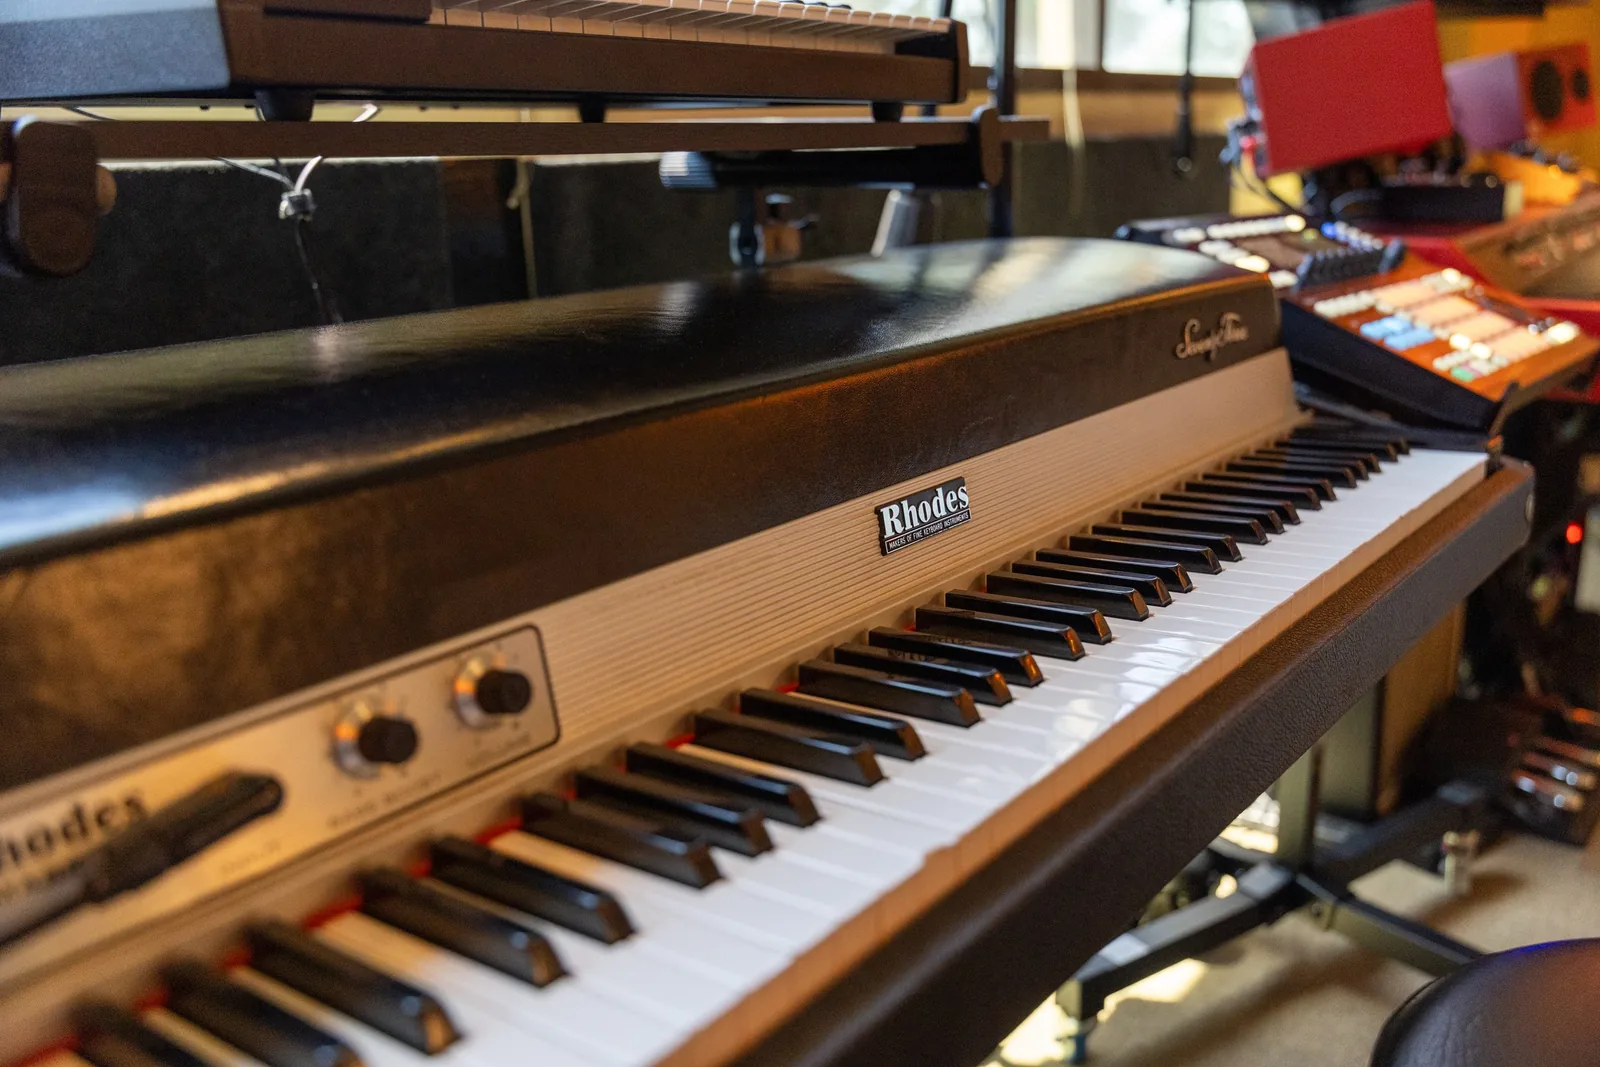
Electromechanical Keyboards like the Rhodes, Wurlitzer, and Hohner Clavinet use a player-actuated mechanism (hammers striking tines, reeds, or strings) and a pickup to generate signal—electromagnetic for the Rhodes and Clavinet, electrostatic for the Wurlitzer's vibrating reeds. They sound nothing like a digital sample of themselves, which is why the originals still command serious money on the used market.
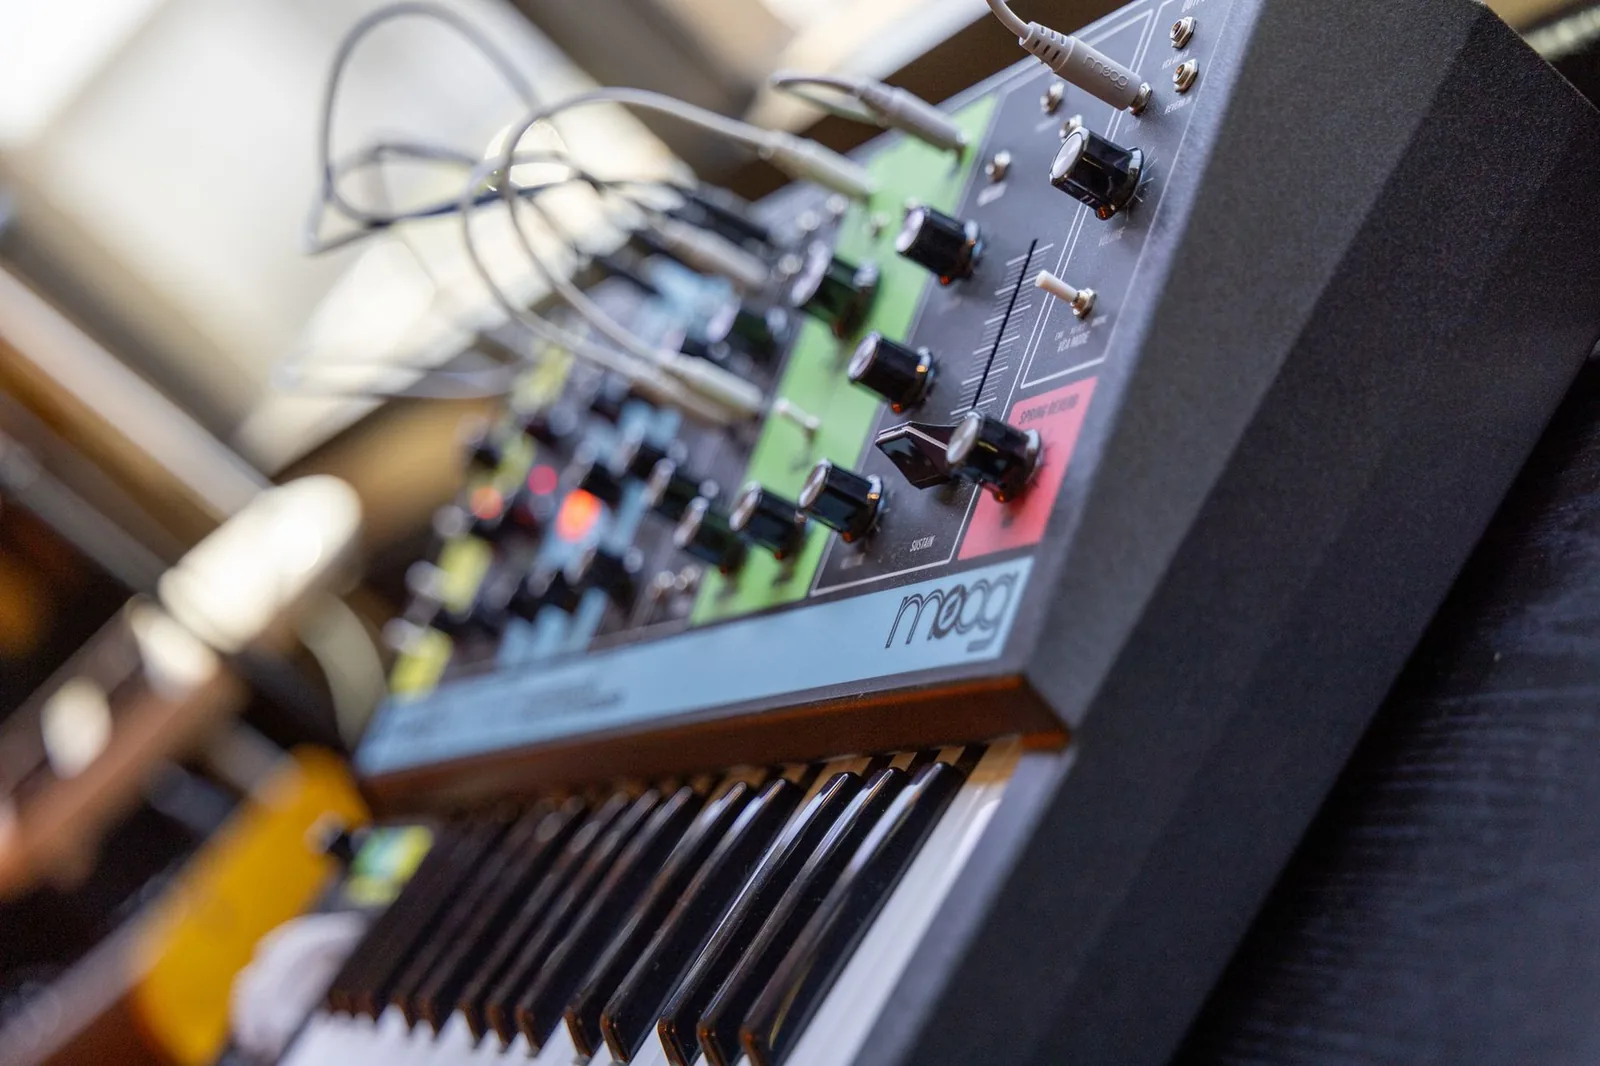
Analog Synthesizers generate sound entirely through electronic circuits (the electrophones)—oscillators, filters, and amplifiers working together without any digital processing. The sound is warm, unpredictable, and alive in a way that digital synthesis has spent decades trying to replicate. Today, analog synths like the Moog Subsequent 37, Sequential Prophet-6, and Arturia MiniBrute 2 sit alongside digital instruments in studios around the world. There is also a thriving Eurorack/modular ecosystem—small standardized synth modules from companies like Make Noise, Doepfer, ALM Busy Circuits, and Befaco that you patch together with cables to build a custom signal flow. Modular gear talks in CV (control voltage) and gate—an analog parallel to MIDI, and one that USB/MIDI-to-CV interfaces (Expert Sleepers ES-9, Befaco MIDI Thing) bridge into the modern DAW.
All of these instruments can be recorded direct—guitars and basses through a DI box into the interface, synths through their line outputs straight into a line input. You can also mic a guitar or bass amplifier, or do both simultaneously (DI + amp mic) for maximum flexibility during mixing. See Chapter 6 for amp micing techniques.
How a Synthesizer Works
suggest a correctionThe Synthesizer Story. The history of synthesizers is one of the great stories in music technology. In 1964, Robert Moog unveiled his first modular synthesizer; it went on sale in 1965. In 1968, Wendy Carlos used a Moog to record Switched-On Bach—a re-recording of Bach compositions performed entirely on the Moog synthesizer. The album sold over a million copies and proved that electronic instruments could produce serious, beautiful music. Within a decade synths appeared on records by Stevie Wonder, Kraftwerk, Pink Floyd, and eventually in every genre. The 1983 Yamaha DX7 brought FM synthesis to the masses, sold over 200,000 units, and became the defining sound of the 1980s—those metallic electric pianos, glassy bell tones, and slap-bass voices on a thousand pop records were almost certainly a DX7. Today, analog hardware (Moog, Sequential, Arturia, Make Noise), digital workstations, modular Eurorack systems, and software plugins all live side by side in working studios.
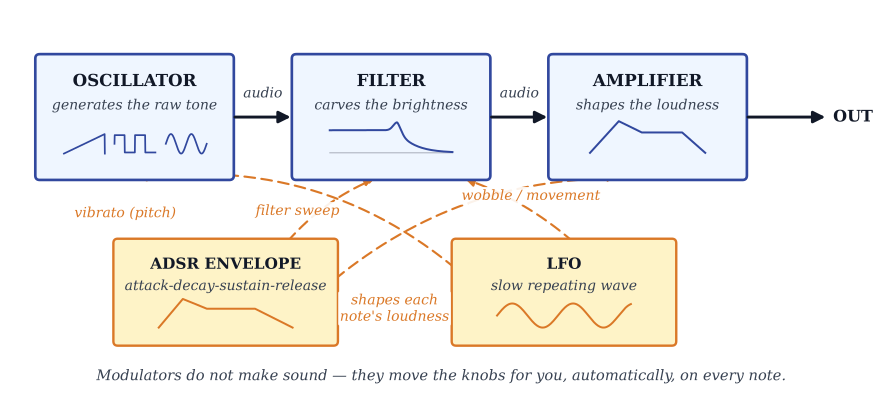
Anatomy of a Synth. Whether analog or digital, hardware or software, nearly every synthesizer is built from the same five components. Understanding these will help you program your own sounds rather than scrolling endlessly through presets.
The signal begins at the oscillator, which generates the raw waveforms that become sound. The classic shapes are sine (pure, smooth tones—flutes, sub-bass), sawtooth (bright and harmonically rich—string and brass-style sounds), square (woody, hollow—reed and clarinet-style sounds), triangle (softer than square, smoother than sawtooth), and noise (used for percussion, wind effects, and texture). Different synthesis methods build on the oscillator differently. Subtractive synthesis (the most common, and the foundation of every Moog and Prophet) starts with a harmonically rich waveform and filters frequencies away. Additive synthesis builds complex sounds from many sine waves stacked at different pitches and amplitudes. FM (frequency modulation) uses one oscillator to modulate another—this is the engine of the Yamaha DX7 and its metallic, bell-like tones. Wavetable synthesis (Xfer Serum, PPG Wave) interpolates between many stored waveforms over time, creating evolving textures. Granular synthesis (Output Portal, Tasty Chips GR-1) chops audio into tiny grains and re-triggers them as clouds of sound. The oscillator is where every synth begins; the synthesis method determines what it becomes. In practice: reach for subtractive when you want warmth, FM when you want metal or glass, and wavetable when you want a sound that moves.
Physical modeling — The sixth synthesis method takes a fundamentally different approach: instead of generating or storing a waveform, it computes the instrument itself. A physical modeling synthesizer solves the physics of a vibrating string, a resonating pipe, or a struck membrane in real time—waveguide algorithms or mass-spring networks calculate how each part of a virtual instrument responds to the player's input, moment by moment.
The practical consequences are significant. There are no samples to load, so the RAM footprint is tiny. Every note is the product of a live calculation, so two identically notated notes never sound identical—they differ the way two strokes on a real piano differ. Most importantly, the model responds to continuous physical input the way a real instrument does: bow pressure changes the tone of a modeled cello, breath velocity shapes the timbre of a modeled flute, and key-release speed affects the resonance of a modeled piano body. This makes physical modeling a natural partner for MPE and MIDI 2.0 controllers (covered later in this chapter)—the expressive resolution those protocols provide finally has a synthesis engine that can use all of it.
Modartt Pianoteq is the best-known example: a fully modeled grand piano with no sample playback, a download under 100 MB, and continuous physical parameters—hammer hardness, string stiffness, sympathetic resonance—that respond to velocity and sustain in ways sampled pianos cannot. Apple Logic Pro's Sculpture applies object-based physical modeling to create sounds that evolve and breathe, from steel drums to hybrid synthetic textures, none of which exist as recordings. The Audio Modeling SWAM family (Solo Strings, Woodwinds, and Brass) models the bowing, aeroacoustics, and embouchure physics of individual string, wind, and brass instruments—the sustained tone responds to aftertouch and expression pedal the way a real oboe responds to the player's breath.
Reach for physical modeling when the source is an expressive solo line that needs to sustain and respond—a melodic flute passage, a lyrical cello line, a piano that breathes under rubato—or when a low-RAM rig cannot afford a multi-gigabyte sample library. For dense orchestral textures where many voices play simultaneously and individual expression is less critical, sample libraries often remain the faster choice.
Next comes the filter, which shapes the frequency content of whatever the oscillator generates. A low-pass filter (the most common) removes high frequencies, making the sound darker and warmer. A high-pass filter removes lows, making it thinner. The two key filter controls are cutoff (the frequency where filtering begins) and resonance (a peak boost right at the cutoff that gives subtractive synths their characteristic “squelch”). The filter is what gives a synthesizer most of its character—the same oscillator through different filters becomes completely different instruments.
The signal then hits the amplifier, sometimes called the VCA (Voltage Controlled Amplifier), which controls the volume of the sound over time. Without an amplifier envelope, every note would be the same volume from start to finish—completely lifeless.
That envelope is the ADSR: Attack (how quickly the sound reaches full volume), Decay (how quickly it drops to the sustain level), Sustain (the level held while the key is pressed), and Release (how quickly the sound fades after the key is released). A piano has a fast attack and long decay. A pad has a slow attack and long release. A plucked bass has a fast attack and a fast release. The ADSR is what makes a sound feel like an instrument rather than a static tone.
Finally, the LFO (low-frequency oscillator) adds modulation. The LFO is a slow oscillator running below the range of human hearing (typically under 20 Hz). On its own you cannot hear it—you hear what it does to other parameters. Route an LFO to pitch and you get vibrato. Route it to volume and you get tremolo. Route it to the filter cutoff and you get the classic wah-wah sweep. The LFO is what adds movement and life to static sounds.
That is every synth. Oscillator generates, filter shapes, amplifier controls, envelope evolves, LFO modulates. Once you have walked the chain from end to end on one synthesizer, you can walk it on every synthesizer.
MIDI: The Universal Language
suggest a correctionIn the early 1980s, every synthesizer manufacturer used its own proprietary communication protocol. A Roland keyboard could not talk to a Yamaha drum machine. A Sequential Circuits synth could not sync with a Korg sequencer. If you wanted multiple instruments to play together, you were out of luck—or you bought everything from the same company.
Then, in January 1983, something remarkable happened. Dave Smith of Sequential Circuits and Ikutaro Kakehashi of Roland connected a Sequential Prophet-600 to a Roland Jupiter-6 on the floor of the NAMM trade show—and they played together. Two instruments from competing companies, communicating through a shared protocol that Smith and Kakehashi had developed together. The crowd went silent, then erupted. That protocol was MIDI—Musical Instrument Digital Interface—and it changed music production forever. In 2013, Smith and Kakehashi shared a Technical Grammy for their invention. Kakehashi passed away in 2017.
MIDI is not audio. It is a set of instructions—a digital protocol that tells an instrument what to play, how hard to play it, how long to hold it, and when to stop. Think of it as sheet music for machines. The instrument receiving the MIDI data produces the actual sound. This means you can change the instrument at any time without re-recording—swap a piano for a strings patch, a synth bass for an upright bass, all with the same MIDI performance data. In your DAW, MIDI data is displayed in a piano roll—a grid where pitch runs vertically and time runs horizontally. Every note you play appears as a colored bar that you can move, resize, or delete after the fact. We will work extensively with the piano roll in Chapter 13.
MIDI is not limited to musical instruments. It also controls digital mixers, lighting systems (especially for live performance), and software automation. Today, MIDI is part of our everyday lives—from virtual instrument performances to ringtones to virtually every song you hear on streaming platforms. More fundamentally, MIDI is what made digital instruments and samplers possible in the first place: without a shared language to trigger them, none of the soft synths, sound modules, and sample libraries we are about to cover would exist.
How MIDI Works
suggest a correctionA MIDI setup involves up to four elements, but only two are strictly required. The two essentials: a MIDI source—the data has to come from somewhere, whether you play it on a controller or draw it into the piano roll with a mouse—and a sound source (a virtual instrument, hardware synth, or sound module) for that data to trigger. The two conveniences: a MIDI controller makes performing the data natural (but you can draw it in instead), and a MIDI interface or USB connection carries data in from external hardware (but a fully in-the-box setup needs none). Your sequencer (the DAW) then records, edits, and plays it all back.
MIDI Connections
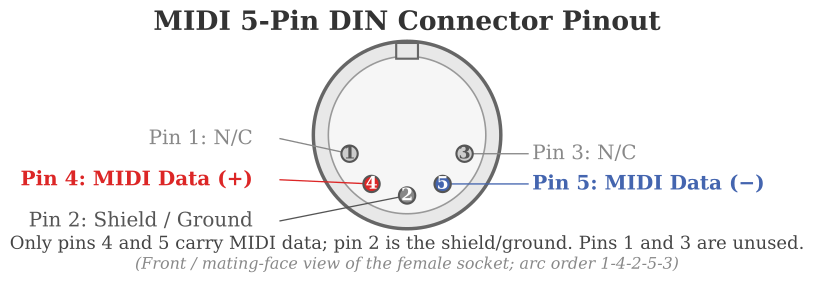
suggest a correctionTraditional MIDI uses a 5-pin DIN connector (see Chapter 8 for cable details). Data travels through pins 4 and 5; pin 2 is ground; pins 1 and 3 are reserved. Every MIDI device has up to three jacks:
MIDI In receives data from another device or computer. MIDI Out sends data generated by the device (when you press a key, that data goes out here). MIDI Thru passes an exact copy of whatever arrives at MIDI In, allowing you to daisy-chain multiple devices. The other standard topology is a multi-port MIDI interface (or USB), where each device gets its own dedicated port—no chain, and no risk of stuck notes accumulating down a long Thru line.
The physical connector where you plug in a cable is the MIDI jack. The virtual path MIDI travels through inside the computer is the MIDI port. This distinction matters when routing MIDI in your DAW.
In a modern studio, MIDI rarely travels over those original 5-pin DIN cables anymore—it travels over whatever transport happens to be convenient.
MIDI Controllers
suggest a correctionA MIDI controller does not produce sound on its own—it generates MIDI data that triggers sounds in other devices or software. Controllers come in many forms: keyboard controllers (25, 49, 61, or 88 keys), pad controllers (like the Akai MPC or NI Maschine), wind controllers, guitar-to-MIDI converters, and even drum triggers that attach to acoustic drums and send MIDI data when struck.
When choosing a controller, consider what you will be playing most. If you are a pianist or play chords, get a 61- or 88-key controller with weighted or semi-weighted keys—the feel of the keys directly affects your performance. If you are a beat-maker, a pad controller with velocity-sensitive pads is more useful. If you do both, many controllers combine keys and pads on one unit. The controller does not affect sound quality—it only affects how the performance feels under your fingers. But do not read ‘feel' as ‘minor': the gap between a cheap controller and a great one is enormous. Budget pads lack the velocity sensitivity to keep up with fast finger-drumming—quick rhythmic runs come out uneven and lifeless—while good pads (Akai MPC, NI Maschine) track every nuance. Weighted keybeds vary just as much: a high-end action like the Kawai keybed in a Nord Grand plays nothing like the mushy semi-weighted action on a budget board. I have owned every kind of controller, and the truth I keep coming back to is that the right controller is the one that disappears under your hands while you play. Do not buy a controller for the spec sheet—buy one for the feel, and spend real money on the action if you play keys or finger-drum seriously, because it is the one part of the rig your hands actually touch.
Most modern controllers also include knobs, faders, and buttons that can be assigned to control plugin parameters in your DAW. This is called MIDI Learn—click a knob in your plugin, twist a knob on your controller, and they are linked. Instead of using a mouse to adjust a filter cutoff or a reverb send, you turn a physical knob in real time. This is how producers add human feel to what would otherwise be static, mouse-drawn automation. Many controllers come with pre-mapped templates for popular DAWs and plugins, but custom mapping through MIDI Learn gives you the most flexibility.
MIDI Channels and Routing
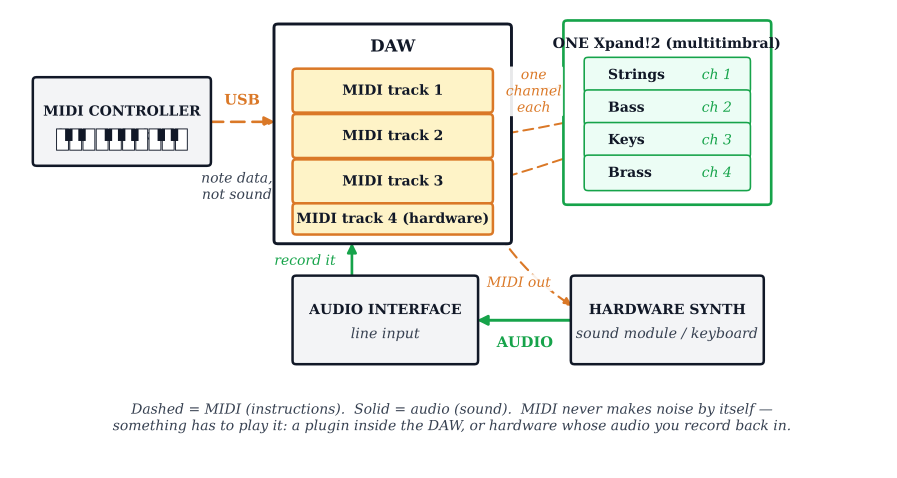
suggest a correctionA single MIDI cable carries 16 channels simultaneously. Think of channels like lanes on a highway—each lane carries its own stream of data to a different instrument. This means a single MIDI connection can control 16 different instruments at once.
General MIDI (GM) is a standard that defines 128 instrument sounds mapped to specific program numbers, so a MIDI file sounds roughly the same on any GM-compatible device. Program 1 is always Acoustic Grand Piano, Program 25 is Acoustic Guitar, Program 57 is Trumpet. GM designates Channel 10 as the drum channel, where each note number triggers a specific percussion sound (note 36 = kick, 38 = snare, 42 = closed hi-hat). While GM sounds are basic, the standard ensures MIDI files are portable across devices.
In practice, most producers ignore GM and assign channels based on their own needs. For example, a 16-channel setup might look like:
- Channel 1: Bass
- Channels 2–3: Keyboards (piano, organ)
- Channels 4–5: Guitars
- Channel 6: Lead synth
- Channels 7–8: Pads and atmospheric synths
- Channel 9: Auxiliary percussion
- Channel 10: Drum kit (following the GM convention)
- Channels 11–12: Strings (sections)
- Channels 13–14: Brass and woodwinds
- Channel 15: Sound effects and risers
- Channel 16: Vocals (if using a vocal synth or sampler)
A story for why 16 channels matter: a client of mine—a working keys player—once described a wedding gig where the bandleader wanted him to cover piano, Rhodes, organ, strings, and brass stabs from a single keyboard. Sixteen MIDI channels routed to one workstation, each preset on its own channel, layered or split across the keys depending on the song. He could change instrument with one button, layer two with a hold key, and never miss a downbeat. That is what a multi-channel MIDI setup buys you on stage and in the studio: speed.
MIDI Messages
suggest a correctionWhen you press a key, twist a knob, or step on a pedal, your controller sends MIDI messages. The most important are Channel Voice Messages—the messages that control musical performance:
Note On tells the instrument to start playing a specific pitch and carries a velocity value—how hard the key was pressed. Velocity is not just volume; velocity-sensitive instruments trigger entirely different samples at different velocities. A soft piano keystroke sounds warm; a hard one sounds bright and percussive.
Note Off tells the instrument to stop playing that pitch. Every note you play generates both a Note On and a Note Off.
Polyphonic Key Pressure (Poly Aftertouch) senses how hard you press each individual key after the initial strike. Used for adding vibrato, filter sweeps, or volume swells by pressing harder into the key.
Channel Pressure (Aftertouch) applies a single pressure value to the entire channel rather than to individual notes—this is what most keyboards mean when they advertise simply “aftertouch.”
Program Change switches the instrument sound (patch). Essential for recalling specific sounds on external hardware.
Pitch Bend continuously varies pitch up or down, typically controlled by a wheel or joystick on the left side of the keyboard.
Control Change (CC) messages control everything else: CC1 = Modulation Wheel, CC7 = Channel Volume, CC10 = Pan, CC11 = Expression, CC64 = Sustain Pedal. There are 128 CC numbers (0–127), many of which are standardized.
System Messages
suggest a correctionBeyond channel-specific performance data, MIDI includes system-wide messages:
System Exclusive (SysEx) messages are manufacturer-specific data used for transferring patches, firmware updates, and custom parameters between devices. SysEx is how you back up the sounds on an external keyboard.
MIDI Time Code (MTC) translates SMPTE timecode into MIDI format for synchronizing devices—essential for locking MIDI sequences to video.
MIDI Clock provides tempo-based synchronization, sending 24 pulses per quarter note so drum machines and sequencers stay in time.
Song Position Pointer tells a device where to start playback within a song, so you can jump to any bar—press Play at bar 17 in your DAW, and SPP tells the connected drum machine to start from bar 17 rather than bar 1.
MIDI Modes
suggest a correctionMIDI devices can operate in four modes that control how they respond to incoming data:
Mode 1 (Omni On/Poly): Responds to all channels polyphonically. The default for most keyboards—play any channel, hear all notes.
Mode 2 (Omni On/Mono): Responds to all channels but plays only one note at a time. Rarely used.
Mode 3 (Omni Off/Poly): Responds to a single assigned channel polyphonically. The standard mode for multi-timbral setups where each channel plays a different instrument. This is the mode you will use 99% of the time in a DAW.
Mode 4 (Omni Off/Mono): Responds to a single channel monophonically. Used for guitar-to-MIDI converters where each string sends on its own channel.
MIDI 2.0: The Next Generation
suggest a correctionMIDI has been the universal language of electronic music since 1983—an extraordinary run for any technology standard. But after four decades, the original specification was showing its age. Velocity had only 128 steps (7-bit resolution), which meant the difference between a soft touch and a hard strike was divided into just 128 levels. Control Change messages had the same limitation. And communication was strictly one-way—devices sent data but never confirmed receipt.
Two milestones bridged the gap. In 2018, the MIDI Manufacturers Association ratified MPE (MIDI Polyphonic Expression), an extension to MIDI 1.0 that uses one MIDI channel per note to deliver per-note pitch bend, pressure, and modulation on standard MIDI hardware. Suddenly the existing protocol could carry the full expression of instruments like the LinnStrument and the ROLI Seaboard without changing the underlying spec. Then in 2020, the MIDI Manufacturers Association officially launched MIDI 2.0, the first major update to the protocol since its creation.
MIDI 2.0's improvements are real and substantial. Higher resolution: velocity now has 65,536 levels (16-bit) and Control Change messages support 32-bit values (MIDI 2.0 specification), so the difference between “almost silent” and “full force” is a smooth continuous curve rather than 128 stepped levels. Per-note controllers are native to the protocol, no longer requiring the one-channel-per-note trick of MPE. Bidirectional communication: where MIDI 1.0 is a one-way street—devices send messages but never confirm receipt—MIDI 2.0 lets devices negotiate capabilities, exchange configuration data, and confirm successful connections automatically. And it is fully backward compatible: MIDI 2.0 devices communicate with MIDI 1.0 devices seamlessly, so your existing gear still works.
The cutting edge of expressive MIDI lives in instruments like the Haken Audio Continuum and the Expressive E Osmose. The Continuum Fingerboard, designed by Lippold Haken at the University of Illinois starting in 1983 and shipped commercially around the turn of the century, captures every finger's X (pitch), Y (timbre), and Z (pressure) position with up to 12 Hall-Effect sensors per finger—it has been tracking per-note expression for decades, long before MPE existed as a formal spec. The Osmose, a 49-key collaboration between Expressive E (France) and Haken Audio that ships with the same EaganMatrix synthesis engine, brings that level of expression to a familiar keyboard form factor: brush a key for one sound, press past a threshold for another, then bend, wiggle, or vibrate the key to keep shaping it. Both use MPE+, Haken Audio's higher-resolution extension of MPE. Playing one is the closest a keyboard player has ever gotten to the expressive depth of a violinist—every finger, every gesture, every micro-pressure shift becomes part of the sound.
At the time of writing, MIDI 2.0 is still in early adoption, but as controllers and DAWs add support, it will become the new standard—bringing the expressiveness of acoustic instruments fully into the digital world.
Digital Instruments and Samplers
suggest a correction“I try to make a product or instrument that, if someone uses it, they say, ‘I wouldn't have asked for this, but this is exactly what I need'.”
—Roger Linn, designer of the LinnDrum and Akai MPC (MusicRadar, 2019)
Digital instruments generate or play back sound using computer processing rather than analog circuits. They come in two forms: hardware (standalone devices with built-in screens, knobs, and speakers) and software (plugins running inside your DAW). The line between hardware and software has blurred significantly—many hardware synths now run the same synthesis engines as their software counterparts, and standalone units like the Akai MPC Live function as self-contained production studios.
Here is the key insight that ties hardware and software together: a hardware sound module or digital sampler is essentially a plugin with its own dedicated computer inside. The processing principle is identical—store or synthesize sound, trigger it with MIDI, shape it with the same kinds of controls. The only real difference is where the computation happens: a plugin borrows your DAW computer's CPU and RAM, while a hardware module runs on its own onboard processor and memory. And because a modern computer dwarfs the chip inside a vintage rack module, software instruments can now hold vastly more samples, voices, and detail than the hardware ever could—which is exactly why so much of what used to be a rack of sound modules now lives inside the DAW.
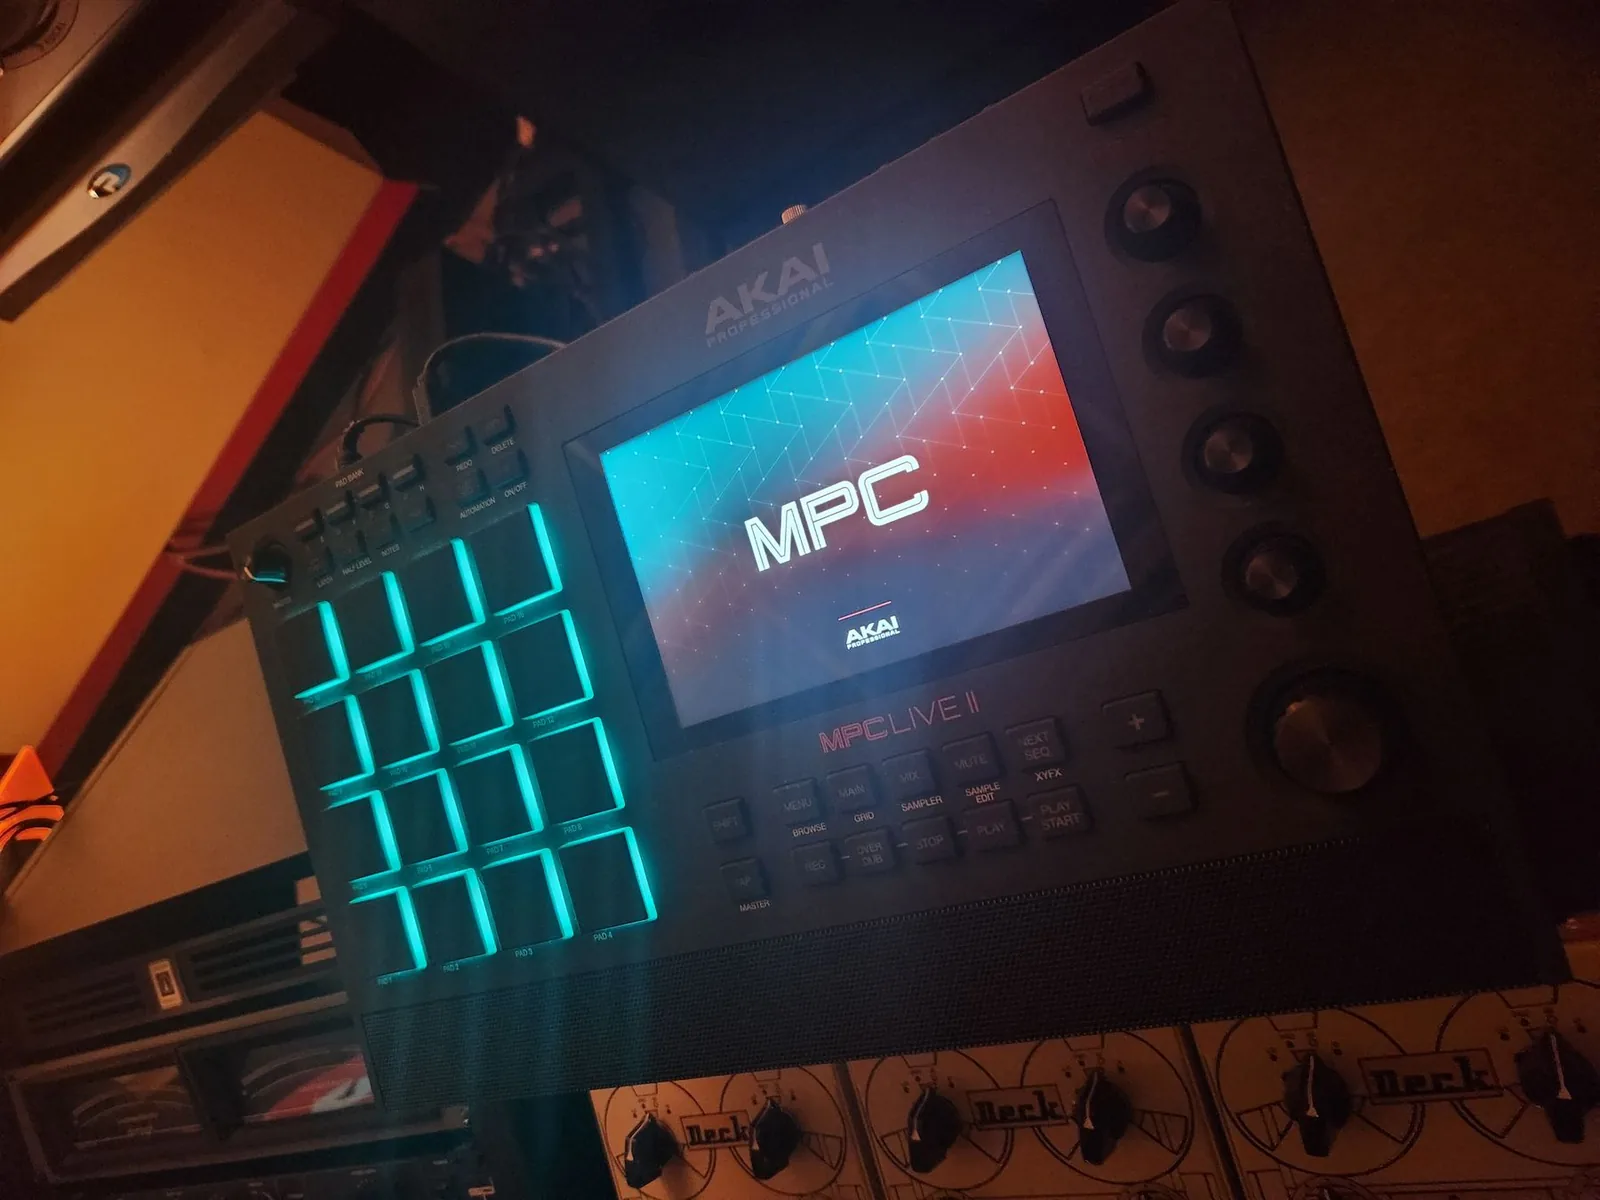
Digital Samplers record audio samples which can then be chopped, processed, mapped to pads or keys, and triggered via MIDI. The sampler changed music forever. In 1979, the Fairlight CMI became the first commercially available digital sampler—it cost $25,000 and was used by Peter Gabriel, Kate Bush, and Herbie Hancock. In 1987, the E-mu SP-1200 brought sampling to hip-hop at a fraction of the cost. Its gritty 12-bit sound became a defining texture of the genre, and producers like Pete Rock built entire careers on it—while DJ Premier (who started on its predecessor, the SP-12) and J Dilla cut their teeth on it before moving to the Akai MPC. The Akai MPC, introduced in 1988, became the most iconic sampler in hip-hop history—an external source (turntable, instrument, vocal) is sampled, edited internally, assigned to velocity-sensitive pads, and performed live. Roger Linn, who designed the original MPC60, was the same engineer who created the LinnDrum and the earlier LM-1—drum machines heard on countless 1980s records from Prince to Peter Gabriel. Modern versions include the Akai MPC Live and NI Maschine. Many producers now sample entirely within their DAW, but the workflow—chop, map, trigger—remains the same. The first time I sliced a four-bar break off an old soul record and tapped a different rhythm onto MPC pads, the whole logic of the form clicked for me. Sampling at its best is not theft of music; it is finding music inside music, then making it your own. To be crystal clear, that is a creative philosophy—not legal advice. Legally, sampling someone else's recording without permission is infringement, full stop, no matter how transformative it feels. Be inspired by this idea; then read the very next section and clear your samples before you release anything.
Digital Synthesizers and Keyboards use digital processing to generate sounds through various synthesis methods. They range from simple preset-based keyboards to deep, programmable instruments with hundreds of parameters. Each preset sound a synth stores is called a patch, and the number of sounds it can play simultaneously is called its polyphony (or voices)—a 64-voice synth can play 64 notes at once before older notes start dropping out. An arpeggiator is a built-in feature that automatically plays arpeggiated patterns based on the keys you hold—turning a simple chord into a rhythmic sequence. Arpeggiators are one of the most creatively useful features on any synth, and I use them constantly in production.
Workstation Keyboards like the Yamaha Montage M, Korg Nautilus, and Roland Fantom combine synthesis, sampling, sequencing, and effects in a single instrument. These are the Swiss Army knives of the keyboard world—a working musician can show up to a gig with one workstation and cover every sound the band needs. I have done full pop sets where the keyboard rig was one Roland Fantom and a laptop, and the audience never knew the difference between that and a stage full of vintage gear.
Drum Machines deserve their own moment. Roland's TR-808 (1980) was a commercial flop on release—it was supposed to imitate real drums and did so badly—but its synthesized kick and snare became the foundation of hip-hop, then trap, then half of modern pop. Entire genres are now described as “808-driven.” The TR-909 (1983) followed and became the engine of house, techno, and electronic dance music. The LinnDrum (1982), Roger Linn's later design, defined the 1980s pop sound on records by Peter Gabriel and Stevie Wonder, while Prince favored its predecessor, the Linn LM-1. Modern drum machines—Elektron Digitakt, Native Instruments Maschine+, Roland TR-8S (the 808/909 engines in one current box), and the standalone Akai MPC line—carry the workflow forward: program a pattern, hit play, edit on the fly. Most producers now sample drums into a DAW or trigger them with virtual instruments, but the drum machine as a thinking-and-performing tool is alive and well.
Sampling Ethics and Copyright
suggest a correctionSampling is one of the most creative tools in modern production, but it comes with legal responsibility—and that responsibility is exactly where the section above leaves off. In 1991, rapper Biz Markie sampled Gilbert O'Sullivan's “Alone Again (Naturally)” without permission—his team had in fact sought a license, been refused, and used the sample anyway. The court ruled against Markie, and the decision fundamentally changed hip-hop—before the case, sampling was a gray area; after it, clearance became mandatory. The judge literally began his opinion with, “Thou shalt not steal.”
If you sample a copyrighted recording and release it commercially without permission, you are liable for copyright infringement (17 U.S.C.). Clearing a sample means obtaining permission from the copyright holder, typically for a fee, royalty, or both. Some samples are prohibitively expensive to clear; others are denied outright. I have watched a finished record get held up for six months because one sample we built the chorus around could not be cleared in time—we ended up replaying the part with session musicians, which sounded fine in the end but was an expensive lesson in clearing first and building second.
The safe alternative: use royalty-free sample libraries (Splice, Loopmasters, Native Instruments) where clearance is built into the license. You can also sample your own recordings, public domain material, or sounds you create from scratch.
AI-generated music introduces new complexity. Many AI models were trained on copyrighted recordings without permission, and the legal status of their outputs is actively being litigated. If you use AI tools in production, ensure your creative contribution is substantial, document your process, and be aware that the legal landscape is evolving rapidly. Chapter 22 covers AI and copyright in depth.
Virtual Instruments
suggest a correctionThe moment software instruments became good enough to replace hardware was a turning point in music production. Suddenly, a bedroom producer with a laptop had access to orchestras, vintage synthesizers, drum machines, and grand pianos—instruments that would have cost hundreds of thousands of dollars in hardware. Today, virtual instruments are the backbone of modern production.
The major virtual instruments are covered in detail in Chapter 13 (Music Production), but here are the categories you should know:
Software samplers like Native Instruments Kontakt host thousands of sample libraries—orchestral, cinematic, world instruments, vintage keyboards. Spectrasonics Omnisphere combines synthesis with a massive sample library. Xfer Serum is the standard wavetable synthesizer for electronic music. Spitfire Audio produces some of the most realistic orchestral libraries available. The Arturia V Collection recreates legendary analog synths (Minimoog, Prophet-5, Jupiter-8) in software with remarkable accuracy.
Your DAW also includes built-in instruments—Pro Tools ships with GrooveCell (drums), Mini Grand (piano), SynthCell (synth), Xpand!2 (multi-timbral workstation), and others covered in Chapter 13.
Latency and Virtual Instruments
suggest a correctionWhen you press a key on a MIDI controller and hear the virtual instrument respond, there is a tiny delay called latency. This delay is caused by the audio interface's buffer—the buffer collects a small chunk of audio data before sending it to the speakers. A larger buffer means more delay but more stability; a smaller buffer means less delay but more CPU demand.
For performing and recording with virtual instruments, aim for a buffer size of 64–128 samples (approximately 1–3 ms of latency). At this setting, the delay is imperceptible. At 512 or 1024 samples, the delay becomes noticeable—like playing a keyboard through a long hallway. Once a vocalist asked me why the playback “felt late.” The vocal track was on time; the buffer was at 1024. I dropped it to 64 and the entire feel of the session changed. If a performer says something feels off and the meters look fine, check the buffer first. Chapter 11 covers buffer settings in detail.
Vocoders and Talk Boxes
suggest a correctionTwo classic tools make a synth “talk,” and producers mix them up constantly. A vocoder is fully electronic. It takes two inputs: a carrier—a harmonically rich synth tone, like a sawtooth pad or a string ensemble—and a modulator, usually a voice. The vocoder analyzes the changing spectral shape of the voice (the formants that turn “ahh” into “ooh”) across a bank of frequency bands, and stamps that moving shape onto the carrier. The result is the robotic, choral, singing-synthesizer sound on Kraftwerk's “The Robots,” ELO's “Mr. Blue Sky,” and Daft Punk's “Harder, Better, Faster, Stronger.” For intelligibility, give the carrier plenty of high harmonics and blend a little of the dry voice's sibilance back in, or the consonants vanish.
A talk box reaches a similar place mechanically. A speaker driven by a guitar or synth pushes sound up a plastic tube into the performer's mouth; the mouth shapes that sound exactly the way it shapes speech, and an ordinary vocal mic captures the result. That is the crying-guitar hook in Peter Frampton's “Show Me the Way” and the intro to Bon Jovi's “Livin' on a Prayer.” A vocoder is patched and electronic; a talk box is physical and played with your jaw.
Neither is the same as Auto-Tune used as an effect. Hard-tuned “T-Pain” vocals are pitch correction pushed to an extreme—the voice snaps to a scale—a completely different mechanism from a vocoder imposing formants on a carrier. Modern plugins (iZotope VocalSynth, Waves OVox, and the stock vocoders in most DAWs) put all of it a few clicks away, with no patch cables or tubes required.
The Language of Sound
suggest a correctionWhen Dave Smith and Ikutaro Kakehashi connected that Prophet-600 to that Jupiter-6 in 1983, they did not just create a protocol. They created a common language that allowed every instrument in the world to talk to every other instrument—and, in doing so, paved the way for the digital instruments, samplers, and virtual instruments that fill modern productions. Every soft synth and sample library you load is, at heart, something MIDI was built to play. Over forty years later, that language is still spoken in every studio, every DAW, every live performance rig on the planet. The instruments have changed—from room-sized modular synths to plugins on a phone—but the conversation is the same.
Remember the maze of five-pin DIN cables I described at the start of this chapter? That maze taught me something important: the instruments do not matter as much as understanding how they work and how they connect. A producer who understands oscillators, filters, MIDI channels, and velocity can sit down in front of any synthesizer—hardware or software, vintage or modern—and make it sing. A producer who does not understand these fundamentals will scroll through presets forever, hoping to stumble onto the right sound, without ever knowing how to shape it.
You now understand the instruments that make the sound and the protocol that controls them. You know how a synthesizer builds a tone from raw waveforms, how MIDI transmits a performance as data, how samplers turned vinyl records into playable instruments, and why clearing your samples before release is not optional. The next chapter puts all of this inside Pro Tools, where the real work begins.
Review Questions
Work these before moving on — every question is answerable from this chapter. Written answers live in the instructor Answer Key, available to course adopters.
- What is MIDI and what does it stand for?
- What are the two essential elements of a MIDI setup, and what two optional ones complete it?
- What is a MIDI interface, and what does it do?
- A traditional MIDI connector has __________ pins, and MIDI data travels through pins _____ and _____.
- Beyond the original 5-pin DIN cable, name three other transports that carry MIDI today.
- How many channels can be sent through one MIDI cable?
- List and describe the function of the three jacks found on a MIDI device.
- What are the two ways you can connect MIDI devices together, and how does each work?
- List and describe the seven types of channel voice messages.
- What are the three categories of instruments? Name examples in each category. Where does the acoustic piano sit, and why?
- How has MIDI changed modern music production?
- What is a voice? What is a patch?
- Describe the five main components of a synthesizer (oscillator, filter, amplifier, ADSR, LFO) and what each contributes to the final sound.
- Name three synthesis methods (subtractive, additive, FM, wavetable, granular, physical modeling) and describe how each generates sound differently.
- What is MPE, and what problem does it solve? How does MIDI 2.0 build on it?
- Name three modern virtual instruments and describe what each is used for.
- What is General MIDI (GM), and what is special about Channel 10?
- List five common MIDI CC numbers and what each controls.
- What is latency in the context of virtual instruments, and how does buffer size affect it?
- Why is it important to clear samples before releasing music commercially?
- If you had $10,000 to spend on a music production system focused on instruments, MIDI controllers, samplers and software, what would you buy and why?
- How does AI-generated music raise new questions about sampling ethics and copyright? What should you do to protect yourself when using AI tools in production?
Studio Exercise: Program a Synth Patch from Scratch
The fastest way to understand a synthesizer is to build one sound from nothing. Pick any synth you have access to—Pro Tools' SynthCell or Vacuum, the free Vital or Surge XT, or any plugin you own (Serum, Massive, Diva, OB-X, Arturia V Collection). Open it, hit the init/reset button, and stare at the blank waveform. That silent init patch is your starting point.
Part A: Build a sound to spec. Pick one of these four targets: a warm pad, a plucky bass, a thick analog lead, or a vintage brass stab. From the init patch, work the chain in order: choose your oscillator waveforms, dial in the filter cutoff and resonance, design the ADSR envelope to match the target's shape (slow attack/release for the pad, fast for the pluck), and route an LFO to whichever parameter the sound needs. No presets, no copying—every parameter you change should be a deliberate choice you can explain.
Part B: Document the patch. Take a screenshot of the synth showing your final settings. Write down each parameter you adjusted and why: which oscillator waveforms you chose and at what mix levels, where you set the filter cutoff and resonance, your four ADSR values, what each LFO is modulating and at what depth. The act of writing it down is what teaches you the synth. Keep this document—you will reuse the framework on every synthesizer you ever touch.
Part C: Record a 30-second performance. Play a short passage that shows off the patch: chords for the pad, a riff for the bass or lead, a hit-and-hold for the brass. Submit the screenshot, the parameter notes, and the audio recording as a single deliverable.
Bonus. Program a basic 8-bar drum pattern in your DAW with humanized velocities (vary velocity between 70 and 127 across notes; no two consecutive notes should be identical). Include the drum pattern alongside your synth patch in the submission.
Common pitfalls. Three things students miss the first time: (1) Filter cutoff and resonance are the two most-used controls on every synth—if your patch sounds wrong, those are almost always the first place to look. (2) An LFO at high depth and slow rate sounds like vibrato; the same LFO at high depth and fast rate sounds broken. Modulation depth and rate must be tuned together, not separately. (3) The init patch is your friend, not your enemy. Starting from a preset means you are editing somebody else's idea; starting from init means every choice is yours, and you actually learn the synth.
Submission. Combine the screenshot, parameter notes, and audio recording (plus the drum pattern if attempted) as a single PDF or zipped folder named SynthPatch_LastName.pdf. The act of building one sound from scratch and writing down every choice is what turns a synth from a mystery into a tool. Engineers who can program their own sounds never run out of textures; the rest depend on whatever the preset library happens to contain.